Universal Analytics is going away, and it might already be gone by the time you’re reading this. But here’s the thing - many Shopify merchants might not realize there could be issues with their tracking setup. They login to Google Analytics, see some numbers ticking up, and think, “Great; it’s all working!” But the truth is, it might not be.
And this change brings us lots of questions:
- Are you ready for this transition?
- Have you integrated Google Analytics 4 (GA4) into your Shopify store?
- And, more importantly, is it working correctly?
- Do you have all the GA4 ecommerce events and parameters collected?
- Have you integrated GA4 with Google Ads & Google Search Console?
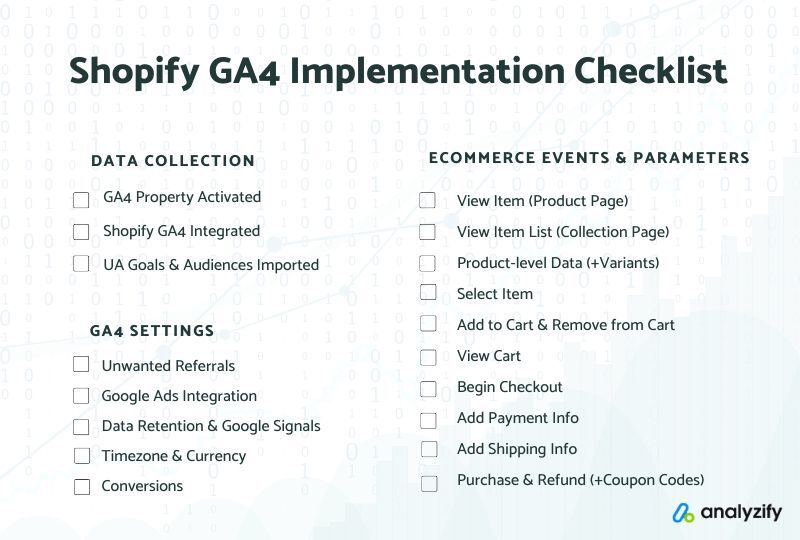
Here’s a list of things you should make sure to complete so your GA4 & Shopify integration works perfectly well:
That’s why we have created this comprehensive troubleshooting guide. This guide will dive deep into the nitty-gritty of GA4 integration with your Shopify store. We’ll walk you through how to spot and fix common issues, making sure your GA4 setup is tracking e-commerce events accurately and feeding you reliable data. We’ll check if your GA4 pixel is implemented correctly, if e-commerce events are being sent as they should, and much more.
This guide is all about practical, hands-on advice. We will use real-world examples to show you common problems and how to fix them. If you want to have a high-level overview of the Shopify GA4 Integration, please view our Shopify GA4 Complete Guide.
So, whether you’re a Shopify veteran or just starting, this guide will give you the know-how to get the most out of your GA4 integration. Ready to get started? Let’s jump in!
Common Issues with GA4 Integration
Having served 2000+ Shopify merchants with Analyzify, we have witnessed hundreds of problems with Shopify GA4 Integration. Here are the most common ones that we hear from our potential clients and detect on a daily basis:
Incorrect GA4 Pixel Implementation This is one of the most basic yet common issues. If the GA4 pixel isn’t implemented correctly, your data won’t be tracked accurately.
Double Tracking It is ok to use multiple Google Analytics 4 properties on your Shopify store if done correctly. However, if you use different integration methods for the same GA4 property, this will cause double tracking. The most common scenario is that you have a hard-coded GA4 tag, and you also use Google Sales Channel or another Shopify GA4 app for the same property.
Missing GA4 Ecommerce Events GA4 should be able to track e-commerce events like “view item”, “view item list”, “select item”, ‘add to cart’, ‘begin checkout’, ‘purchase’ and many others. If these events aren’t being tracked, you’re missing out on crucial data about your customers’ behavior. Shopify native GA4 integration doesn’t have the following events.
Incorrect or Missing Product, Cart, and Order Level Data GA4 should send detailed data about products, carts, and orders. If this data is incorrect or missing, it can lead to inaccurate insights about your store’s performance.
The most common problems are:
- Missing brand, category, and variant data on the product & purchase events
- Missing coupon code in the purchase event.
- Missing payment_type in the checkout events.
Check out the other limitations that come with Shopify’s native GA4 integration here: Analyzify vs. Native Shopify GA4 Integration
In the following sections, we’ll dive into how to identify and fix these common issues, ensuring your GA4 setup is accurately tracking all the data you need.
Tools Required for Troubleshooting
Before diving into the troubleshooting process, let’s discuss the tools we’ll need. These tools will help us identify and fix the common issues discussed in the previous section.
Don’t worry, they’re straightforward to use, and I’ll guide you through each step.
Google Tag Assistant Legacy (Chrome Extension):
This is a Chrome extension that helps us see all the tags that are triggered on your Shopify store. It’s a simple yet powerful tool to help us identify issues like double tracking or missing GA4 property. You’ll need to install this extension from the Chrome web store to get started. Once installed, you’ll see a small tag icon on your browser. Clicking this icon will show you all the tags triggered on your store. View on Chrome App Store
Analytics Debugger (Chrome Extension): This is another Chrome extension that helps us check e-commerce events and the data sent with these events. Like Google Tag Assistant Legacy, you must install this extension from the Chrome web store. Once installed, you can access the Analytics Debugger from the Google Developer Console. This tool is more sophisticated, allowing us to dive deeper into the data sent to GA4. View on Chrome App Store
Google Tag Assistant: Google’s another great tool for analyzing the tags, triggers, events, and parameters on your website. View Google Tag Assistant
GA4 DebugView: Google Analytics 4 has a great feature called DebugView. We can see the upcoming data in realtime using GA4 Admin Panel.
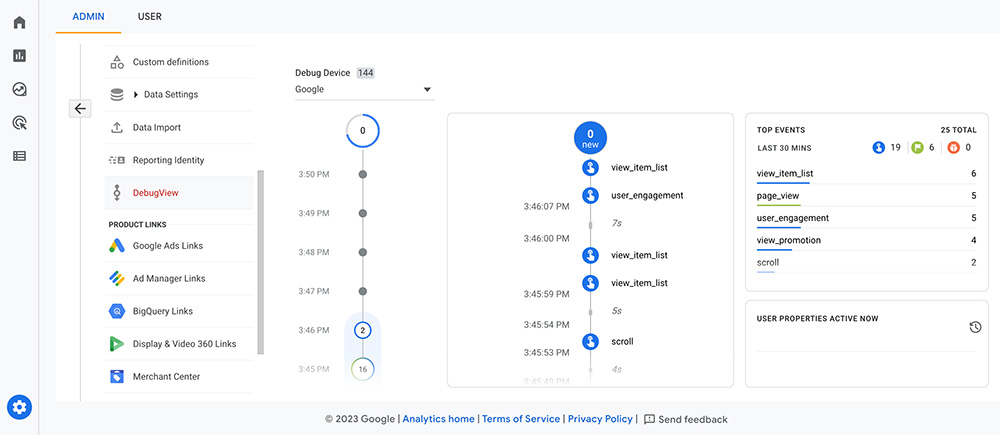
Learn more about the DebugView on Google’s documentation
In the following sections, we’ll walk through how to use these tools to identify and fix common issues with your GA4 integration. So, let’s get started!
Checking GA4 Tracking on Your Store
This step is crucial as it helps us identify if the GA4 pixel is present in your store and if there are any issues like double tracking or missing GA4 property. Before we start:
- We will use the Google Tag Assistant Legacy Chrome extension, so make sure it is installed on your browser.
- Ensure you disable any ad blocker that can interfere with the tracking tags.
We have a Youtube video that goes through step-by-step GA4 troubleshooting on Shopify stores. You can watch the video if you prefer moving on that way! Otherwise, scroll down and continue with the article.

Learn and Migrate to Google Analytics 4
Step 1: Visit your store & enable the extension Open your Shopify store in a new browser tab. Click on the Google Tag Assistant Legacy icon on your browser and hit ‘Enable.’ Now, refresh your store’s page. The extension will start listening to the page and show you all the tags that are triggered on this specific page load.
To see this process in action, refer to our Shopify GA4 Crash Course from 01:30 onwards.
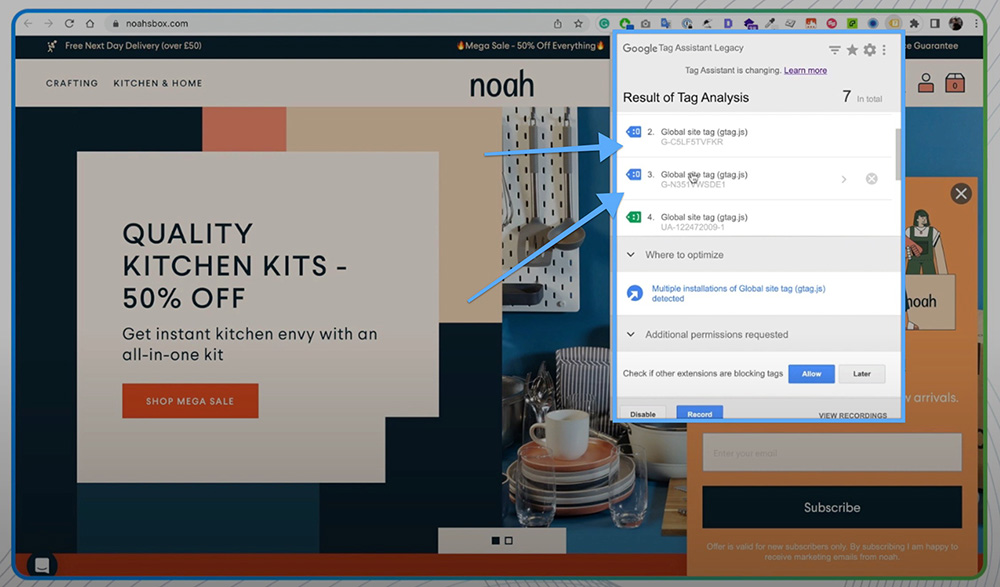
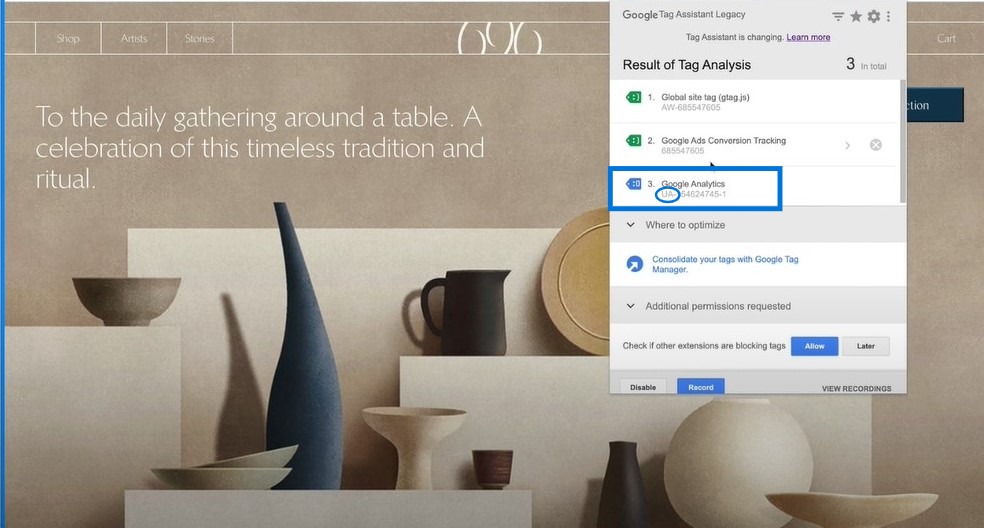
Step 2: Understand the tags You’ll see a list of tags. The ones that start with ‘AW’ are Google Ads remarketing tags. The ones that start with ‘G-’ are the GA4 tags.
To gain a detailed understanding of these tags, you can watch our Shopify GA4 Crash Course and refer to the relevant segment starting at 02:40.
Step 3: Checking GA4 property The main thing we’re looking for here is the presence of a GA4 property. If you don’t see any GA4 property, you’re not tracking any data with GA4, which is a significant issue that needs immediate attention.\n\n
Using Google Tag Assistant Legacy, we can quickly check the GA4 tracking on your store. However, remember that this only shows us that you have GA4 tracking. It doesn’t guarantee that the tracking is working correctly.
To see a practical example, you can explore our Shopify GA4 Crash Course and refer to the timestamp 4:26.
In the following sections, we’ll dive deeper into checking e-commerce events and the data sent with these events. So, let’s keep going!
Checking GA4 Ecommerce Events on Shopify
Once we confirm the presence of the GA4 tag on your Shopify store, we now need to check the GA4 ecommerce events.
We need to track E-commerce events like ‘view item’, ‘add to cart’, ‘begin checkout’, ‘purchase’, and many others to provide crucial insights into your customers’ behavior.
Otherwise, ecommerce focused reports won’t work in GA4.
Before we start, you need the Analytics Debugger Chrome extension to proceed with this troubleshooting.
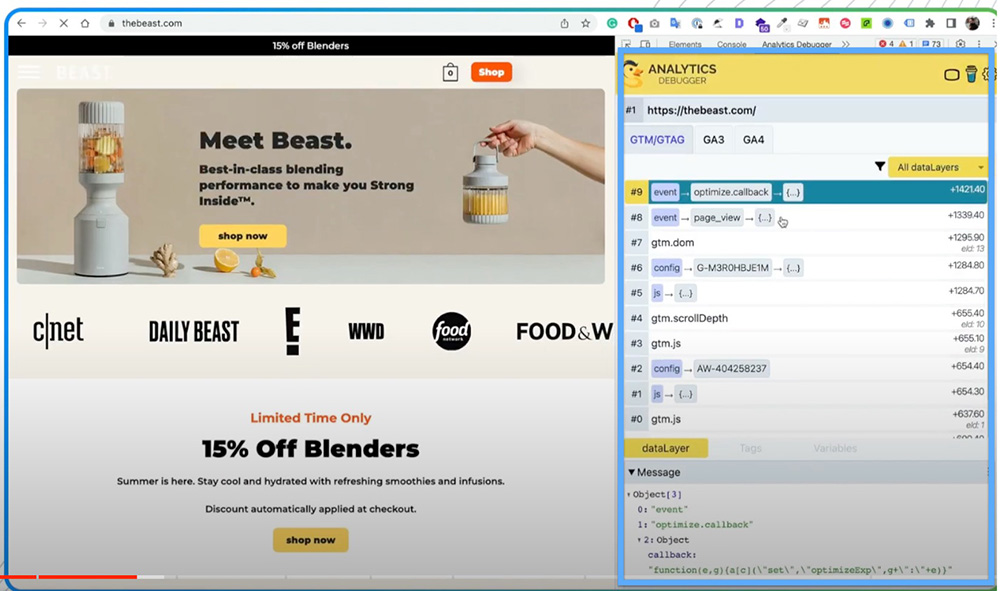
Step 1: Using Analytics Debugger Open your Shopify store in a new browser tab and access the Google Developer Console. Click on ‘View Developer’ > ‘JavaScript Console’, then click ‘Analytics Debugger’ and hit ‘Start Debugging’. The console will start showing you which tags are being triggered from your store.
For a visual demonstration of this process, you can watch the step-by-step walkthrough in our Shopify GA4 Crash Course, specifically the segment starting at 06:25.
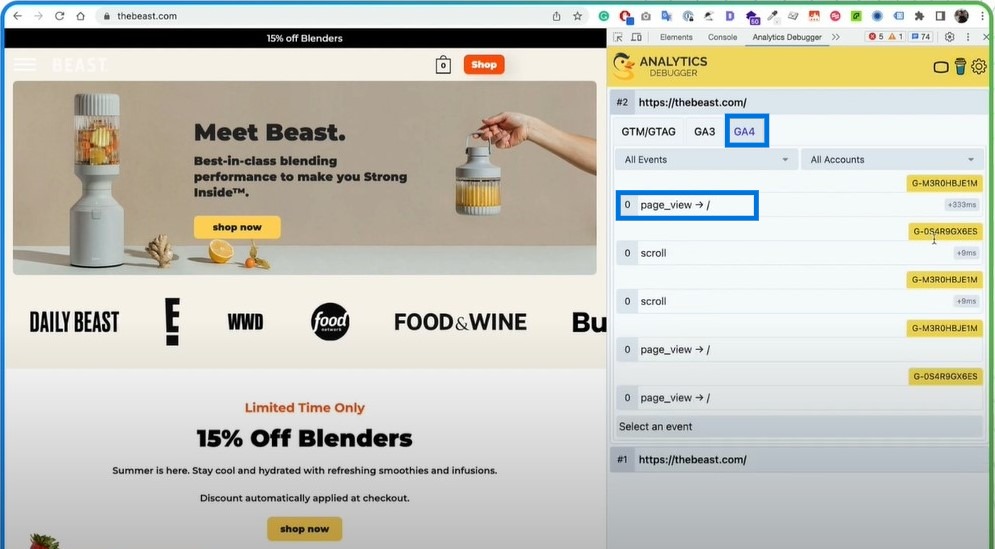
Step 2: Checking the Home page Start by checking the events on your store’s home page. You should see a ‘page view’ event being triggered for your GA4 property. If not, there might be an issue with your GA4 setup.
Step 3: Collection Page Events Next, navigate to a collection page on your store. Here, you should see a ‘view item list’ event being triggered. This event is used when a user views a list of items on a collection page. If this event isn’t being triggered, it could indicate a problem with your GA4 setup.
To see a practical example, you can explore our Shopify GA4 Crash Course and refer to the timestamp 4:26.
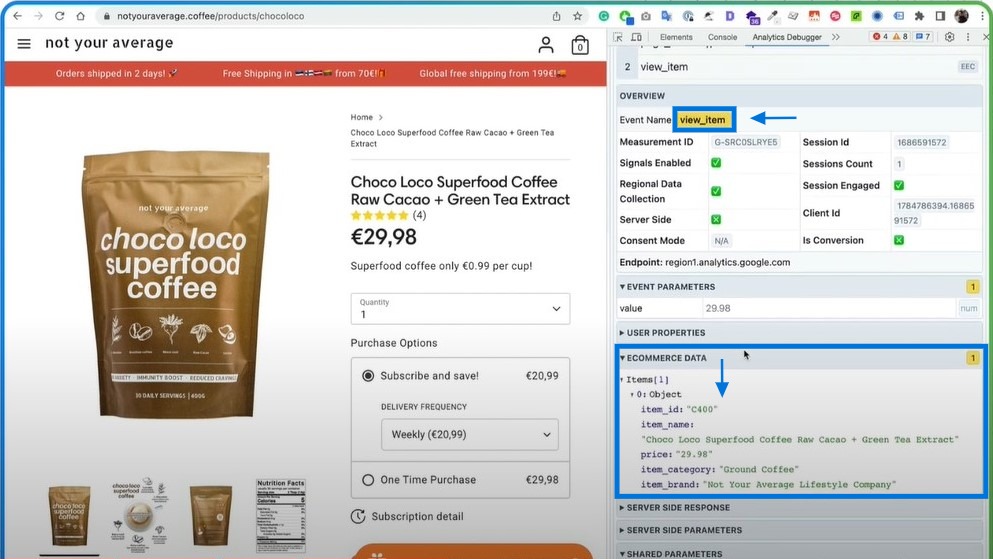
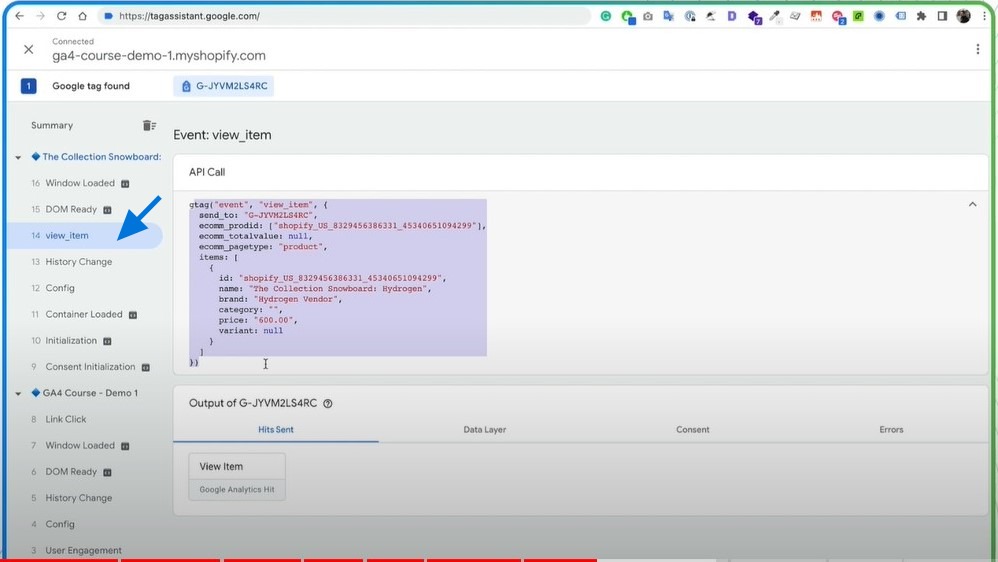
Step 4: Product Page Events Now, navigate to a product page. Here, you should see a ‘view item’ event being triggered. This event should include detailed product data like item ID, item name, price, item category, and item brand.
If this event isn’t being triggered or the product data is incorrect, it could indicate a problem with your GA4 setup.
If you are using variables on your store, also make sure to check this data for different variables as well.
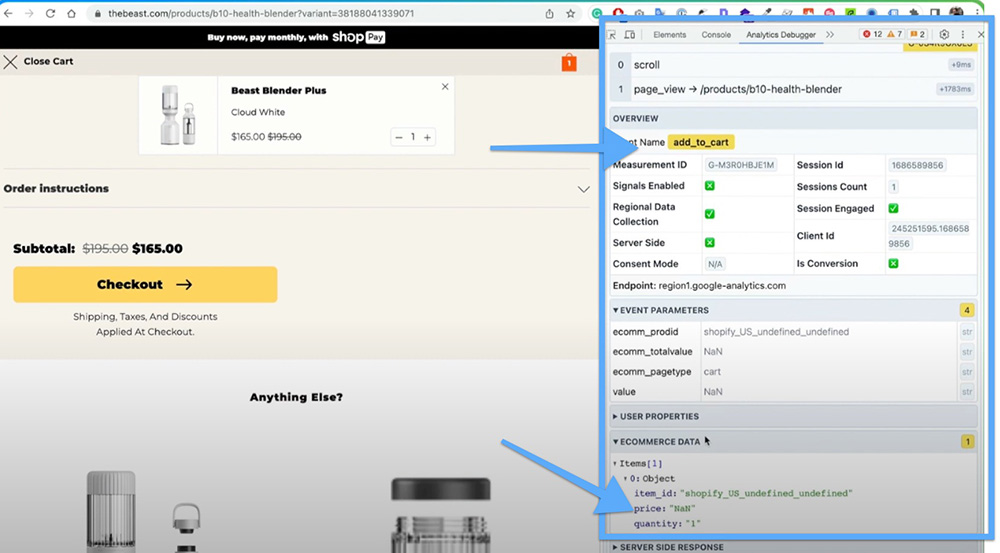
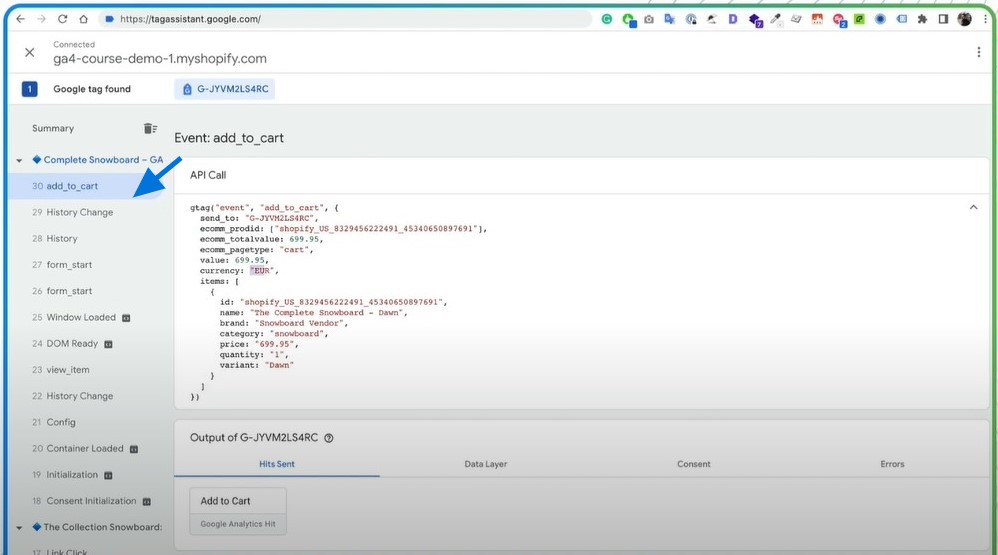
Step 5: Cart Events Add a product to your cart and check if an ‘add to cart’ event is being triggered. This event should include detailed cart data like item ID, item name, and price. If this event isn’t being triggered or if the cart data is incorrect, it could indicate a problem with your GA4 setup.
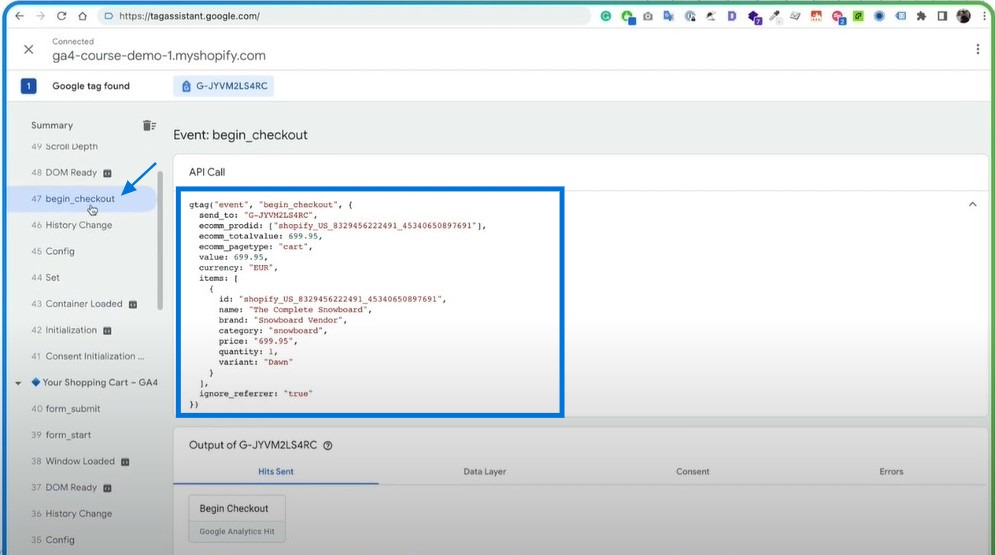
Step 6: Checkout Events Proceed to checkout and check if a ‘begin checkout’ event is being triggered. This event should include detailed order data like value and currency. If this event isn’t being triggered or if the order data is incorrect, it could indicate a problem with your GA4 setup.
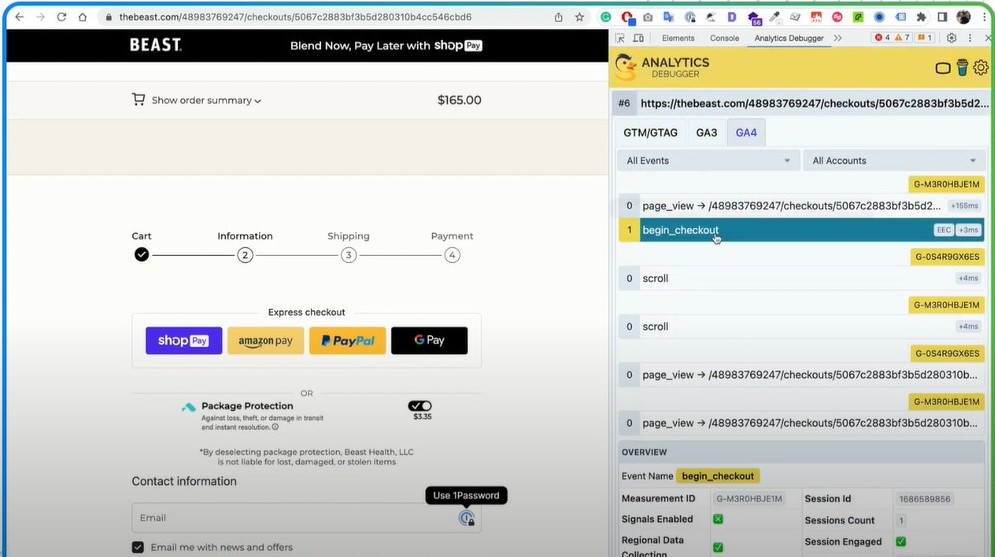
We also expect to see events like add_payment_info, add_shipping_info.
To see an example of how these events should be triggered, you can refer to the relevant time segment in our Shopify GA4 Crash Course, starting at 10:06.
Step 7: Purchase Event Now you can make a test order while keeping the Analytics debugger open. We expect to see GA4 Purchase event to be triggered along with all the variables.
By using Analytics Debugger, we can check if e-commerce events are being tracked correctly and if the data sent with these events is accurate.
In the next section, we’ll dive deeper into checking product, cart, and order level data. So, let’s continue!
Checking Product, Cart, and Order Level Data
Now that we’ve checked the e-commerce events, let’s dive deeper into the data being sent with these events. Specifically, we’ll look at product, cart, and order level data. These data provide detailed insights into your customers’ behavior and your store’s performance.
To learn how to test a purchase and ensure the proper triggering of the GA4 Purchase event, you can refer to the relevant time segment in our Shopify GA4 Crash Course, starting at 12:28
We will keep using the Analytics Debugger extension so keep it open!
Product Level Data
Navigate to a product page on your store and trigger a ‘view item’ event. Check the data sent with this event using the Analytics Debugger. You should see detailed product data like item ID, item name, price, item category, and item brand. If any of this data is incorrect or missing, it could indicate a problem with your GA4 setup.
Cart Level Data
Add a product to your cart and trigger an ‘add to cart’ event. Check the data sent with this event using the Analytics Debugger. You should see detailed cart data like item ID, item name, and price. If any of this data is incorrect or missing, it could indicate a problem with your GA4 setup.
Order Level Data
Proceed to checkout and trigger a ‘begin checkout’ event. Check the data sent with this event using the Analytics Debugger. You should see detailed order data like value and currency. If any of this data is incorrect or missing, it could indicate a problem with your GA4 setup.
By checking the product, cart, and order level data, we can ensure that your GA4 setup accurately tracks all the necessary data. If any data is incorrect or missing, it could lead to inaccurate insights about your store’s performance.
In the next section, we’ll test a purchase event to ensure that the most essential e-commerce event is tracked correctly. So, let’s move on!
Testing the GA4 Purchase Event
The ‘purchase’ event is arguably the most important e-commerce event to track. In this section, we’ll test a purchase event to ensure it’s being tracked correctly and send all the necessary data to GA4.
To observe this process in detail, you can refer to the relevant time segment in our Shopify GA4 Crash Course, starting at 15:40.
If the purchase event data is incorrect or missing, it could significantly impact your understanding of your store’s performance and analyzing your Ads campaigns’ performances.
Let’s get into that!
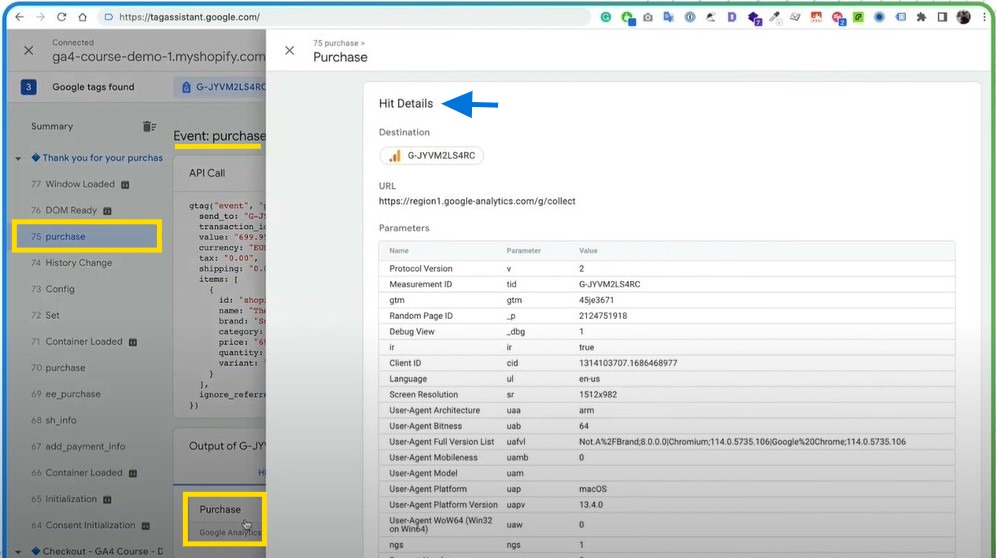
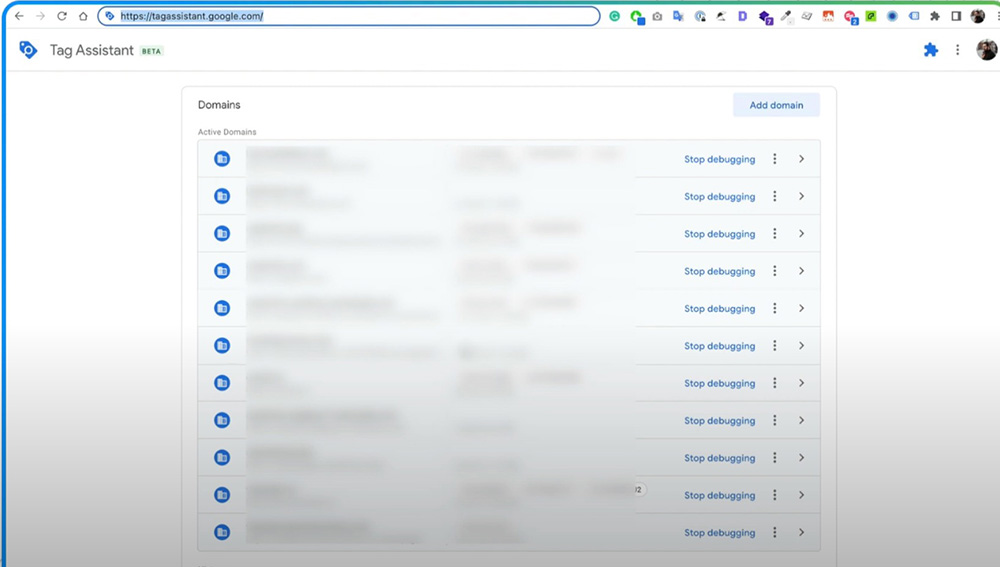
Step 1: Google Tag Assistant This time, we’ll use Google Tag Assistant (not legacy). Click here to start with the Google Tag Assistant.
Open the Tag Assistant and click ‘Add Domain.’ Enter your domain and wait for it to connect. Once connected, you’ll see the data from your store and the properties here. You’ll also see the events on the left-hand side.
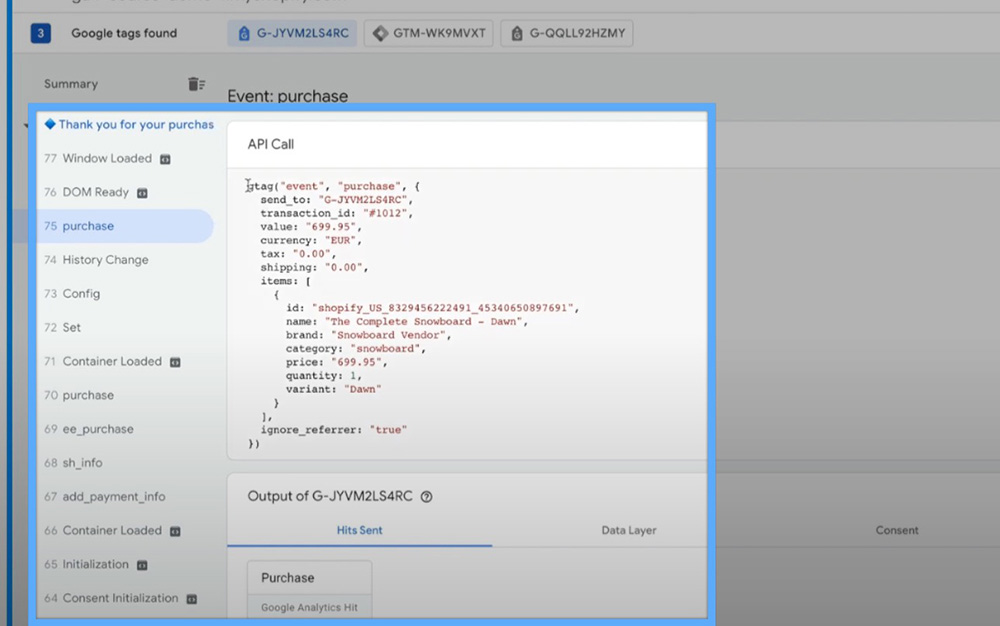
Step 2: Triggering a Purchase Event Navigate to a product page on your store, add a product to your cart, and proceed to checkout. Complete the checkout process to trigger a purchase event. Remember, this is a test, so you should use a test product or a test payment method.
Step 3: Checking the Purchase Event Data Once the purchase event is triggered, check the data sent with this event using Tag Assistant. You should see detailed purchase data like transaction ID, value, currency, and items. If any of this data is incorrect or missing, it could indicate a problem with your GA4 setup.
And that’s it! You’ve now learned how to troubleshoot your Shopify GA4 integration. We recommend doing this regularly on your store so that you can stay on top of your tracking quality.
Conclusion
Navigating the transition from Universal Analytics to Google Analytics 4 (GA4) can be a challenging process, especially when it comes to ensuring that your Shopify store’s data is being accurately tracked and reported. From checking the GA4 pixel implementation to verifying the accuracy of e-commerce events, there’s a lot to consider. However, with the right tools and a systematic approach, you can effectively troubleshoot your GA4 integration and ensure you get the most out of this powerful analytics tool.

But what if you could simplify this process even further? That’s where Analyzify comes in. Analyzify is a professional Shopify GA4 integration tool that can help you avoid many common issues associated with GA4 setup.
It ensures that your GA4 pixel is implemented correctly, prevents double tracking, and accurately tracks all e-commerce events. With Analyzify, you can be confident that your product, cart, and order level data are accurately tracked and reported.
Moreover, Analyzify goes beyond the basics. It provides additional features like user ID tracking, lifetime value tracking, and more. These features can give you deeper insights into your customers’ behavior and your store’s performance, helping you make more informed decisions.