Follow our step-by-step tutorial. You will be able to set Facebook Conversion API up on Shopify - all by yourself without an app or an expert.
You have probably heard about Facebook Conversion API (aka FB CAPI), but are still not sure whether you need it or not. Take our word for it - you definitely do. The good news is that it is quite easy to set up the FB Conversion API on Shopify. You will be able to set it up all by yourself without an app or an expert once you follow our step-by-step tutorial!
The browser-based, classic Facebook pixel alone can no longer manage to provide accurate and consistent data since its amount has been cut down by ad-blockers, cookie blockers, and other masking tools. What’s worse, Apple’s iOS updates are causing even more obstacles for tracking data through the pixel.
That’s where Facebook Conversion API comes in to help you properly track, attribute, and improve your Facebook marketing performance. Here, you’ll see how to set it up on Shopify.
You can check our complete guide to Shopify & Facebook Pixel page if you want to learn more about how it works and the differences between FB CAPI and FB Pixel.
Required steps before setting up FB CAPI on Shopify
Before we start, let’s clarify some important points:
- Make sure that you have the official Facebook Channel App installed on your Shopify store. https://apps.shopify.com/facebook?locale=tr#_ga="2".216708118.1459774467.1673954990-978512443.1670319434” rel=”nofollow noopener” target=”_blank”>Click here and install if you haven’t done it so far.
- You need to have Facebook Business Manager - and have admin rights there. The same goes for Shopify.
- It’s important to note that FB Conversion API is quite new. You might be having some issues and seeing some errors but they are mostly resolved over time.
- This tutorial/post explains how to set FB CAPI on your Shopify store using the native FB App. If you want to get further information and a more in-depth setup - don’t hesitate to visit the following pages
How to set up FB Conversion API on Shopify using the native integration
Let’s dive directly into that!
-
Go to Shopify Admin > Online Store > Preferences > Setup Facebook
- Authorize your FB Business Manager account and choose the pixel
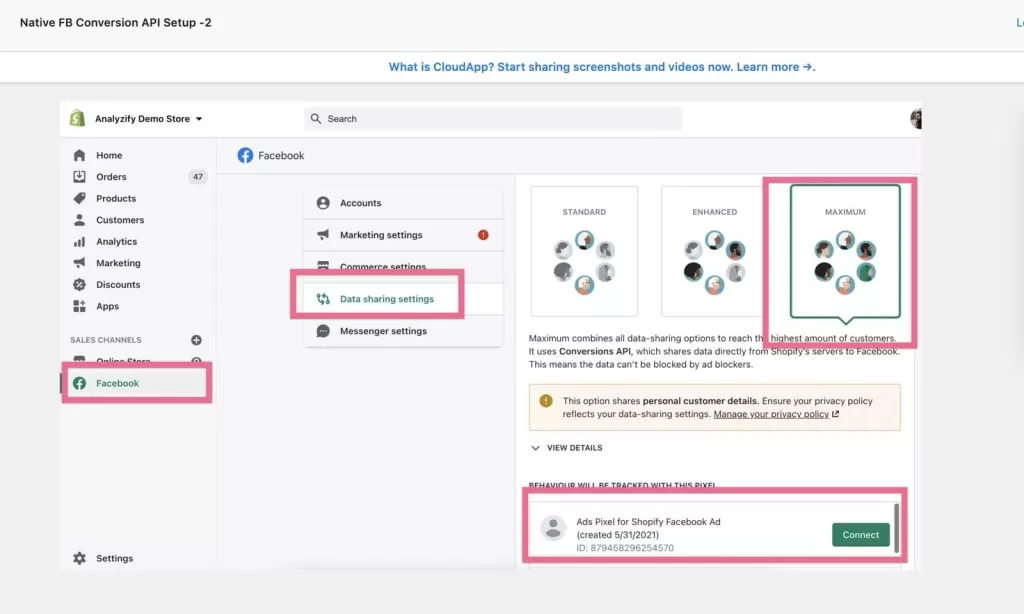 Make sure you choose MAXIMUM so that all the possible data will be shared. Then, confirm, and you are all set.
Validate your Shopify - FB Conversion API setup
The native Facebook Conversion API setup on Shopify also includes the browser pixel. That surely helps you with your validation. Firstly, check the Facebook Pixel and see if it includes the variables/data that FB CAPI needs.
Step 1: Check browser-based Facebook Pixel
In order to do this, you need a Google Chrome extension called Facebook Pixel Helper. Just visit this page and add it to your Chrome browser. Then, you should visit your Shopify store’s homepage.
Following that, you need to activate the FB Pixel Helper extension. First, click the Extension icon on the upper right corner and then click the little PIN icon next to Facebook Pixel Helper. That will add the extension to your browser.
Click the Extension icon at the top-right corner and then click the little PIN icon near Facebook Pixel Helper. That will add the extension to your browser.
![]()
If you are using an ad-blocker, you should deactivate that due to the fact that it will block the Facebook Pixel, and it will be impossible to debug afterward. Visit your Shopify store, and your FB Pixel Helper should look like the graphic below:
![]()
What we should see here:
- PageView should be triggered on your homepage.
- Ideally, ONLY one pixel would do. Some merchants have their reasons to use multiple pixels. However, generally speaking, it is not a good practice.
- Once you click the PageView event, the Event ID should be there.
![]()
Event ID is used to de-duplicate events. You can get more information on deduplication on https://www.facebook.com/business/help/823677331451951?id="1205376682832142”” rel=”nofollow noopener” target=”_blank”>the official help page.
You can also visit a product page of yours and expect to see the ViewContent event on your FB Pixel Helper. Product-level data such as ID, price, name, and category should be visible just like the one below:
![]()
At this juncture, there’s yet another thing to do so that you can get the best out of pixel: You need to navigate to FB Pixel Settings > Automatic Advanced Matching. Then, you should re-adjust the settings that are already in use. That’s to say, make sure you set all of the fields (from Email to External ID) ON.
![]()
Step 2: Check data on FB Business Manager
You can view all data once you navigate to FB Business Manager > Events Manager > Pixels section. Nevertheless, it will take some time for the data to be visible. We recommend doing this in the following days so that you can observe a good amount of data.
Go to Facebook Business Manager > Data Sources > Events Manager

Make sure you check the correct pixel - you can compare the Pixel IDs with Step 1. Then, events should be listed below. Here you should see “Browser - Server” in some events. Another important point is to check “Last received X minutes ago”. This part is not updated instantly but you should be seeing your data here in a few hours. On the other hand, it might simply mean that there is something wrong if a purchase is still not visible after 12 hours or so.
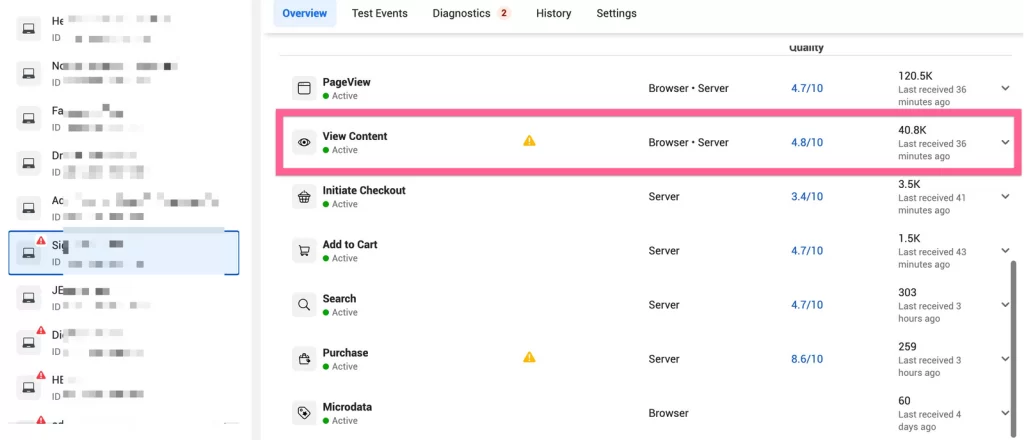
Now, let’s take a deep dive into the most important FB Conversion API Event for your Shopify store: Purchase. Click Purchase and check the parameters section, the last received time - and then click View Details.
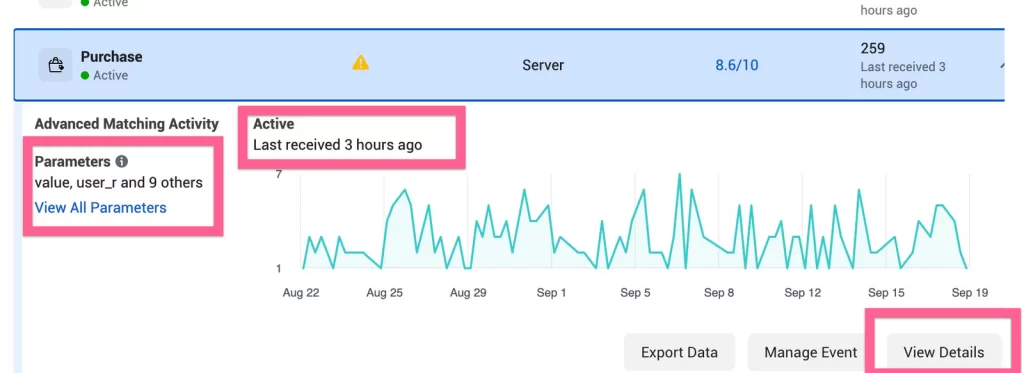
Your Purchase events quality score might not be above 8.5 as in this example. At this point, it’s important to note that Shopify’s native integration is usually between 7 and 8; and it is fine. If you want to achieve a better Event Match Rate; you should consider Analyzify’s Shopify Server-Side Add-on.
On the Recent Activities tab, you should be seeing all of your latest sales one by one.
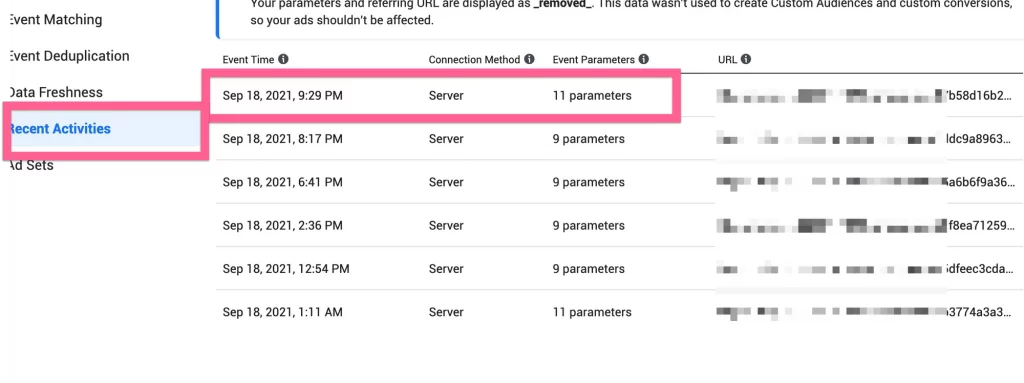
You can have a look at the Event Parameters section and see which parameters are being sent and whether they are being sent correctly.
Also, a lovely trick here; you will see the Order details in the URL section. This way, you can detect which orders are being counted and which ones aren’t.
Final Words
Don’t frustrate yourself with missing details. Even the best integrations have some warnings on the accounts. Remember that the FB Conversion API is quite new, and the FB CAPI Shopify integration will only get better and better.