It has always been challenging to manage tracking & marketing pixels for Shopify merchants. Shopify has released a galvanizing update that is set to become a game changer in how we manage and collecting and sharing data: Shopify Customer Events.
Shopify Pixels is the core feature of Shopify Customer Events. It is designed to add an extra edge to your overall tracking experience, making life easier when setting up the right tools to monitor how customers engage with your business.
Now, let’s delve into it all and find valuable answers to your most popular questions:
- What is Shopify Pixels change and how will we use it?
- What is Shopify Customer Events?
- Should we take any actions at this point?
- Can we set up Google Analytics 4 (GA4) using Shopify Pixels?
- What should we expect from this update in the near future?
Excited already? You’ll also get your hands on a step-by-step approach to “Setting Up Google Analytics 4 using Shopify’s New Pixels Feature” if you’d like to try and test it.
Here is a brief overview of what Shopify Customer Events offers and how you should respond:
While this update is exciting, it is still not fully functional. As a result, we advise against taking any action in the production environment.
We have prepared a step-by-step tutorial in case you want to play around and discover more about how it works. Check out the corresponding section below.
Thanks to what it offers, we will not be dependent on 3rd party Javascripts to track the events anymore. Shopify will provide these from the backend using Shopify Pixels & Customer Events.
As a merchant, you will easily see and manage all the pixels created on your store (by apps or professionals).
The pixels won’t need to be added to your theme files anymore – so they will be more reliable and stable.
Apps like Analyzify will have more capabilities and will provide much better results using the Pixels API.
Shopify doesn’t recommend using this feature (yet) unless you are a professional.
What is “Shopify Pixels”?
Basically, pixels are code snippets (mostly Javascript) that transfer the user-behavior data from your Shopify store to 3rd parties for marketing and reporting. The most popular pixels can be listed as Facebook Pixel, Google Analytics, Google Ads, Tiktok, etc. Shopify says,
“Pixels collect and pass behavioral customer data for marketing and reporting.”
With Shopify Pixels:
- Events such as product view, add to cart, purchase, page view, etc., will be available without modifying any sort of code and additional Javascript. So, it will make tracking more reliable, flawless, and accurate.
- You will have more control over the data being sent to 3rd parties, see which pixels are shared in these settings, and easily disable, delete, or manage.
- 3rd party apps will utilize the Pixels API to get the relevant event data instead of injecting codes into your theme files.
- You will secure privacy compliance more easily with a streamlined data collection and sharing method.
- It will be possible to create custom pixels for some stores that need unique events to be tracked.
Let’s admit that it was never easy to manage the pixels for Shopify merchants. However, Analyzify users have been quite happy with our service as they’ve always had professional & expert support.
Now, it is set to become even more accessible & more stable than ever with an enhanced instrument.
Effortlessly integrate Shopify & GTM, including advanced data layers.
The importance of Shopify Pixels
We have helped more than 1500 Shopify merchants with their data analytics setup.
Yet, we should admit that it was challenging even for us to catch up with the pixel updates because the market is so dynamic as it depends on 3rd parties.
Here is a quick look at what’s happened only in the last few years:
- Google launched GA4 and established it as the primary version,
- iOS updates changed everything in the tracking world,
- Facebook launched Conversion API,
- Google Ads launched Enhanced Conversions,
- Google launched server-side tracking
- And many more changes.
All these updates have a direct effect on e-commerce businesses because most Shopify merchants heavily rely on the performance of the Ads. And, of course, this performance depends on the data the Ads platform receives.
That’s why Facebook Ads were not profitable & useful for many merchants following the iOS 14.5 changes.
Shopify Pixels API and Shopify Customer Events feature will make managing pixels more stable as it will all be managed directly from the Shopify API (back-end).
What’s changing exactly?
Let’s picture it with a clear example:
You are running an affiliate program, and they provide you with a code block, asking you to add this code into Shopify Checkout Additional Scripts and ensure it works. This is a 3rd party script, and you can never know which data is being taken under which condition.
Even worse, your theme files & checkout scripts become too messy in time; you have 10s of pixels, and you don’t even know which one is still active and should be there. This is both a privacy issue – and a business risk.
Even if you add an open-source code like Analyzify’s open-source Shopify data layers for Shopify; it is still hard to manage. There are 10s of lines of codes only that try to:
- Catch the purchase event,
- Create a data layer window,
- Push purchase-related data into this data layer.
And it is executed when someone completes an order and views the thank you page. Simply put, the old method brings about too much work.
With Shopify Customer Events & Pixels; you will just add a Pixel through your Shopify admin panel and set the conditions on when this pixel should be triggered. You can also attach the data pieces (such as order details) easily.
You will discover more details in the section below.
Shopify Customer Events
Shopify Customer Events provides you with a set of features to add, change, and manage custom pixels from a single location: your Shopify admin.
So, you won’t have to tinker with codes to sustain reliability and accuracy when integrating third-party services to track customer behaviour.
As Shopify states:
“Customer events are actions taken by your customers that can help you understand how your customers engage with your business. Third-party services integrated with your store use the customer event data they collect using pixels to optimize your marketing automation and analytics.”
 This way, you can:
- Manage Pixels,
- Share data without 3rd party scripts,
- Get accurate data & reports,
- Monitor what’s sent from the store to 3rd parties.
Without needing to inject code blocks into your Shopify themes, which will also provide more accurate results.
Customer events to track with Shopify Web Pixel
By tracking customer events, such as those listed below, you can gain valuable insights into customer behavior and preferences easily.
Here are the 5 pre-checkout customer events that you can track with web pixel:
- page_viewed
- collection_viewed
- product_added_to_cart
- product_viewed
- search_submitted
In addition to them, web pixel allows you to track the following checkout events:
- checkout_started
- checkout_contact_info_submitted
- checkout_address_info_submitted
- checkout_shipping_info_submitted
- payment_info_submitted
- Checkout_completed
With Shopify web pixel, you can monitor these events without having to modify any sort of code or additional Javascript.
Code Overview: Example Pixel
Let’s have a quick overview of an example code snippet from Shopify’s Customer Events section and understand how it performs better.
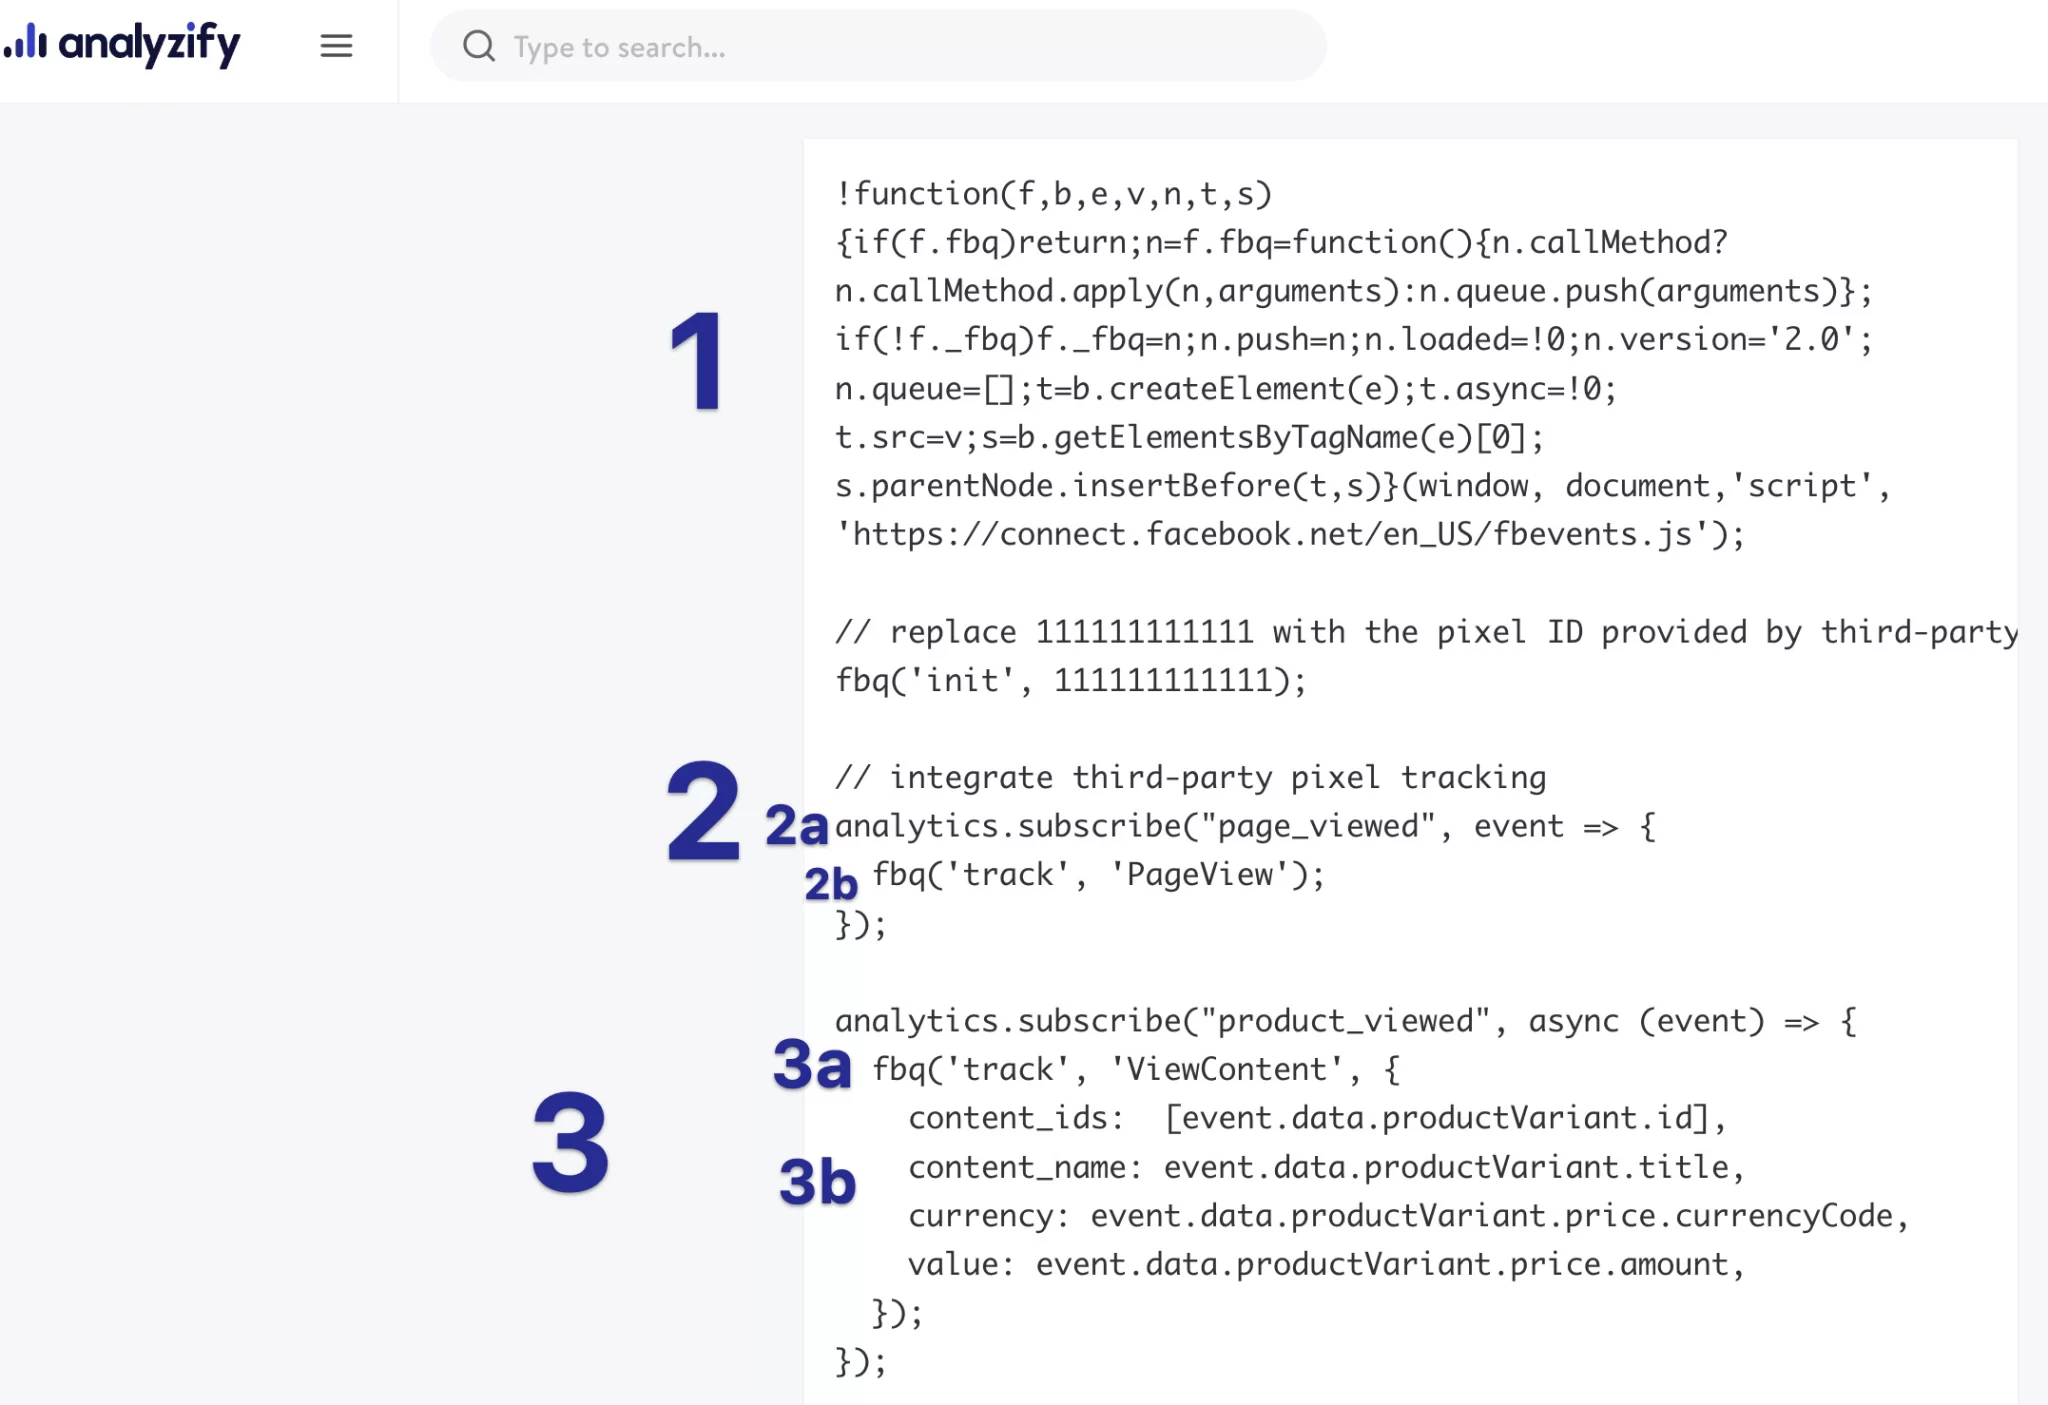 Section 1: This is the code block that’s given by the 3rd party. In this example, it is Facebook Pixel (aka Meta Pixel).
Section 2: This sends the PageView event to Facebook Pixel when a page is viewed. 2a here is where the magic happens. This code “analytics.subscribe(“page_viewed”, event =>” – is Shopify’s new investigation. That’ll trigger the code block in 2b when the specific condition is met.
Section 3: And here, we are not only pushing the event but also attaching additional data. In this example, 3a is the push event and adds the data pieces in 3b. It simply sends the product level data (Content ID, Name, Price, etc) along with this event.
GA4 E-commerce Tracking Setup Using Shopify Pixels
This is the most exciting part: We will achieve the result without using data layers, Google Tag Manager, or any 3rd party app. We will only use Analyzify’s open-source GA4 Shopify Pixel and Shopify’s new feature Shopify Pixels.
Shopify Google Analytics 4 E-commerce setup on Shopify includes:
| Page view | Each page view | Page title, page language |
| Search | A site search is performed | Search query |
| Product view | A product is viewed | Product ID, Product Name, Product Price |
| Add to cart | A product is added to the cart | Product ID, Product Name, Product Price |
| Begin checkout | Checkout process started | Currency, value, line items (products) |
| Add payment info | Payment info (credit card, etc) is added | Currency, value, line items (products) |
| Purchase | Purchase completed | Currency, value, line items (products) |
After this setup, you will have all e-commerce data on your Google Analytics 4 account flowing from your Shopify store.
Please read the sections above carefully before taking any action on your store. This is an open-source solution that’s prepared by the Analyzify team. Analyzify or Shopify doesn’t provide any support for these features. Consider purchasing Analyzify for the best results. Contact our support team if you are an existing client.
You can follow our in-depth tutorial on Youtube (recommended) or scroll down for the web version.

Shopify Pixels GA4 Setup
Step 1: Add a new Pixel on Shopify Customer Events
Visit Shopify Admin > Settings > Customer Events > Add Custom Pixel
Name the new pixel as Analyzify OS – GA4 v1.0. Click Add Pixel.
- Please try to do the naming as we suggest.
- This will get quite important once you have more pixels.
- It will help you to manage and stay up-to-date. (OS refers to open-source)
Step 2: Copy Analyzify’s open-source Shopify GA4 Pixel.
After hours of deep work and collaboration with many experts, our team has come up with this masterpiece. A perfectly working Shopify GA4 Pixel and we are proud to serve this to the Shopify community.
Just copy the code-block and move on to the next page. View Analyzify Github repository if you want to learn more about the code.
Step 3: Paste the code & add your own GA4 ID
Step 3.1: Go back to your recently added Shopify Custom Pixel and paste the Analyzify’s Google Analytics 4 Pixel code block.
Step 3.2: Update the G-XXXXXXXX with your own GA4 measurement ID. You can create a new test property using this tutorial. Get help from this tutorial if you don’t know how to find your own Google Analytics 4 measurement ID.
Step 3.3: Click “SAVE” and make sure the changes are saved with your own GA4 ID. Click here for a detailed video setup.
Step 4: Connect the pixel
The Shopify pixels will not start functioning unless you CONNECT them. Click on CONNECT and proceed to the next step for the tests. If you have successfully connected, the button should change to “Disconnect”.
![]() Step 5: Testing Shopify GA4 Pixel
Step 5: Testing Shopify GA4 Pixel
Google Analytics 4 has several different testing methods. We will use the GA4 RealTime view in this tutorial. Make sure to check out the Youtube video if you want to execute an in-depth test using GA4 DebugView.
Step 5.1: In an incognito window, visit your Shopify store. Make sure you don’t have any adblockers or tracker blockers active. Google Chrome is usually the best for these kinds of tests. Visit a couple of pages and leave this page open on your browser.
Step 5.2: Visit your Google Analytics 4 account. Click Left Menu > Reports > Realtime. It might take a couple of minutes for the first data to come in. You should already be seeing yourself as the visitor. If the data is not there yet, make sure to watch the troubleshooting section in our YouTube video.
Step 5.3: Go back to your store and add a couple of products to your cart; then go to your Cart page, and begin the checkout process.
Step 5.4: You should be seeing “page_view, view_item, add-to-cart, add_payment_info, purchase” events in your Real-time reports under the events section. You can click these event names and also check the relevant data.
Step 6: Double-check your data after a couple of days
Real-time reports are excellent for displaying the data flow. However, it’s advisable to wait for a couple of days before fully trusting a data source. You should collect real visitor data and compare it to your GA4 data to make sure that the setup is working properly.
We hope everything went well for you. Before you leave:
- Make sure to use a secondary Google Analytics 4 account for this and compare the results often.
- The pixels you add here in Shopify Pixels will not be supported by Shopify. Consider purchasing Analyzify for the best results. Our team will make sure to keep your setup up-to-date with the best practices.
This is an open-source solution that’s prepared by the Analyzify team for the Shopify community. Analyzify or Shopify doesn’t provide any support for these features.
FAQ on Shopify Pixels
Will Google Analytics 4 on Shopify work with Shopify Pixels?
Our open-source solution should work and the GA4 should be up and running on your Shopify store with the major e-commerce events. We have tested this in many possible scenarios and stores. Stay tuned as we will keep improving the solution.
Can I use Google Tag Manager with Shopify Pixels?
As the Analyzify team, we are always up for the best solution. At the moment, it is still definitely: Google Tag Manager.
You can keep using the setup you have and trust. Most Shopify merchants rely on Google Tag Manager to centralize and manage their tags. Google Tag Manager will keep working as it is until the next notice.
We are working on creating data layers using Shopify Pixels and we plan to execute them through Google Tag Manager. We believe this combination will work great.
Can I add multiple Facebook pixels to Shopify?
We advise against adding multiple pixels to Shopify, as this can adversely affect your performance and profitability.
Multiple Facebook pixels on your Shopify store will trigger multiple conversion events for each visitor, resulting in lower conversion rates and higher costs per conversion.
Instead of using multiple Facebook pixels, we suggest using Google Analytics 4. This way, you can track all the relevant data in one place, without any drawbacks.
How can I use web pixels to track Shopify’s new checkout?
If you have a Plus plan and have upgraded to the new checkout version of Shopify, your already-existing GTM container for the checkout.liquid file will stop working soon as Shopify will not let you add scripts.
You can use the Analyzify & Shopify Pixels Checkout Module as a powerful solution for the new checkout version of Shopify & important events and pageviews during the checkout process without the need for the checkout.liquid file.
I am an Analyzify client. What should I do?
You can consider purchasing Analyzify to leave everything to expert hands and have the best possible data analytics setup on your Shopify store.
As seen on this topic, our team stays on top of the industry updates and implements them into our product once they are reliable & stable. Additionally, we don’t hesitate to execute the updates on our clients’ stores.
We are discovering the Shopify Pixels feature at the moment. And we have already released an open-source community solution for those who want to test it as well.
For example, our experts (depending on your case) can advise that Shopify Pixels will work better for your store on a specific case. We can apply this solution specifically to your store upon your approval, at no extra cost.
Here is what you get with Analyzify:
- Hands-on Audit & Setup & Validation service [at no extra cost]
- The most loved Shopify & Google Tag Manager & GA4 integration
- Data layers & pre-built GTM container
- Real-time data validation
- Google Ads Enhanced Conversions, remarketing pixels (Including hands-on audit)
- Custom solutions to store-level tracking problems
- GDPR compliant tracking including setup service
With the Analyzify v3, we will have several different setup options, including Shopify Pixels, Google Tag Manager, Server-side, and more. Existing Analyzify clients always have the option to get a free upgrade.
Have questions? Don’t hesitate to contact our amazing support team.
Why do I need Analyzify?
You can consider purchasing Analyzify to leave everything to expert hands and have the best possible data analytics setup on your Shopify store. As seen on this topic, our team stays on top of the industry updates and implements them into our product once they are reliable & stable. Additionally, we don’t hesitate to execute the updates on our clients’ stores.
We are discovering the Shopify Pixels feature at the moment. And we have already released an open-source community solution for those who want to test it as well. However, we DO NOT recommend using Shopify Pixels (or any recently released solution) as the primary tracking source until the results are proven.
For example, our experts (depending on your case) can advise that Shopify Pixels will work better for your store on a specific case. We can apply this solution specifically to your store upon your approval, at no extra cost. Here is what you get with Analyzify:
- Hands-on Audit & Setup & Validation service [at no extra cost]
- The most loved Shopify & Google Tag Manager & GA4 integration
- Data layers & pre-built GTM container
- Real-time data validation
- Google Ads Enhanced Conversions, remarketing pixels (Including hands-on audit)
- Custom solutions to store-level tracking problems
- GDPR compliant tracking including setup service
We have several different setup options, including Shopify Pixels, Google Tag Manager, Server-side, and more. Existing Analyzify clients always have the option to get a free upgrade.
Have questions? Don’t hesitate to contact to our amazing support team.