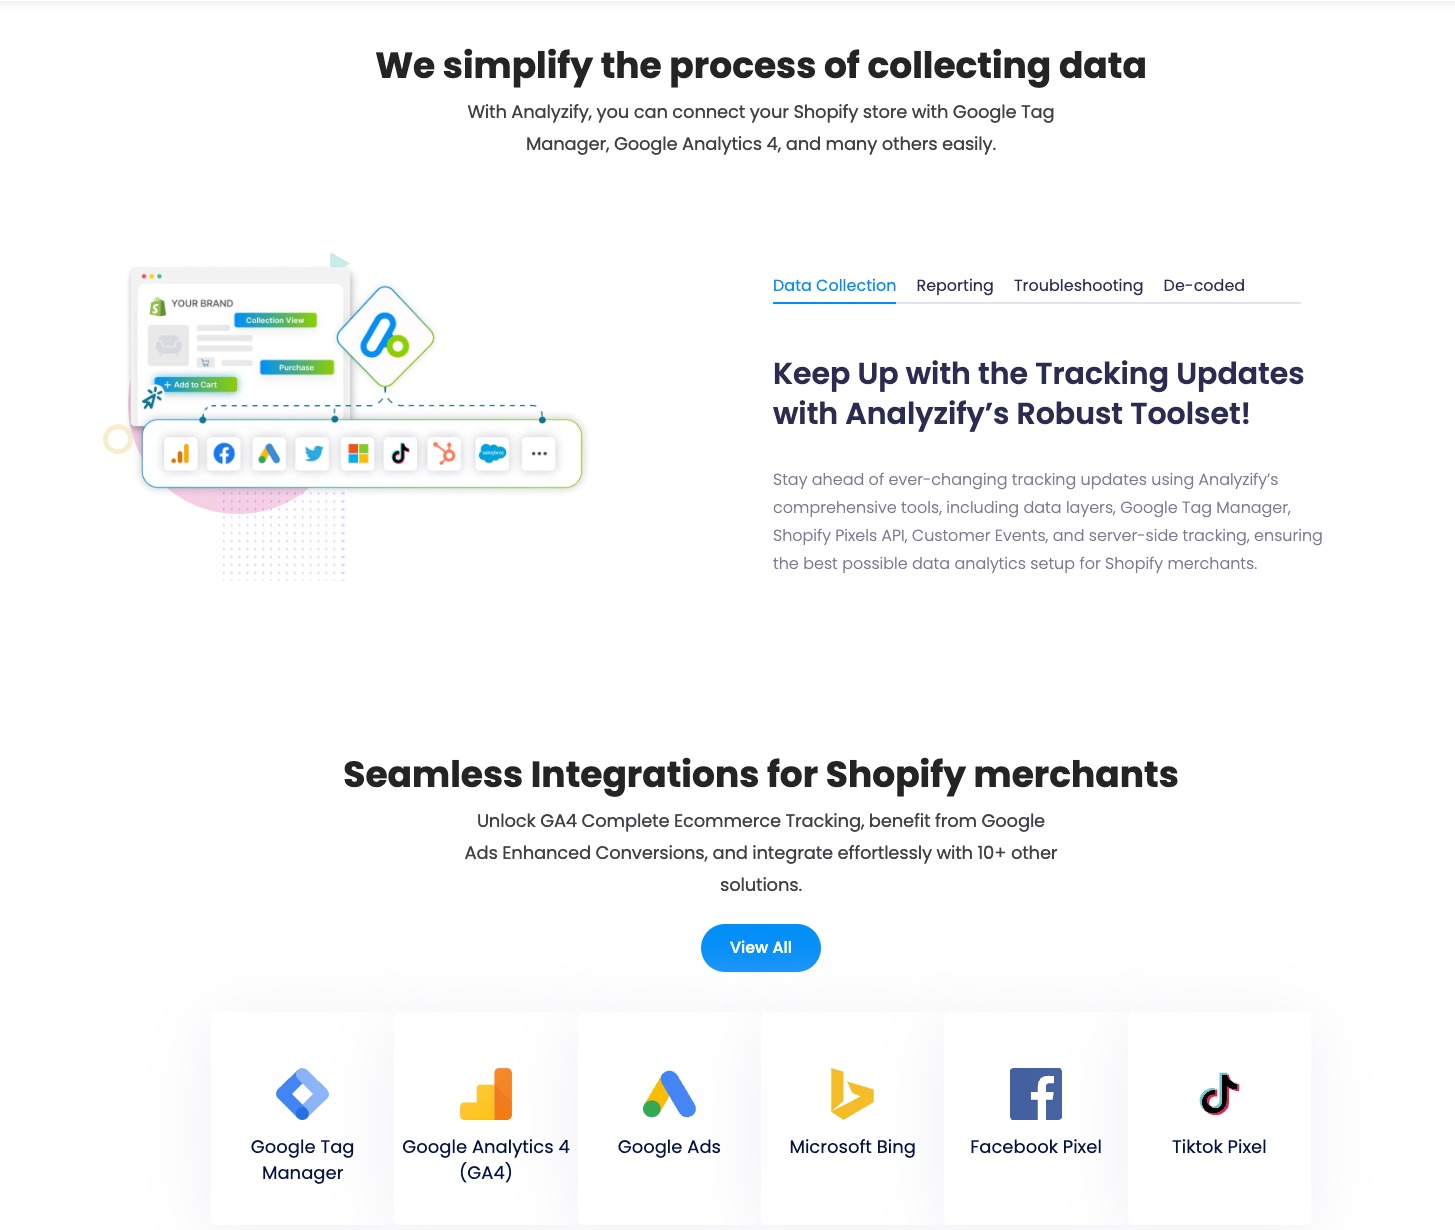
Tracking your Shopify sales with Shopify Analytics, GA4, and Google Ads can help you make better decisions and understand your Shopify store’s performance.
And also, tracking your competitors’ sales strategies is key to positioning your brand effectively in the market.
This guide introduces smart ways to track competitors’ sales and pricing trends without direct monitoring, focusing on alternative analytics and market research strategies.
We also cover how to track Shopify sales by using Shopify Analytics, GA4 and Google Ads.
Here, you will explore:
- Methods to track your competitors’ sales
- A guide on using Shopify Analytics for effective sales tracking
- How to use GA 4 for comprehensive Shopify sales insights
- How to get detailed conversion tracking & analysis on Google Ads
- Detailed instructions and examples for analyzing key reports
- The process for creating detailed ecommerce funnels in GA4
- Integrating Analyzify for advanced data analytics and tracking
Let’s get started!
How to Track Your Competitors’ Sales
Tracking your competitors’ sales can help you better position your brand.
It’s also important in embracing the right strategies and maintaining a competitive edge, refining your product offerings, marketing tactics, and customer service.
However, tracking your competitors’ sales is not as easy as you might think because Shopify continues to take serious precautions against spy apps.
Therefore, instead of searching for solutions to track your competitors’ sales directly, you can use apps that can help you with competitor price monitoring.
PriceMole
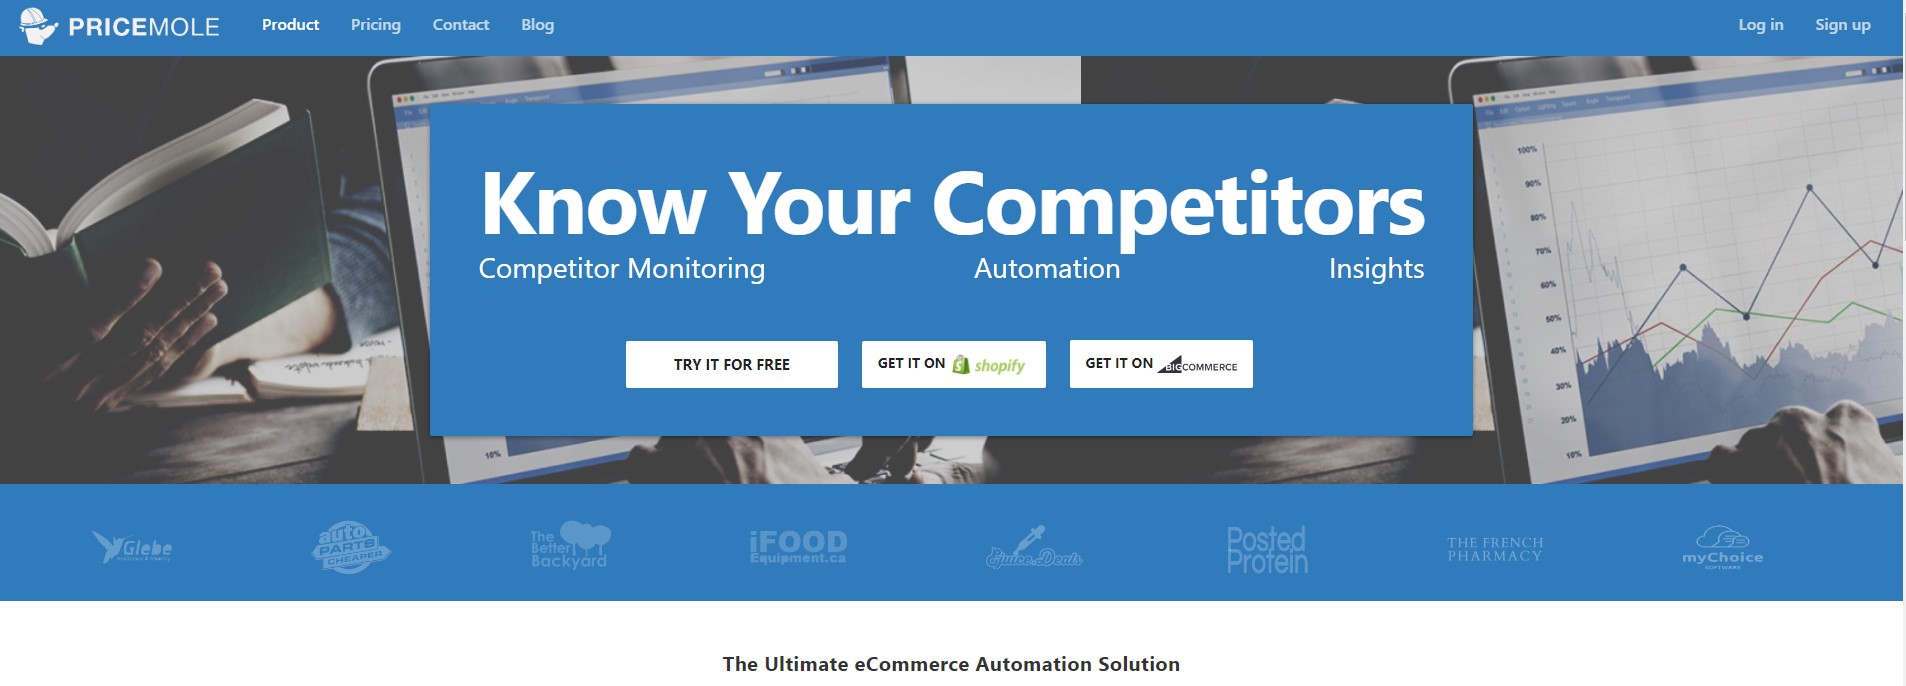
PriceMole helps to automate competitor price monitoring and dynamic pricing strategies for Shopify merchants. The app enables Shopify merchants to save time by automating the process of checking competitor prices and adjusting their own prices strategically to boost profits by up to 20%.
It provides actionable insights, historical pricing charts, and revenue reports to maximize opportunities.
Key Features:
- Automated Competitor Monitoring: Tracks competitor prices and availability in real time, allowing for automated adjustments to your store’s pricing based on the competitive landscape.
- Dynamic Pricing Strategies: Customizable rules for repricing products dynamically to optimize profits and sales. It uses machine learning to recommend the most profitable prices considering market trends and competitor prices.
- Comparison Widget: A customizable widget that can be added to your website, helping shoppers by allowing them to compare your prices with those of competitors.
PRISYNC - Dynamic Pricing Optimization

Prisync - Dynamic Pricing Optimization automates the process of price optimization based on competitor pricing data. It supports a global market with site and currency coverage, ensuring merchants can operate and compete internationally with ease.
Key Features:
- Competitor Price Tracking: The app enables merchants to track an unlimited number of competitors, including product variants such as size and color, and channel-based competitor price tracking.
- Dynamic Pricing Rules: It uses dynamic pricing rules based on product costs and competitive intelligence, allowing for strategic pricing adjustments that can improve profit margins.
- Automated Price Adjustments: Prices are automatically adjusted in response to market changes, stock availabilities, and competitor pricing strategies, ensuring the users pricing remains competitive.
- Advanced Analytics and Reporting: Merchants can gain access to detailed analytics and reports, including price history and instant price change notifications, enabling informed decision-making.
Best Practices
In addition, you can follow these best practices to better understand your competitors’ strategies
1. Market Research Reports
Industry reports and market research can offer valuable data on market share, industry trends, and sales figures for major players in your sector.
This information can be used to benchmark your performance against competitors.
For example, you can have a look at the top ecommerce statistics so you can insights about markets, trends, and expectations.
2. Use Competitor Analysis Tools
Use tools like SimilarWeb, SEMrush, or Ahrefs to get data on your competitors’ website traffic, source of traffic, and keywords they’re ranking for.
This can give you an indirect measure of their popularity and marketing effectiveness.
3. Monitor Competitors’ Websites and Social Media
Regularly visit their online stores and social media profiles to observe any new products, promotions, sales, or marketing strategies they’re implementing.
Pay attention to customer reviews and feedback for insights into product popularity and customer satisfaction.
4. Sign Up for Competitors’ Newsletters
Subscribe to their email newsletters and follow their blogs to stay updated on new product launches, sales events, and promotional offers. This can also provide insights into how they engage with their customers.
5. Analyze Product Reviews and Ratings
Look at product reviews and ratings on your competitors’ Shopify stores. High ratings and volumes of reviews can give you an idea about best-selling products.
Tracking Your Shopify Sales
You have three methods to track your Shopify sales properly:
- Shopify Analytics
- Google Analytics 4 (GA4)
- Google Ads
Let’s have a look at how you can track your Shopify sales with Shopify Analytics, GA4, and Google Ads:
Shopify Analytics to Track Your Sales
Shopify Analytics provides you with direct insights to track your sales.
You can discover meaningful data about your sales although it is not the best alternative for details such as consumer behaviour, customer intents and etc.
For example, you can see the number of orders, sales over time, sales by product variant SKU, net sales and other data through default Shopify reports.
Let’s take a look at some reports with examples:
Default Shopify Reports
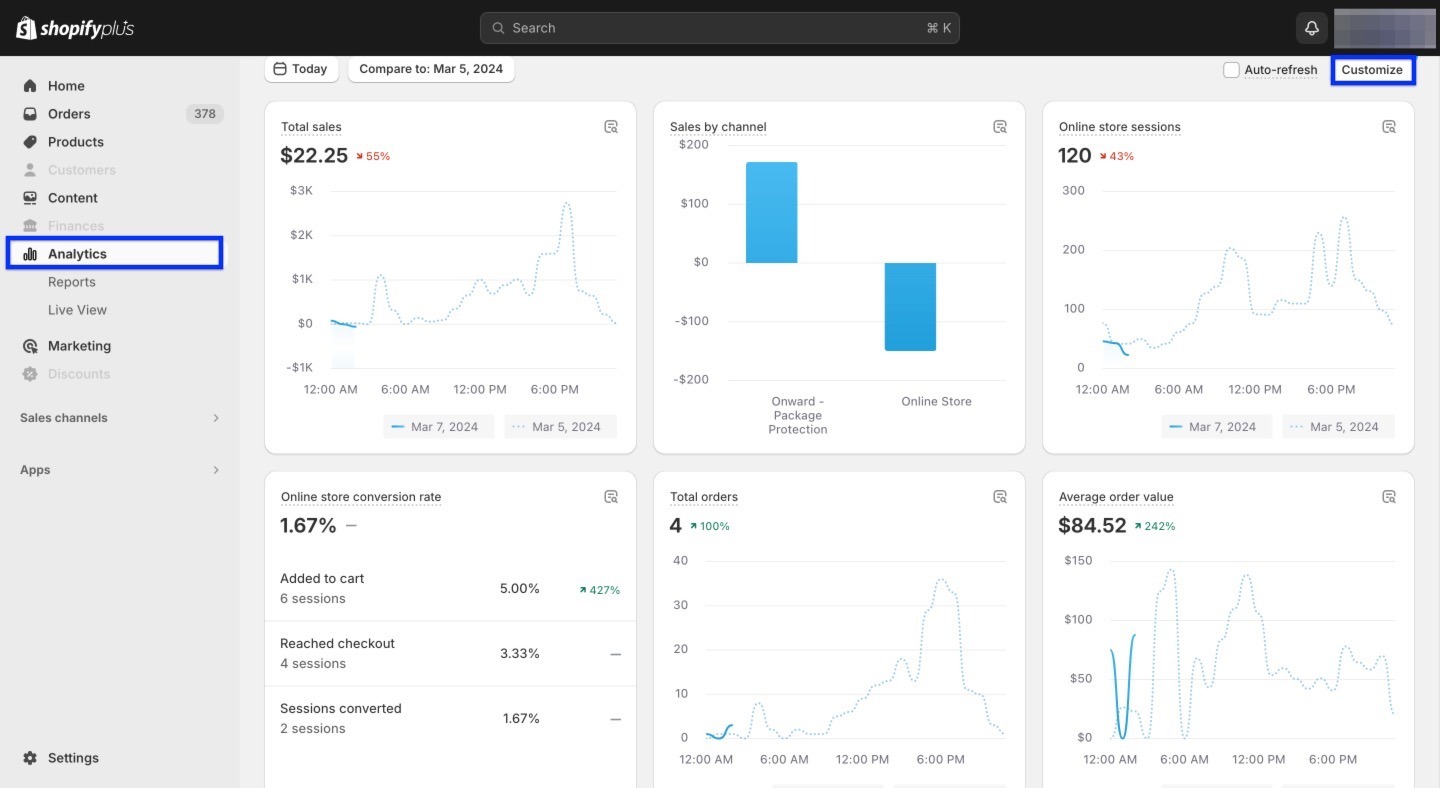
Navigate to your Shopify admin dashboard. Then, click on “Analytics” on the left.
You’ll see a dashboard full of graphics, and ” “Reports” & “Live View” under that here.
Dashboard
The Dashboard gives you an overview of your sales performance, including total sales, sales by channel, total orders, average order value, and more.
Also, you can click “Customize” to change the look of your dashboard and add other metrics.
Reports
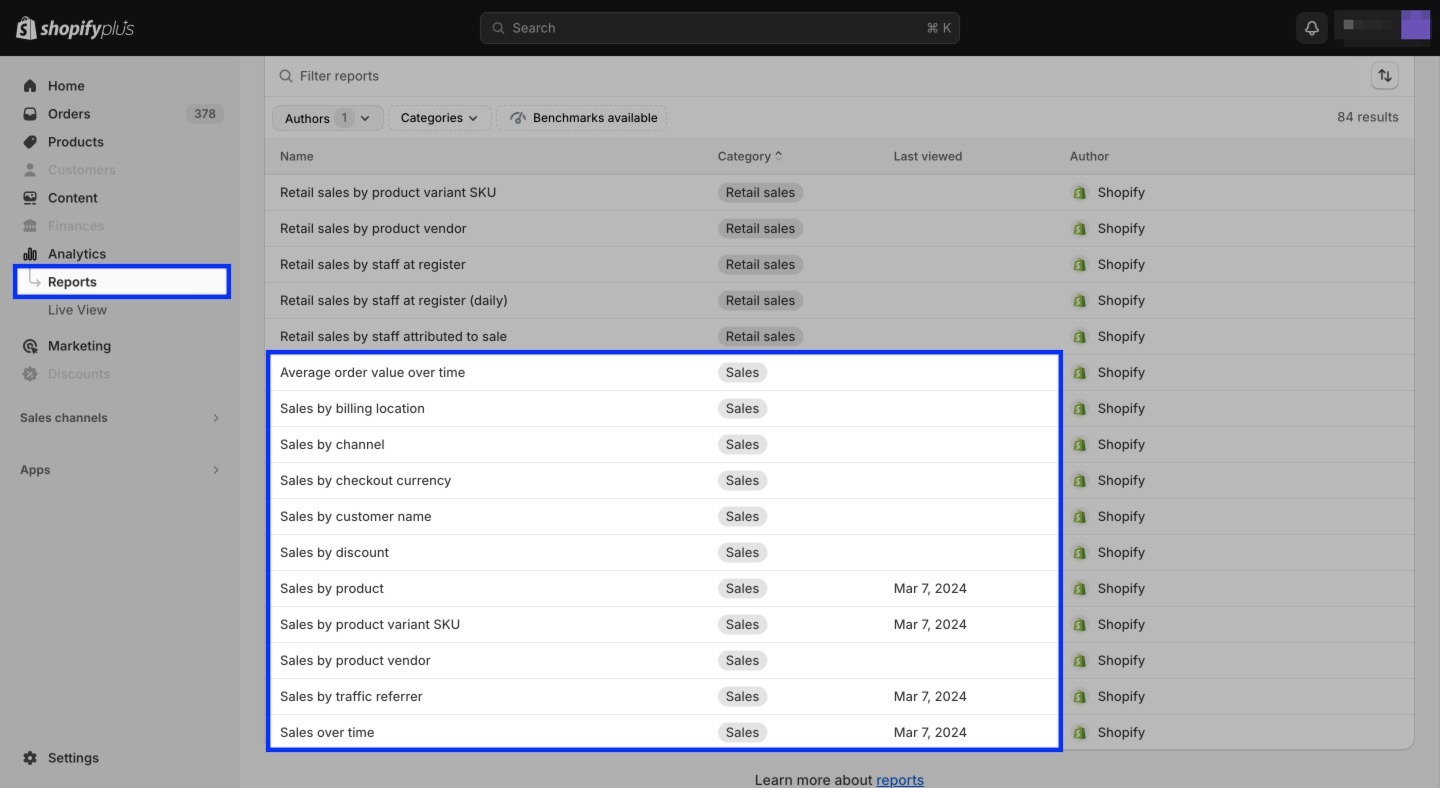
In the “Reports” section, you can access more detailed reports.
You have various report types available under the category of Sales. These include:
- Sales by product
- Sales by product variant SKU
- Sales by traffic referrer
- Sales over time
- Average order value over time
And many other sales-related reports as you can see here:
Example 1:
If you want to see your online store’s number of orders, total sales, net sales, gross sales etc., you can follow the steps below:
1- Go to “Sales over time” report.
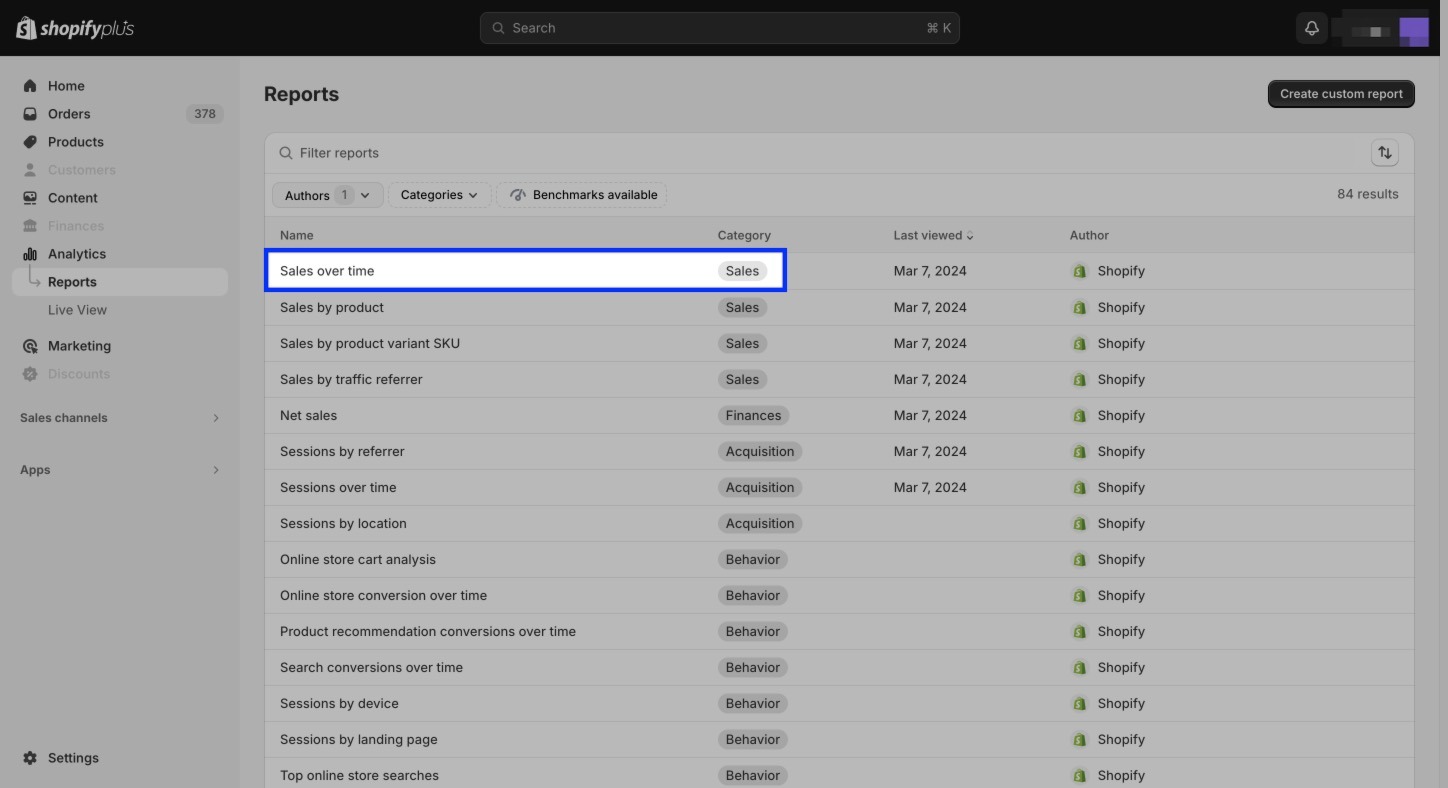
2- Click the filter icon.
![]()
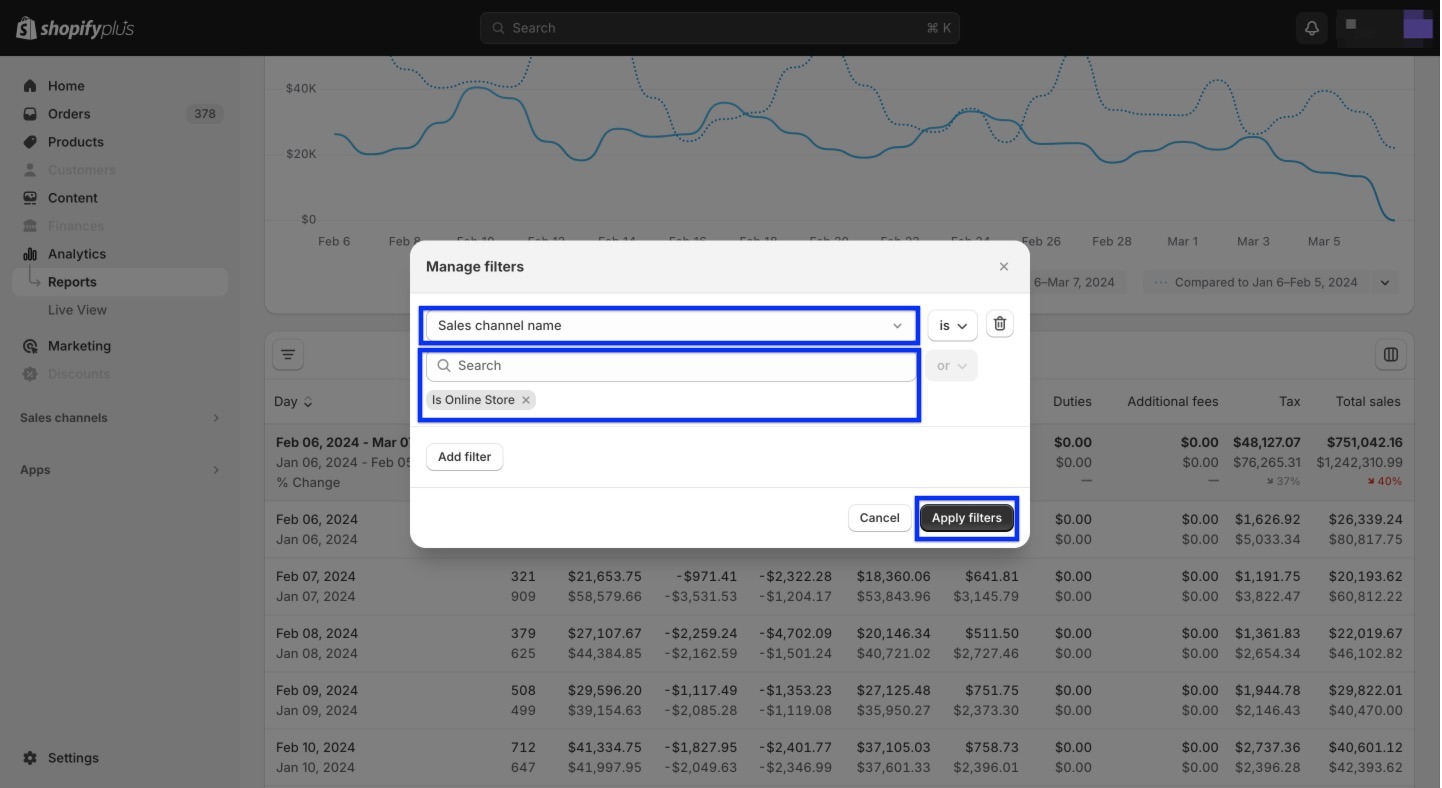
3- Click “Select filter” and choose “Sales channel name”. Then, click “Search” and choose “Online store” from the list. Finally, click “Apply filters”
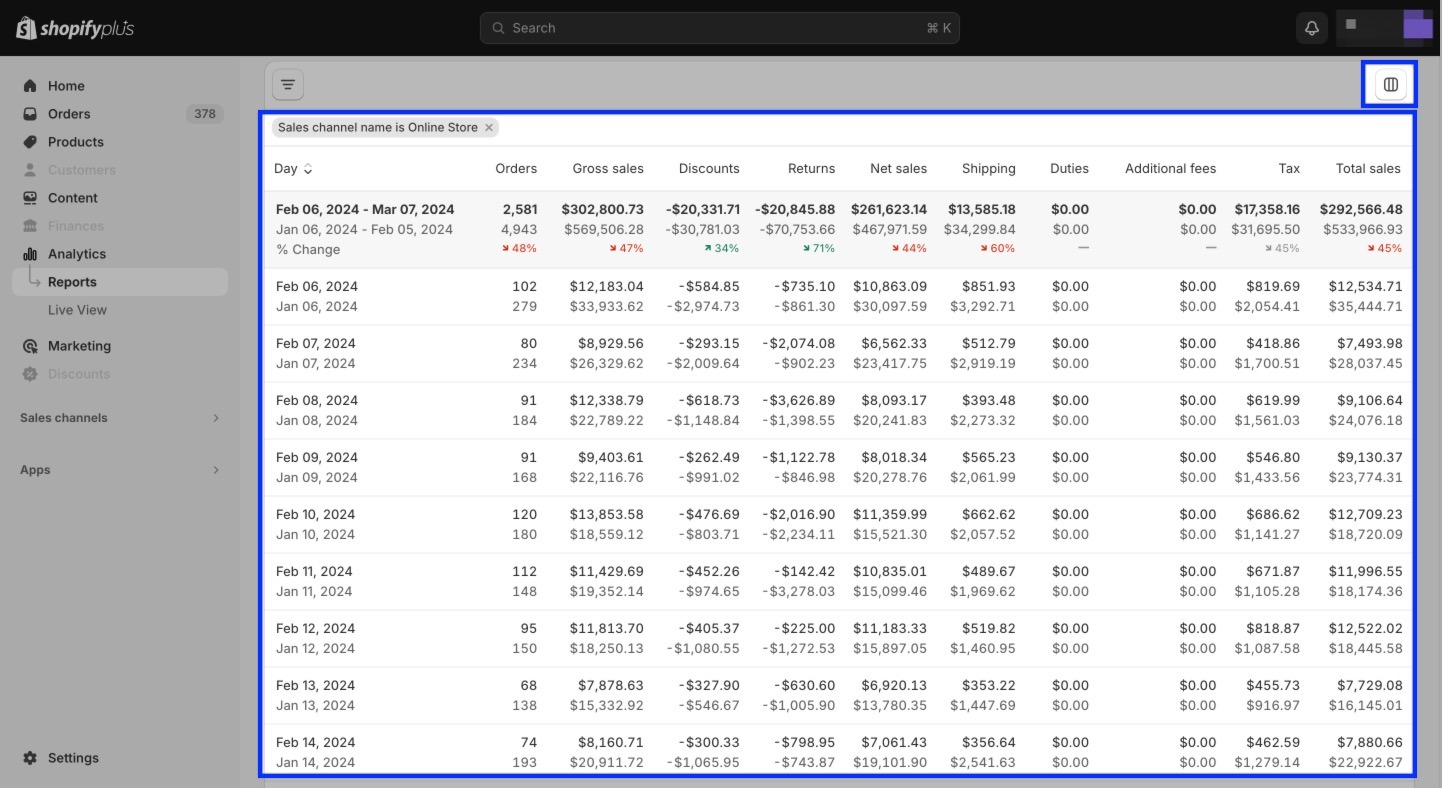
4- Here you can see your data. If you click the columns icon on the right, you can add/remove more columns in your report. It also allows your export your report (at the top of the page) as a CSV file.
Example 2:
Shopify Analytics offers insights into how different sources of traffic contribute to your sales.
To see that, simply open the “Sales by traffic referrer” report.
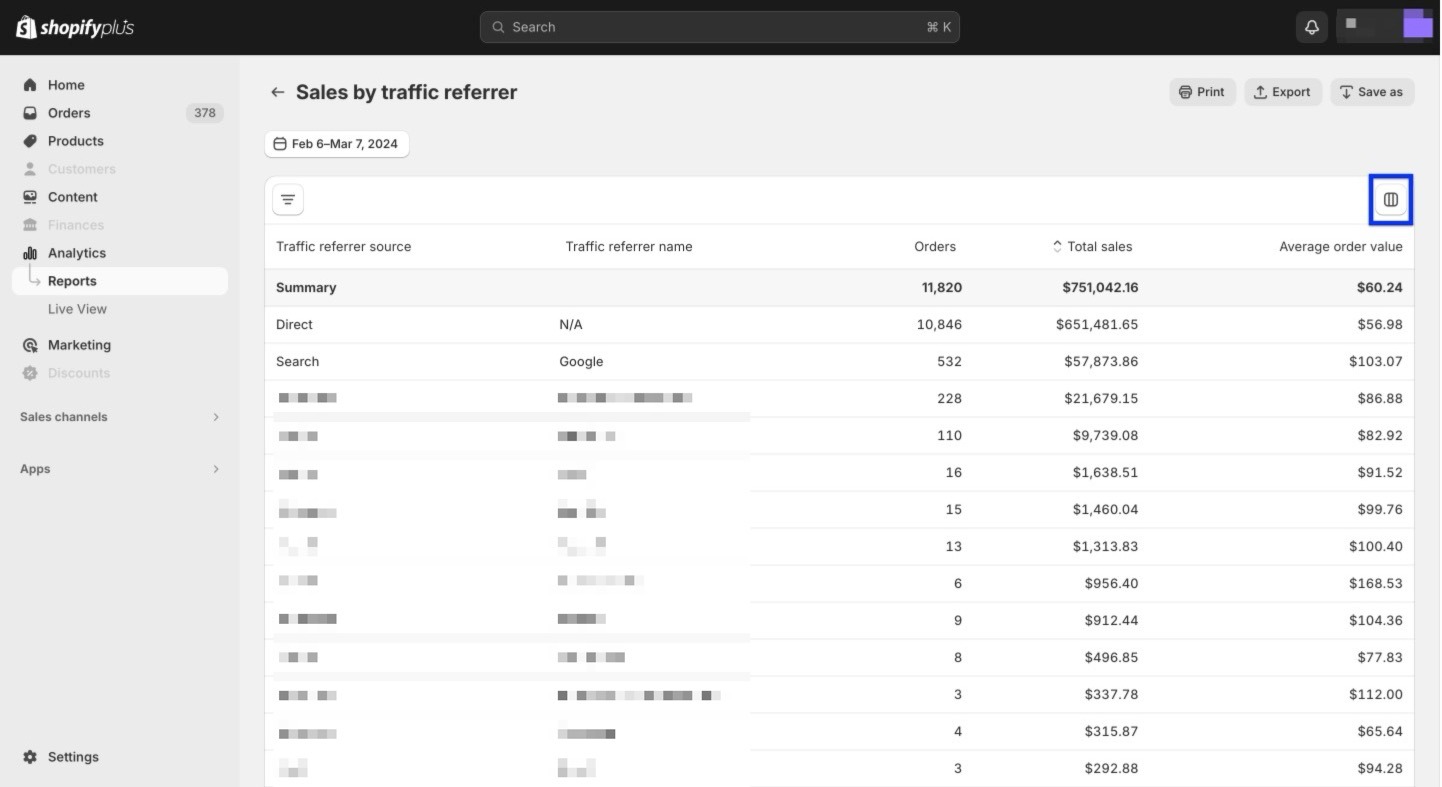
You can click the column icon on the right and add more data such as “Average order value”.
Example 3:
You can track the performance of individual products in your store through Shopify Analytics.
It offers information about which products are selling the most in terms of quantity and revenue, along with metrics you can add.
To see that, go to the “Sales by product” report.
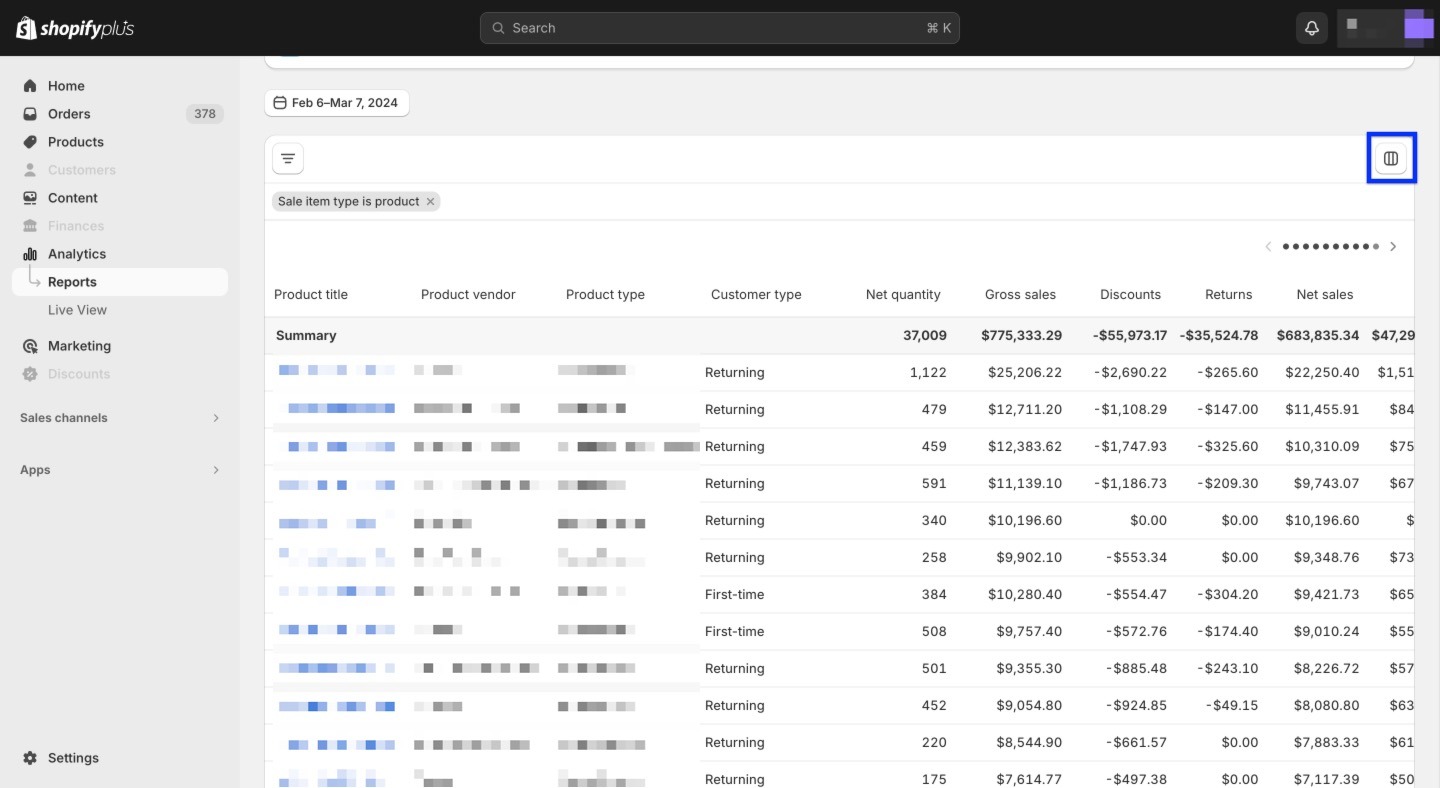
You can click the column icon on the right and add more data such as “Customer type”.
Live View
Live View offers a real-time look at your sales.
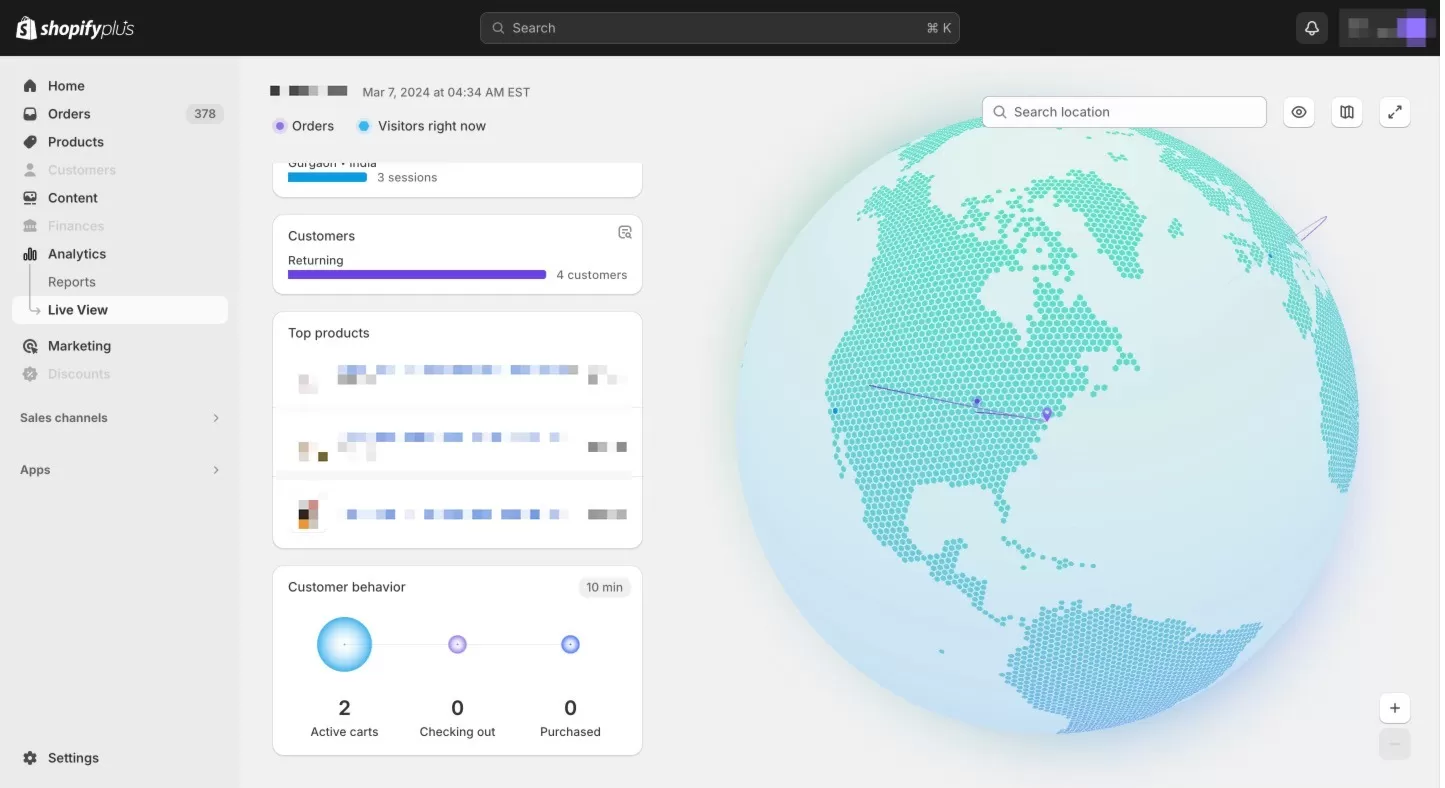
You can see your active carts, checkouts, and purchases as they happen. It might be useful during a sale or promotional event.
Custom Shopify Reports
Custom Shopify reports are available to Shopify Advanced and Shopify Plus plans.
When you go to reports, click “Create custom report” on the top right. Then, choose a report template such as sales over time.
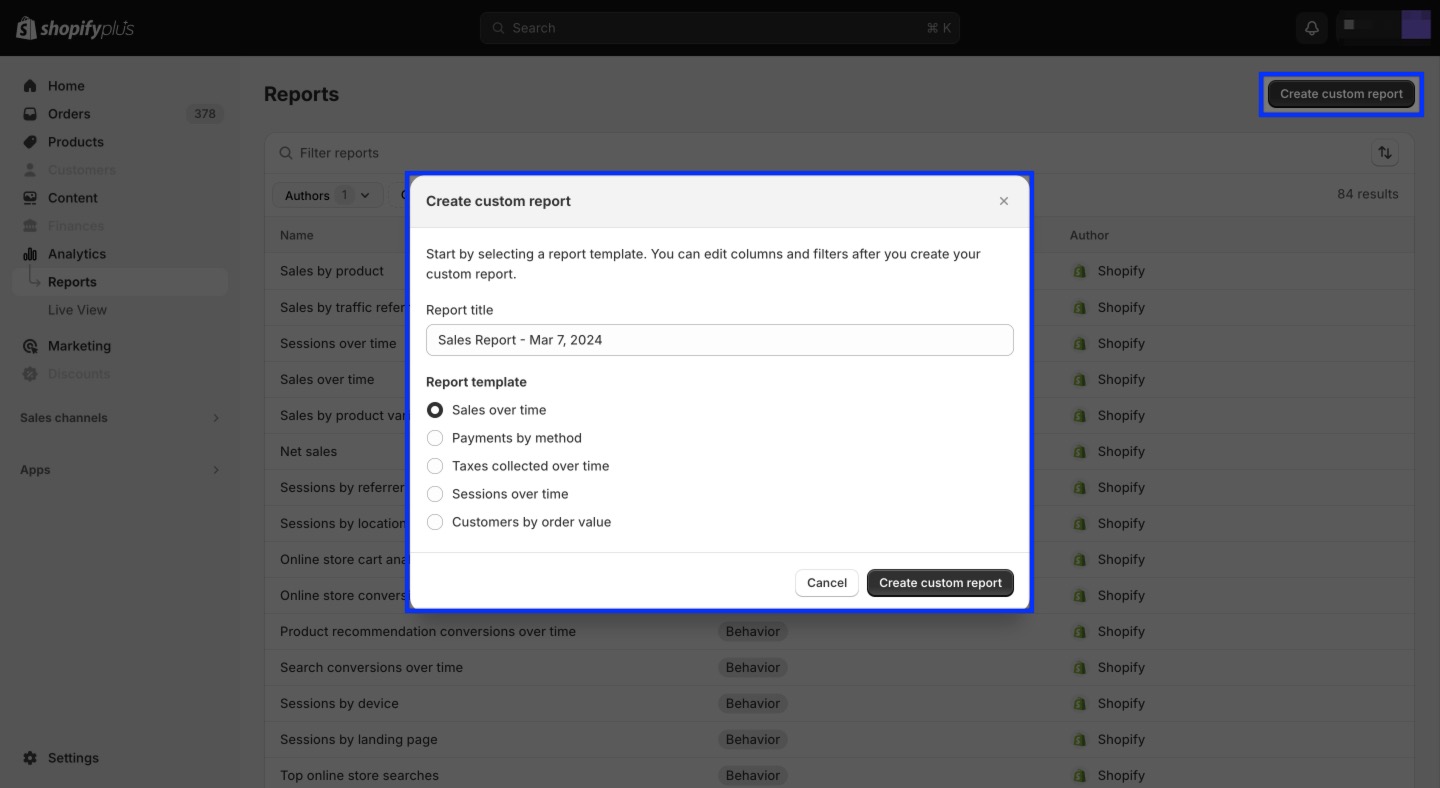
Then, click “Create custom report” and columns and filters to get a more specific report.
You can refer to the official Shopify document for common sales report terms.
Track Your Sales with Google Analytics 4 (GA4)
GA4 stands out as the most capable tool to track your sales with endless dimensions & metrics to give you a complete picture of your Shopify sales.
While Shopify now provides a native integration with Google Analytics 4, it’s important to note that it still lacks some important ecommerce events & parameters.
For example, if you set up GA4 on your store via the native integration, you get basic reporting, which means you might miss such parameters as coupon code, Customer ID, Variant ID.
To get a fully-functional GA4 & Shopify integration for the most detailed sales data tracking, you can get Analyzify now and secure a turnkey data analytics solution.
Preparing Your Ecommerce Setup
First things first, it’s crucial to ensure your e-commerce setup is correctly configured in GA4.
Your reports should display revenue information accurately. If this isn’t the case, we recommend referring to our troubleshooting guide for GA4 Shopify integration.
This step is important to unlocking the insights your data holds.
Accessing Ecommerce Reports
Navigating to your ecommerce reports is your next step. Here’s how:

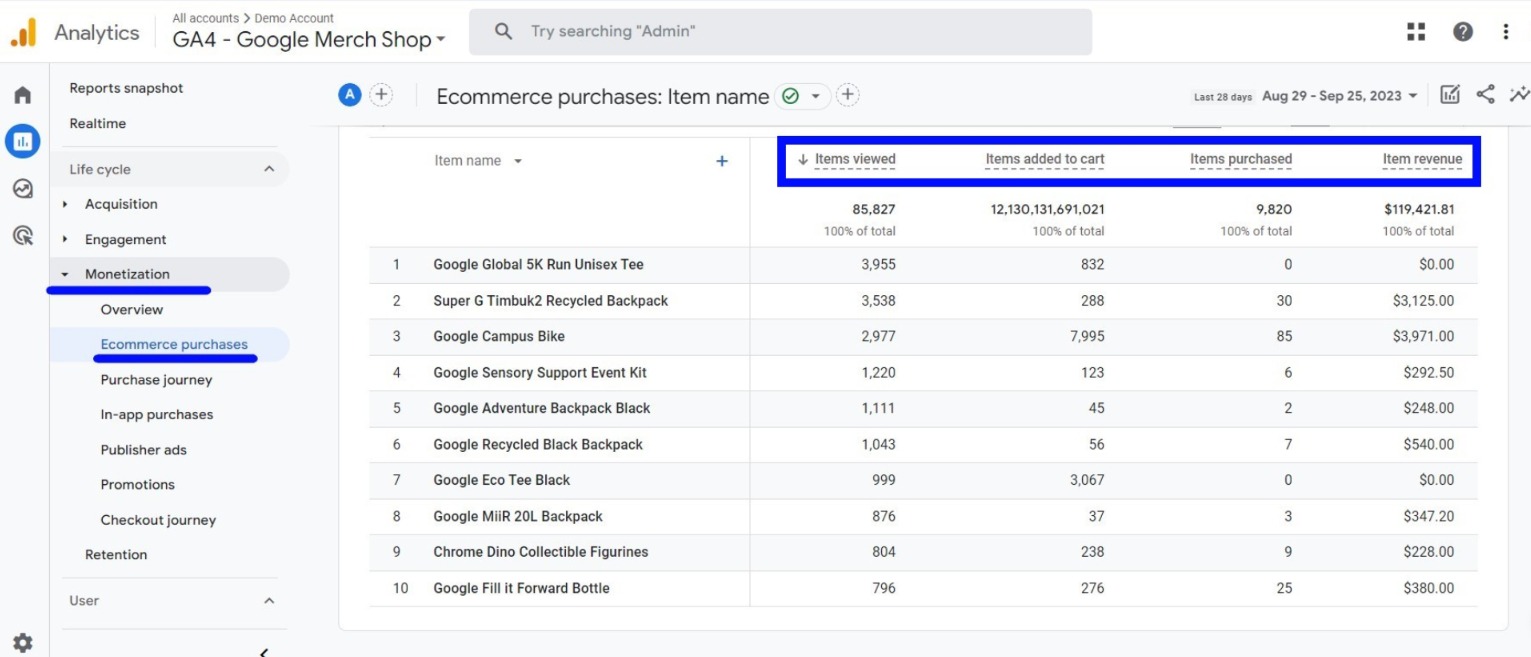
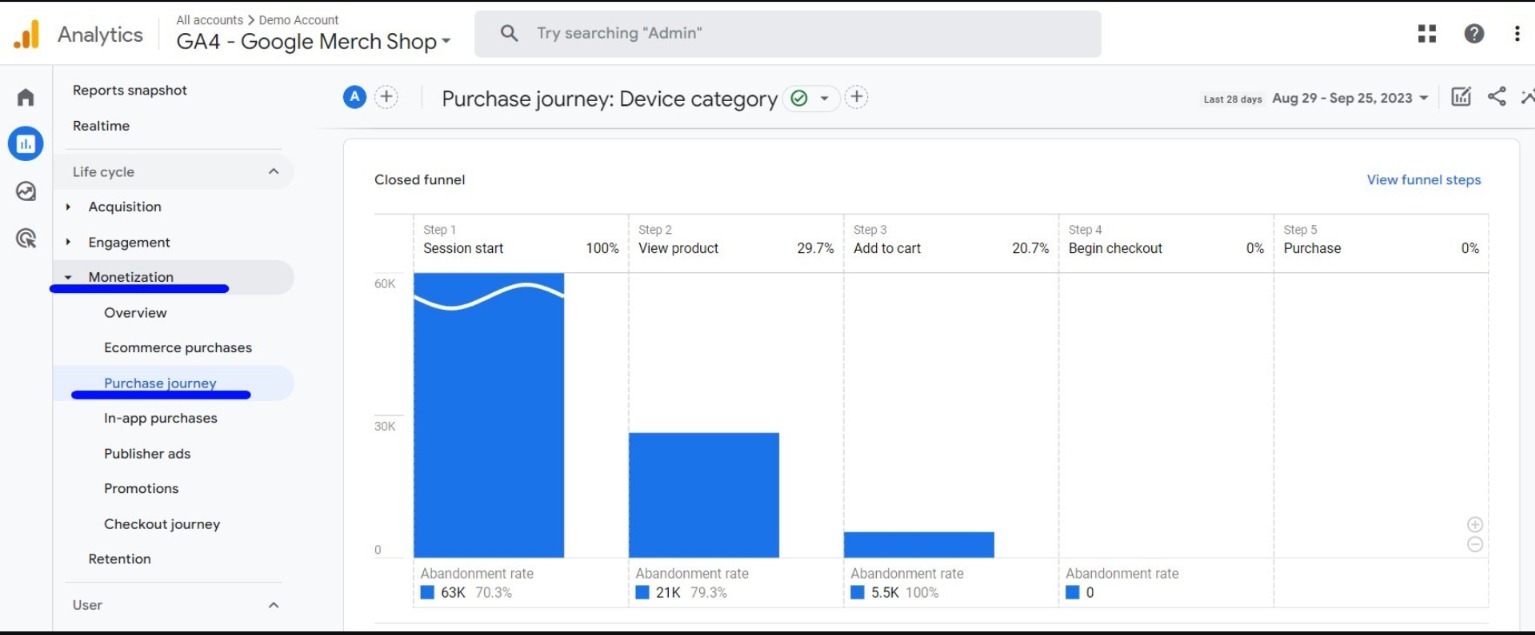
Exploring the User Purchase Journey
An invaluable aspect of your analytics is the User Purchase Journey report.
This comprehensive overview tracks the steps customers take en route to a purchase, offering critical insights into your conversion funnel.
Analyzing this report helps pinpoint areas for optimization, enhancing the purchasing path for your customers.
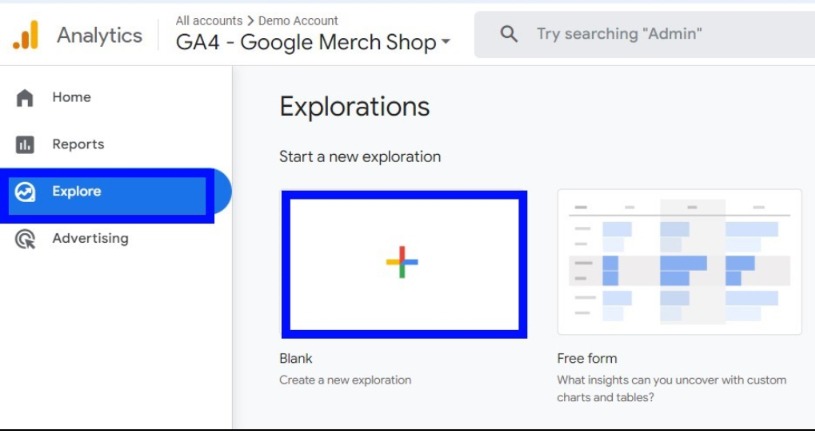
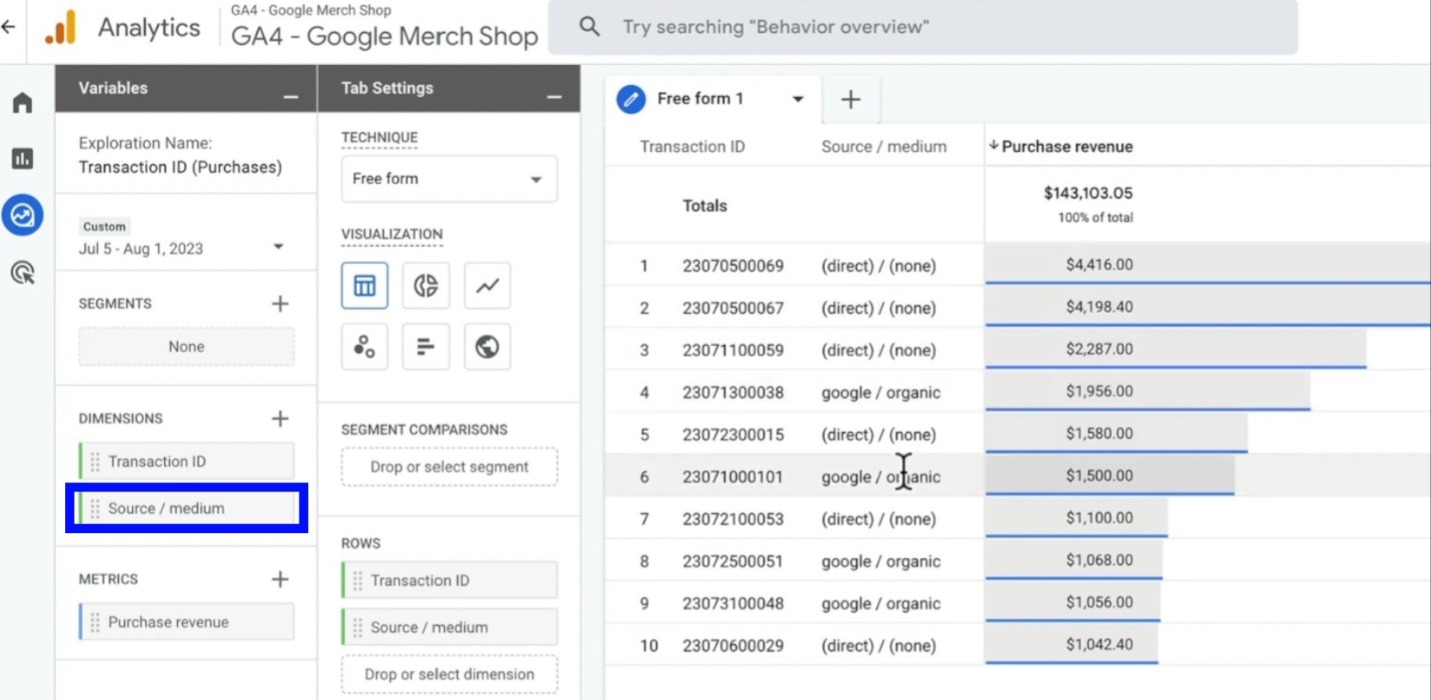
Creating a Custom Transaction ID Report
For those requiring a deeper understanding of transactions, a custom report is your go-to:
Create a New Report: Click on Explore and choose Blank to start from scratch.
Customize Your Report: Give your report a name, such as “Transaction ID Purchases” Select Your Metrics: Add Transaction ID from Dimensions and Product Revenue (noted as recently renamed) from Metrics.\n\n
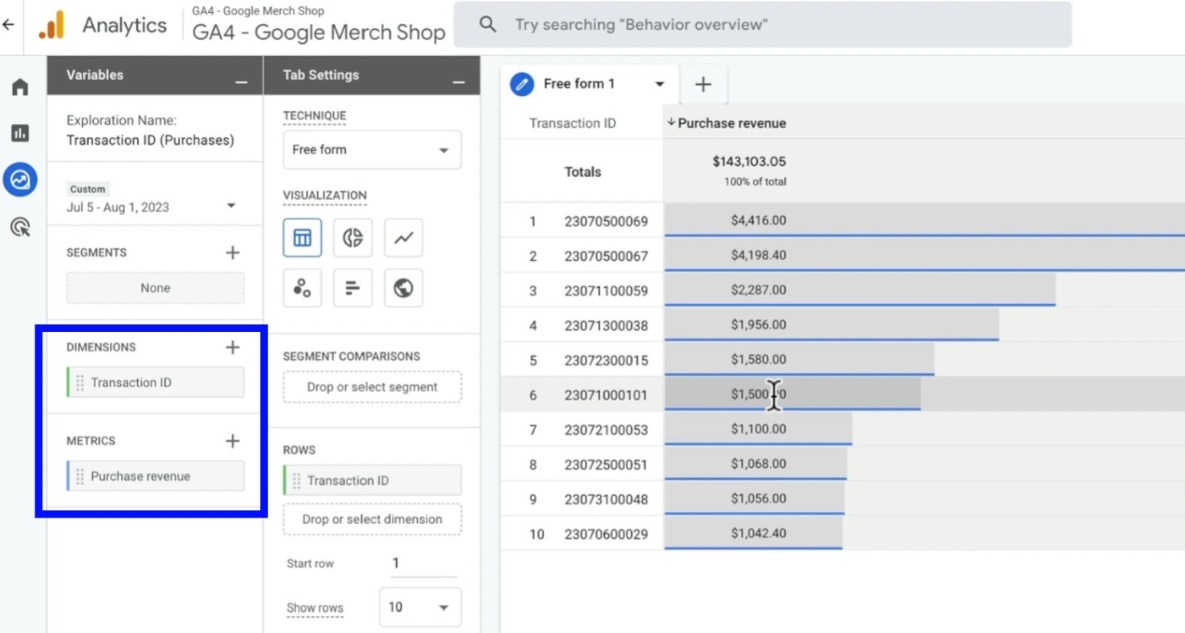
This custom setup allows you to track each transaction ID with its corresponding revenue, providing a detailed financial overview.
Incorporating Source and Medium Data
Enhance your report by including Source and Medium data.
This addition reveals the origin of your transactions, offering clarity on how customers discover your Shopify store.
Understanding these pathways is important for optimizing marketing strategies and investment.
Creating an Ecommerce Funnel in Google Analytics 4 (GA4)
To create a custom funnel in GA4, you need to use the Explore feature, which is a tool that allows you to create and customize your own reports using various templates, charts, and filters.
Follow the steps for a custom ecommerce funnel:
Sales Tracking with Google Ads
You can track your Shopify sales with Google Ads conversion tracking. If you want to set it up manually, please refer to the steps below:
Step 2: Set Up the Google Tag
After creating the conversion action, click on Set Up with a Google Tag and then see your snippet by clicking See event snippet.
Copy the code here
<script>
gtag('event', 'conversion', {
'send_to': AW-123456789/pasteconversionlabelhere,
'value': {{ checkout.subtotal_price | divided_by: 100.0 }},
'currency': '{{ currency }}',
'transaction_id': '{{ order_number }}',
});
</script>
and then add your own conversion ID instead of ’1234567’.
Additional Script Placement: Go to “Settings” > “Checkout,” scroll to “Order Status Page” additional scripts, and paste the Google tag. Save to ensure tracking across the entire store.
To prevent multiple counting & set up enhanced conversions you can read our comprehensive Google Ads Conversions guide.
By following these steps, you’ll effectively set up Google Ads conversion tracking on your Shopify store so you can track your Shopify sales.
However, to improve the performance of your Google Ads conversion tracking by applying the best practices you can set up Analyzify.
Analyzify’s Shopify-Google Ads integration offers the following features:
- Up-to-date Google Ads Tag Setup: Ensures your Google Ads tags are correctly implemented for accurate tracking.
- Conversion Health Monitoring: Keeps an eye on the health of your conversions to ensure data accuracy.
- Data Enrichment for Google Ads: Supplies detailed order-level and customer-level data to Google Ads for optimization.
- Enhanced Conversions via Google Ads API: Uses Google’s enhanced conversions feature for better conversion tracking.
- Dynamic Remarketing Support: Enables dynamic remarketing by accurately tagging and tracking products.
- Expert Audit and Support: Offers professional audit and support to maximize your Google Ads performance.
Track Your Shopify Sales with Analyzify
When preparing the ecommerce setup in GA4, Analyzify can help you track data by connecting Shopify with GA4 with a 5-min setup, and Google Tag Manager for advanced tracking.
You can read our article to learn more about Analyzify’s integration methods.
You get everything from data layers and Google Tag Manager to Shopify Pixels API, Customer Events, and server-side tracking.
It’s all designed to give you the best setup for a better understanding of your Shopify data:
The best possible solution with GA4 complete ecommerce tracking, Google Ads Enhanced Conversions, and 10+ integrations.
