Without question, the best possible way is to use modern dataLayers and Google Tag Manager. In this way, there will be many checkpoints to make sure the data is 100% accurate. Analyzify does this for you within minutes of launching. You simply need to create Google Ads Conversions in your account and then provide it to your Analyzify app.
Of course, we will make sure to include all of these details in your GTM set up and send the data to Google Ads.
Within the last 12 months, as a worldwide trusted analytics partner of Shopify merchants, we have executed over 1000 data analytics setups. Here’s what we recommend on setting up Shopify for Google Ads:
1) Analyzify’s Google Tag Manager Setup (for Conversion Tracking):
Google Tag Manager renders conversion tracking significantly better than the other techniques. We strongly advise you to use Analyzify’s Conversion Tracking (through GTM) as your primary conversion source.
2) Manual Google Ads Enhanced Conversion Setup:
Considering the fact that Enhanced Conversions is a new feature, we do NOT recommend utilizing it as the primary conversion. For this new feature, it would be wise for you to establish a new secondary conversion and set it up manually using this guide.
3) Google Analytics & Google Ads Integration (as a backup):
Having a backup is always a good idea. As a backup to your Google Ads conversion tracking, we strongly advise exploiting Google Analytics 4 purchase tracking. Make sure you set these conversions as secondary conversions.
To set up Google Ads conversion tracking, you should follow these steps:
1- Create a conversion action in Google Ads.
2- Install the global site tag in your Shopify theme.
3- Add the event snippet to your checkout page.
4- Edit conversion values of the purchases (for purchase tracking).
Now, we will explain each step in detail within two setup methods.
First and foremost, regardless of the conversion tracking method you choose, you must begin by creating conversions.
How to create conversions on Google Ads
If you don’t have any conversion created on your Google Ads account yet – we have you covered. Follow the quick guide below and create a new conversion in Google Ads. Creating the conversion is not enough, later on, you will need to connect it with Shopify.
Method 1: Basic Conversion Setup (without an app)
It’s the most basic Google Ads conversion setup method for Shopify merchants. We do not recommend this method because it only sends order ID, total purchase amount, and currency metrics. Further methods are better because they include more data.
However, if you prefer setting up conversions manually (by yourself), here is a guide for you:
Note: This method is also explained in Shopify’s official Google Ads guide.
Method 2: Complete Ads Conversion Setup with Analyzify
Analyzify integrates Shopify and Google Ads Conversion via Google Tag Manager (GTM). The best part is that you do not need to be an expert to set up and validate Google Ads Conversions using Analyzify. Here are the tags and events involved:
- View Item
- Add To Cart
- Purchase
- Begin Checkout
Google Tag Manager simplifies Google Ads Conversion Tracking. Analyzify’s GTM container already includes the tags; all you need to do is double-check and add your ID and label via GTM.
Primary & Secondary Conversion on Google Ads
Google has brought a concept to conversion tracking called Primary & Secondary Conversion Actions.
To put it simply, this setting allows you to separate the conversions that should take a role on Ads Optimizations from the ones that are there just for reporting purposes.
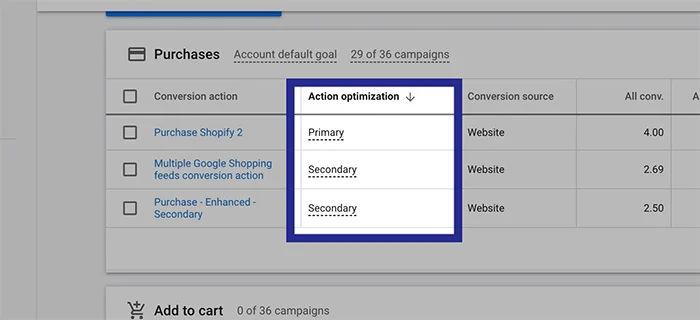
Check out our guide on primary and secondary conversions to learn more about these two conversions with best practices.