
Also known as Dynamic Retargeting, Dynamic Remarketing is an advanced form of remarketing that shows tailored ads to previous visitors to your store.
Unlike standard remarketing, dynamic remarketing creates personalized ads based on the specific products or services that a user viewed on your site.
Here’s an example of Dynamic Remarketing:
A visitor browsed a particular pair of shoes on your online store but didn’t decide to make a purchase in the first place.
You can show them ads featuring those exact shoes as they browse other websites within Google’s advertising network.
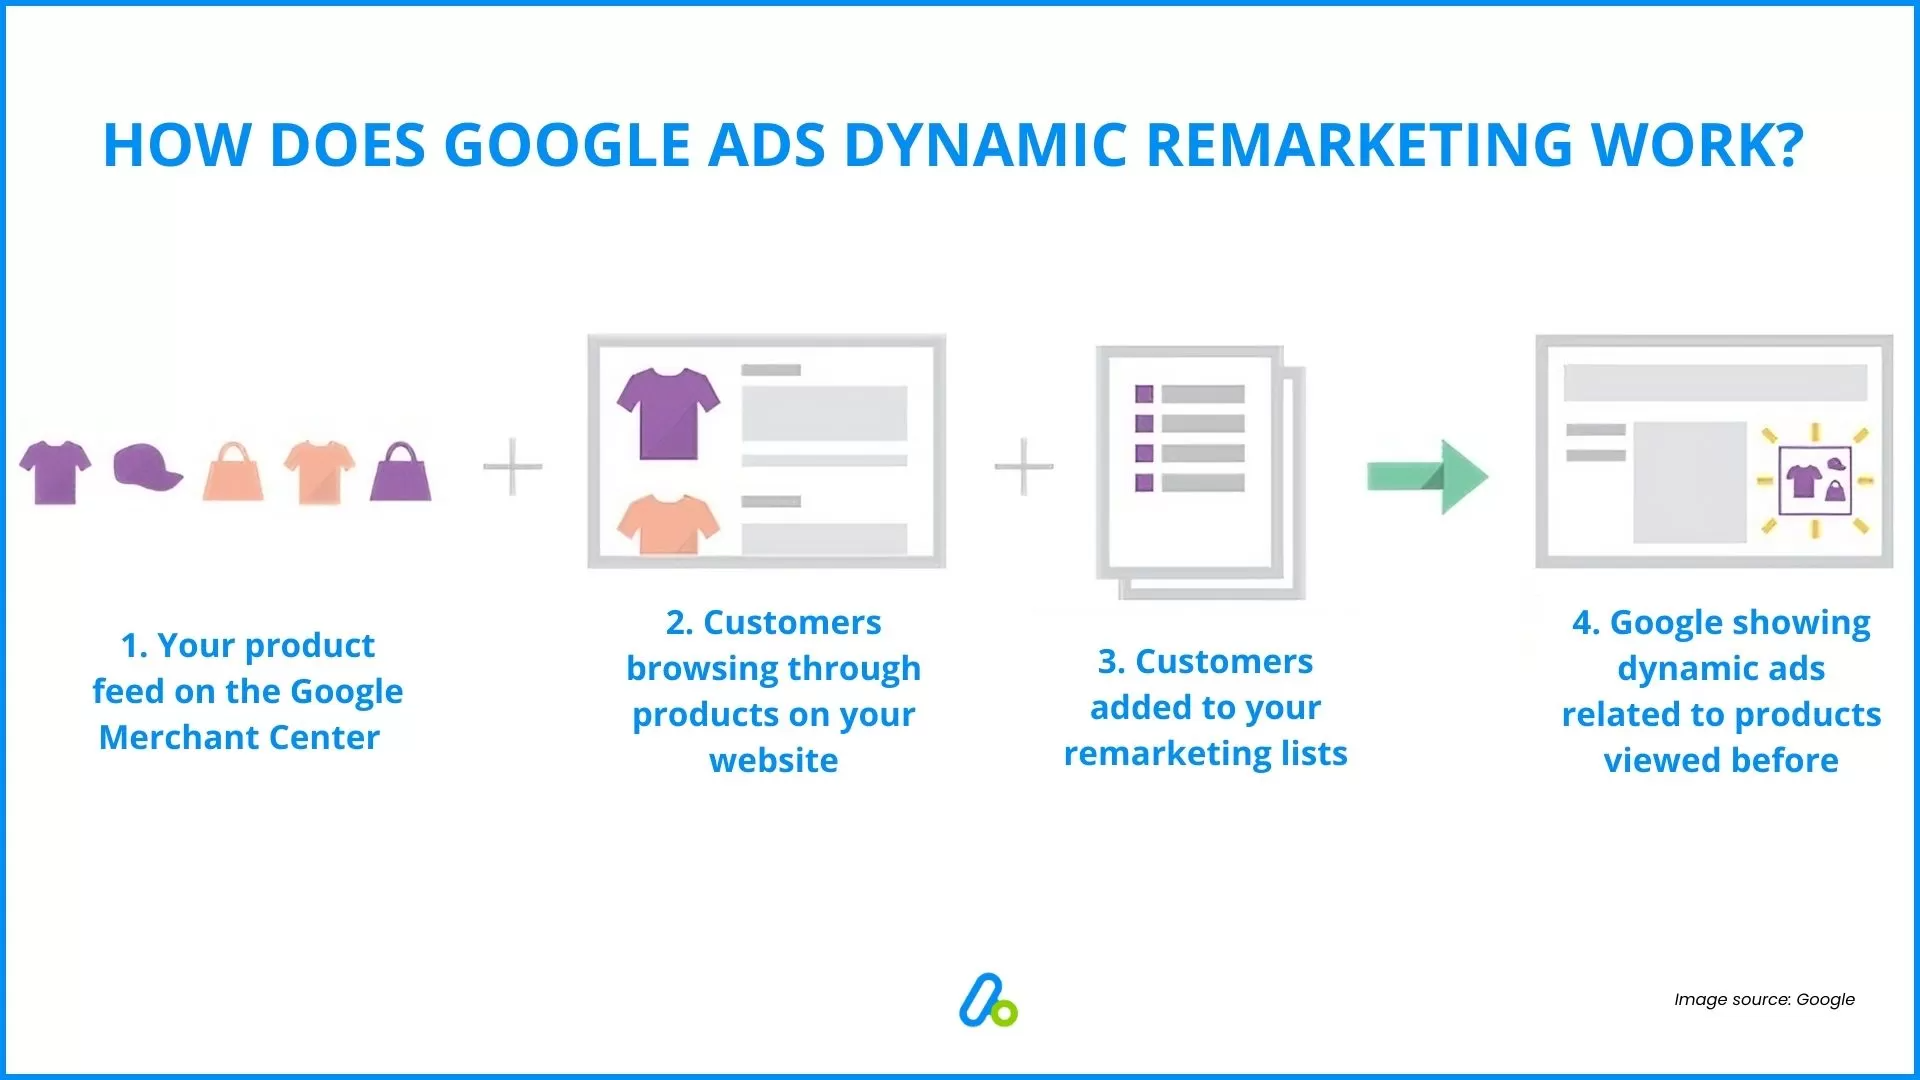
Key Steps in Setting Up Dynamic Remarketing
For a more detailed, step-by-step guide on setting up dynamic remarketing, including tips for success and cost considerations, please refer to our comprehensive blog post:Google Ads Dynamic Remarketing Guide
Here’s a quick look at the main steps involved in the process:
Setting Up Your Product Feed
Your product feed is the backbone of your Dynamic Remarketing campaigns. It provides Google with the information needed to create personalized ads. Key considerations include:
- Ensure all required attributes (ID, title, description, link, image link, and price) are included for each product.
- Use high-quality images that showcase your products effectively.
- Keep your feed up-to-date, especially for pricing and inventory information.
- Follow Google’s product data specifications to avoid feed errors.
Implementing the Remarketing Tag
The remarketing tag is a piece of code that needs to be added to your website. It tracks user behavior and allows you to create remarketing lists. Important points:
- Add the tag to all pages of your website.
- Ensure the tag is firing correctly using tools like Google Tag Assistant.
- Implement dynamic remarketing parameters to track specific product views and cart additions.
Creating Remarketing Lists (Audiences)
Remarketing lists are groups of users who have interacted with your website in specific ways.
For your Dynamic Remarketing campaigns, consider creating lists of audiences such as:
- Product viewers
- Cart abandoners
- Past purchasers
- Category browsers
You can target each audience with tailored messaging and bidding strategies.
Setting Up Your Dynamic Remarketing Campaign
Creating your Dynamic Remarketing campaign in Google Ads involves several key steps:
- Choose the “Display” campaign type.
- Select “Standard display campaign” as the campaign subtype.
- Set your campaign goals, budget, and bidding strategy.
- Define your audience using the remarketing lists you’ve created.
- Create ad groups based on product categories or user behaviors.
- Configure Dynamic Ads settings:
- Enable the “Use dynamic ads feed for personalized ads” option.
- Select the appropriate data feed (e.g., “Bad.no | ID: 140912464” as shown in the image).
- Choose a product filter option:
- “No filters: Advertise all products in the country of sale” (recommended)
- Or “Filter: Advertise only products that match all your requirements”
This setup ensures your dynamic remarketing campaign uses personalized ads based on your product feed, allowing for more targeted and relevant advertising to users who have previously interacted with your website or products.
Remember to review other important settings such as ad rotation, start and end dates, devices, frequency management, and campaign URL options to optimize your campaign performance.

Creating Your Ads
Dynamic Remarketing ads are created using responsive ad formats. You’ll need to provide:
- Headlines and descriptions
- Your logo
- A marketing image (optional, but recommended)
Google will automatically generate ads using this content along with product information from your feed.
Setting Up Conversion Tracking
To measure the success of your campaigns, proper conversion tracking is essential:
- Define what actions count as conversions (e.g., purchases, sign-ups).
- Implement conversion tracking tags on your website.
- Set up enhanced conversions for more accurate measurement.
Launching and Monitoring Your Campaign
Once everything is set up:
- Review all settings before launching.
- Start with a conservative budget and gradually increase based on performance.
- Regularly monitor key metrics like click-through rate (CTR), conversion rate, and return on ad spend (ROAS).
Taking the Next Step
While this overview provides a solid foundation for understanding the setup process for Dynamic Remarketing campaigns, the actual implementation can be complex and nuanced.
Each step requires careful consideration and may need to be tailored to your specific ecommerce business needs.
For Dynamic Remarketing campaigns, including detailed instructions, screenshots, and advanced tips,
Check out our in-depth guide to get started with Dynamic Remarketing in Google Ads and get step-by-step instructions and advanced tips.
By following the overview provided here and the detailed instructions in our blog post, you’ll be well-equipped to harness the power of Dynamic Remarketing for your ecommerce business.