It’s surprising to see the number of Shopify merchants using UTM parameters wrongly - or not even using them.
Unfortunately, that’s the case even with Facebook Ads or marketing professionals.
We prepared a practical tutorial on ideal UTM setup on Facebook Ads, covering:
- How to Build UTM parameters
- Which UTM parameters are required
- UTM parameters on Facebook ads
- The best UTM structure for Facebook ads
and more to help you set everything up correctly.
Follow along and make sure to apply it to every Ads campaign.
Important: you should have proper UTM settings even if you use Facebook Conversion API on Shopify.
Facebook Conversion API will only get the data into your Facebook Pixel, but you still want to use your marketing campaigns’ performance on Google Analytics.
How to Build and Use UTM Parameters
Let’s start with common mistakes:
- Do not use UTM parameters for internal links on your website. UTM is only to be used with external links.
- Do not type your UTM parameters manually on Facebook. We will provide you with a dynamic script below. You will insert the same code into each ad - and the dynamic values will be automatically inserted.
You don’t need to worry about Facebook Ads.
However, if you want to create UTM parameters for other placements, you can always use Google’s UTM Builder.
You will type your landing page URL and the UTM details, and the new URL with the UTM parameters will be automatically generated.
Important: UTM parameters are automatically sent to GA4. But if you want to populate dimensions like Utm Manual Content or Utm Manual Term, and to ensure Shopify accurately attributes conversion data—such as displaying paid ad campaign names in the “Sales Attributed to Marketing” report— You may want to manually add UTM parameters to all Google Ads campaigns and other paid channels.
Which UTM parameters are required?
There are five UTM parameters, and three of them are required.
- utm_source (required): the source of your traffic such as search engine, newsletter, Facebook
- utm_medium (required): the medium the link such as paid, organic, social, PPC
- utm_campaign (required): the name of the campaign such as “Summer Sale” - “Remarketing” - “Early Adaptors”
- utm_term: used to print the Ad Group ID on Facebook Ads for Shopify stores
- utm_content: used to print the Ad Group Name on Facebook Ads for Shopify stores.
Setting Up Ideal UTM Parameters on Facebook Ads
Most Shopify stores rely on Facebook and Instagram as marketing channels.
More often than not, we see the wrong use of UTM parameters. Make sure to follow the steps below for each Facebook Ad Campaign/Ad you are running.
Before you move on, here is a Complete Guide to Shopify- Facebook Pixel Integration:
In that guide you can find all about Shopify & Facebook Pixel Integrations, setup methods, trips & tricks, Facebook Conversion API, product feed and more.
Where to place UTM Parameters on Facebook Business Manager?
The most common mistake is that advertisers tend to place the UTM parameters in the Website URL section.
DO NOT use UTM parameters in the URL field:
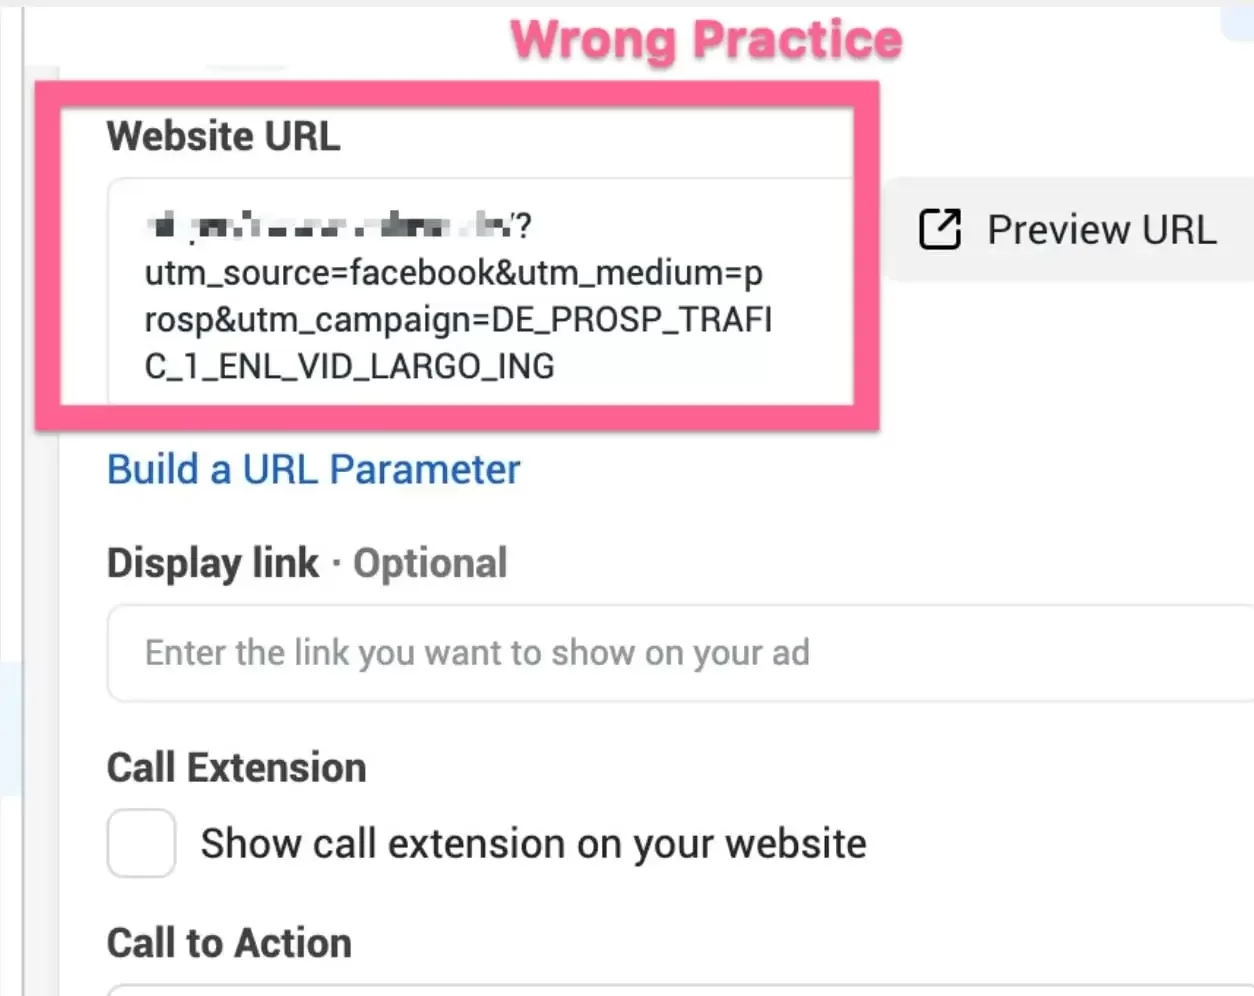
The URL field should only include the landing page URL.
The parameters should be excluded from here.
If it’s a shopping ad, you don’t have to do anything here as the URL will be retrieved from the catalog.
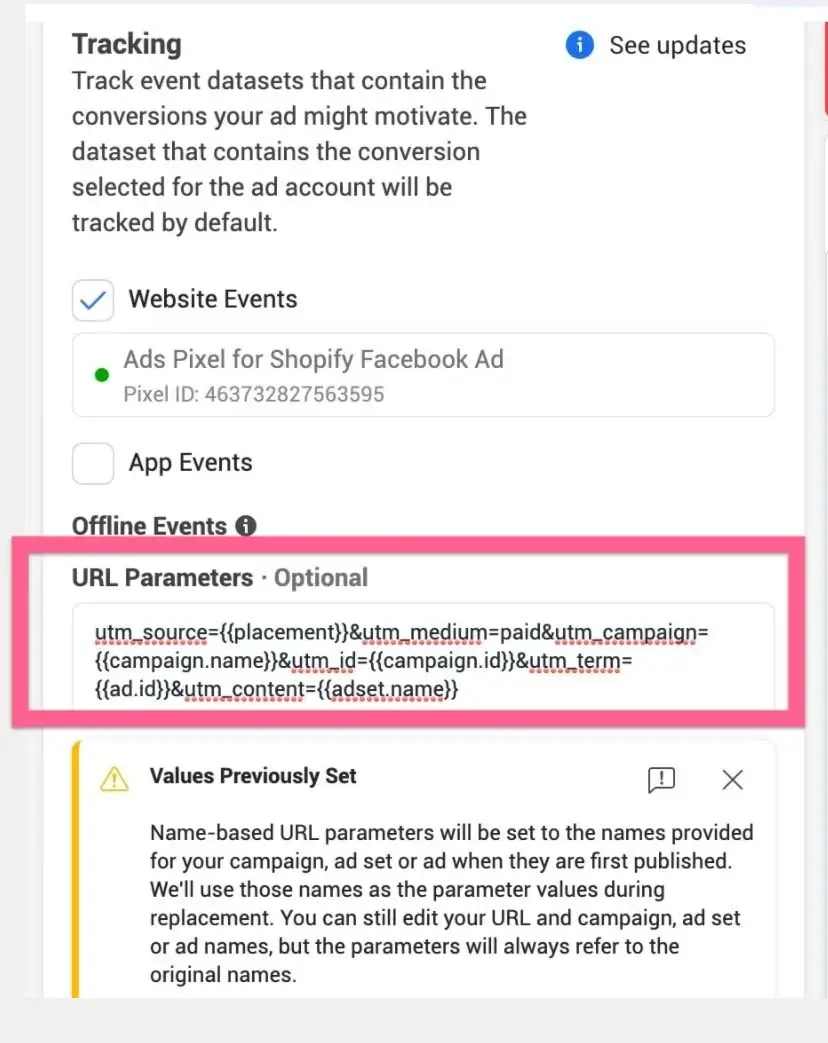
Scroll down to the “Tracking” section and there is a specific section for UTM parameters called: URL Parameters.
The Best UTM Format for Facebook Ads
Facebook allows you to add dynamic fields to the UTMs.
That means you don’t have to type the campaign and/or ad set names for each. So the ideal format we propose includes the dynamic parameters.
Here you go:
Ideal UTM Structure for Facebook Ads
So when you paste this code into your Ads, the values will be dynamically changed for each ad set and campaign so you do not need to worry about creating different UTMs for each ad set.
Let’s break it down:
- Placement (such as Facebook_Desktop_Feed, Instagram_Stories) as a campaign source,
- “Paid” as a medium for Analytics to recognize it as a paid campaign,
- Campaign name for the campaign field,
- Campaign ID for the ID field,
- AD ID for the Term field,
- AdSet Name for the Content field
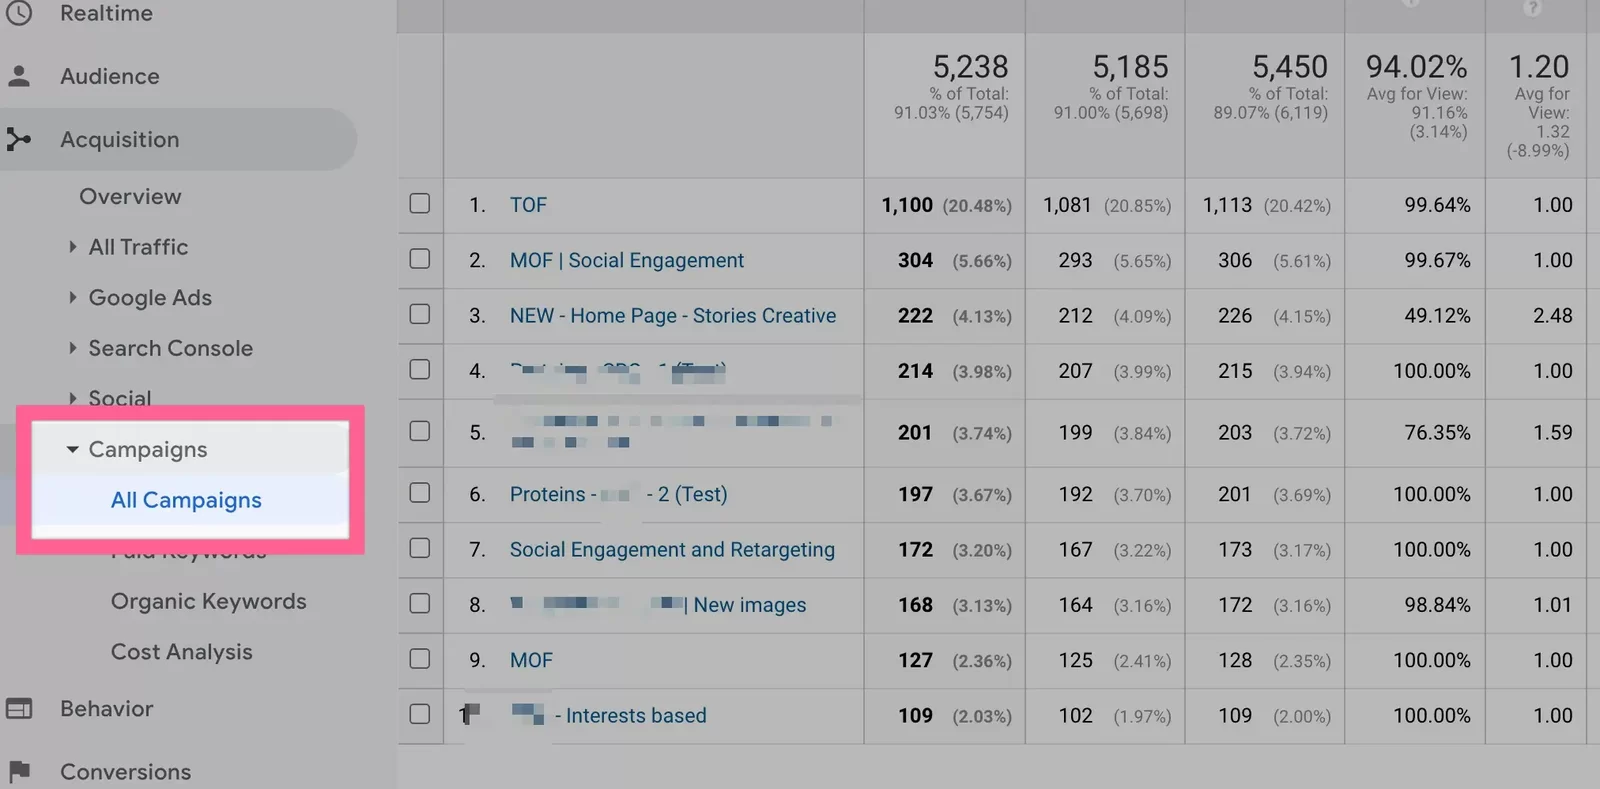
Please make sure to include this in ALL OF YOUR ADS. You should expect your Google Analytics > Campaigns report to look like this:
What are UTM Parameters?
UTM (Urchin Tracking Module) codes are added at the end of the URL to define where this specific traffic comes from.
For example, we would like users to visit our homepage (or any other landing page) when running ads for our store. And most probably we are running more than one ad. This is where the UTM parameters come into play.
If I use the same URL for both campaigns, I will not be able to differentiate the performance of these 2 campaigns on Google Analytics.
URL Without UTM:
Campaign 1: https://analyzify.com/
Campaign 2: https://analyzify.com/
URL With UTM:
Campaign 1: https://analyzify.com?utm_source=facebook&utm_medium=AdName1&utm_campaign=Campaign1
Campaign 2: https://analyzify.com?utm_source=facebook&utm_medium=AdName1&utm_campaign=Campaign2
This way, Google Analytics will be able to recognize the campaign name, the traffic source, ad name, and even more parameters if we provide.
Bonus: UTM Format for Pinterest Ads
We know you love Pinterest Ads as well! Facebook and Pinterest use different dynamic parameters. We have also prepared a UTM code block that will work on Pinterest Ads.
Here you go: Ideal UTM Structure for Pinterest Ads
![]()
FAQ: Ideal UTM Setup on Facebook Ads
Here are the most common questions about UTM setup for Facebook ads:
Why do I need UTM parameters for Facebook ads?
UTM (Urchin Tracking Module) parameters are tracking codes added to URLs to help you identify where your traffic comes from.
For Shopify stores running multiple Facebook ad campaigns, UTMs are essential because they allow you to:
- Differentiate between different campaign performances in Google Analytics
- Track the effectiveness of various ad placements
- Measure ROI across different marketing initiatives
What are the required UTM parameters for Facebook Ads?
There are three required UTM parameters:
-
- utm_source: Identifies the traffic source (e.g., Facebook)
- utm_medium: Specifies the marketing medium (e.g., paid)
- utm_campaign: Names the specific marketing campaign
Two optional parameters are:
- utm_term: Used for Ad Group ID
- utm_content: Used for Ad Group Name
What are the most common UTM setup mistakes to avoid?
-
- Adding UTM parameters in the Website URL field instead of the URL Parameters section
- Using UTM parameters for internal website links
- Manually typing UTM parameters for each ad
What’s the right UTM structure for Facebook Ads?
Your UTM structure should include:
- Placement (e.g., Facebook_Desktop_Feed, Instagram_Stories) as the campaign source
- “Paid” as the medium
- Campaign name for the campaign field
- Campaign ID for the ID field
- Ad ID for the Term field
- AdSet Name for the Content field
Where should I add UTM parameters in Facebook Business Manager?
UTM parameters should be added in the “URL Parameters” section under “Tracking” - NOT in the Website URL field. The Website URL field should only contain your landing page URL without any parameters.
How do I test if my UTMs are working correctly?
- Launch a test campaign with UTM parameters
- Visit your website through the ad link
- Check Google Analytics real-time reports to verify tracking
- Confirm that campaign data appears correctly in your Analytics reports
Conclusion: UTM Setup for Facebook Ads
Facebook provides campaign & ad level conversion reports and results.
However, it is always great to keep an eye on Google Analytics reports as well.
You will see different results as they use different attribution models. It can be quite insightful.
Thanks for reading our tutorial. Make sure to subscribe to Analyzify Hub, where we share tutorials and best practices!