The Google Tag (gtag.js) is a single tag that can act as a bridge between your website and the Google products & services.
For example, you can use Google Tag to send data to Google Analytics 4, where you can see detailed reports on your website traffic and behavior.
It also helps you send data to Google Ads, where you can create and manage your advertising campaigns.
Here, you will learn about every nook and cranny of Google Tag (gtag.js), plus how you can set it up.
Key Takeaways:
- Before gtag, you needed to use a specific tracking code for every Google product.
- Google Tag Manager and Google Tag are different terms.
- You can configure your Google products much more easily by utilizing the Google Tag (global site tag).
Let’s get started with the essentials.
What Is the Google Tag (Gtag.Js)?
The Google Tag is a messenger for sending your website data to connected ‘destinations’ like Google Ads or Analytics.
As privacy concerns force cookie technologies to evolve, it’s important to have a site-wide tag setup for accurate data flow.
It doesn’t sound like the most significant revelation yet, but here’s the shiniest part of the Google Tag:
Combining multiple Google Tags into one and/or adding multiple destinations to a single Google Tag.
Implementing the tag? That’s the easiest part.
What Are The Benefits Of Using Google Tag?
There are countless benefits of using Google Tag. For example:
- It makes companies less dependent on coding changes.
- It combines tags. When combined, the two tags share critical features like event detection configuration, cross-domain measurement lists, destinations, and tag coverage. If you combine G-111111 and AW-222222, they will be interchangeable, and assuming both tags’ previous coverage, it’ll reach 100%.
- It simplifies the process of configuring all your Google products, making integration and implementation easier.
- It sends user-provided data to Google, which is similar to Enhanced Conversions.
Some examples of the data that the global site tag can track:
- The number of visitors to the website
- The source of the traffic (e.g., search engine, referral website, or direct traffic)
- The pages on the website that the visitors viewed
- The amount of time that the visitors spent on the website
- The actions that the visitors took on the website (e.g., clicking on a button, filling out a form, etc.)
- The devices and browsers that the visitors use to access the website
- The geographical location of the visitors
Tag Manager And The Google Tag (Gtag.Js)
Here’s the basic definition from Google:
“Tag Manager is a tag management system that allows you to quickly and easily update tags on your website or mobile app from a web interface. gtag.js is the JavaScript framework that is used to add Google tags directly to web pages.”
Now, let’s deep dive into it and learn more about these two.
What Are The Differences Between Tag Manager And Google Tag?
How do you pick the right one? Take a look at the list below and identify your needs.
With GTM, you can;
- Deploy and modify both Google and 3rd party tags
- Deploy and modify tags for both web and mobile apps
- Deploy and change tags on the fly from a web interface
If you can’t use GTM or prefer to have the functions below, choosing Google Tag can help you:
- Install tags directly on your web page without the hassle of a tag management system.
- To work with your tags directly in JavaScript without being required to work with a separate interface.
- If you have a working GTM setup, you don’t need to add Google Tag to your toolset. GTM is a good enough solution where Google Ads and Analytics are supported.
How To Add A Google Tag To Your Website?
Adding a Google Tag to your website is as easy as pie.
You just copy the code snippet generated for you and paste it after thetag on every page of your website.
Follow the steps below to find your code snippet and start sending data to Google Analytics 4:
How To Set Up Conversion Tracking Using The Google Tag?
Tracking conversions to see the effectiveness of different ad campaigns is essential for any business. User actions on your website, like purchases, form submissions, or sign-ups, provide valuable insights.
You’ll need to complete 2 main steps to set up conversion tracking using Google Tag successfully.
Creating a conversion action.
Setting up the Google Tag.
How to create a conversion action:
How to set up the Google Tag:
The Google tag adds website visitors to your “All visitors” data segments and sets cookies in your domain. It’ll allow you to store information about the ad clicks that brought users to your site.
When using Google tag, make sure to comply with GDPR and related regulations and ensure users consent to the tracking.
Choose your preferred installation method:
Using Google Tag Manager
Set up Google Tag options:
- Use the Google tag found on your website (Recommended)
- Use a Google tag you already have
- Install a Google tag
One more step to go: Checking your conversion tag.
How To Check Your Conversion Tracking Tag?
Follow the instructions below to check your conversion tracking tag:
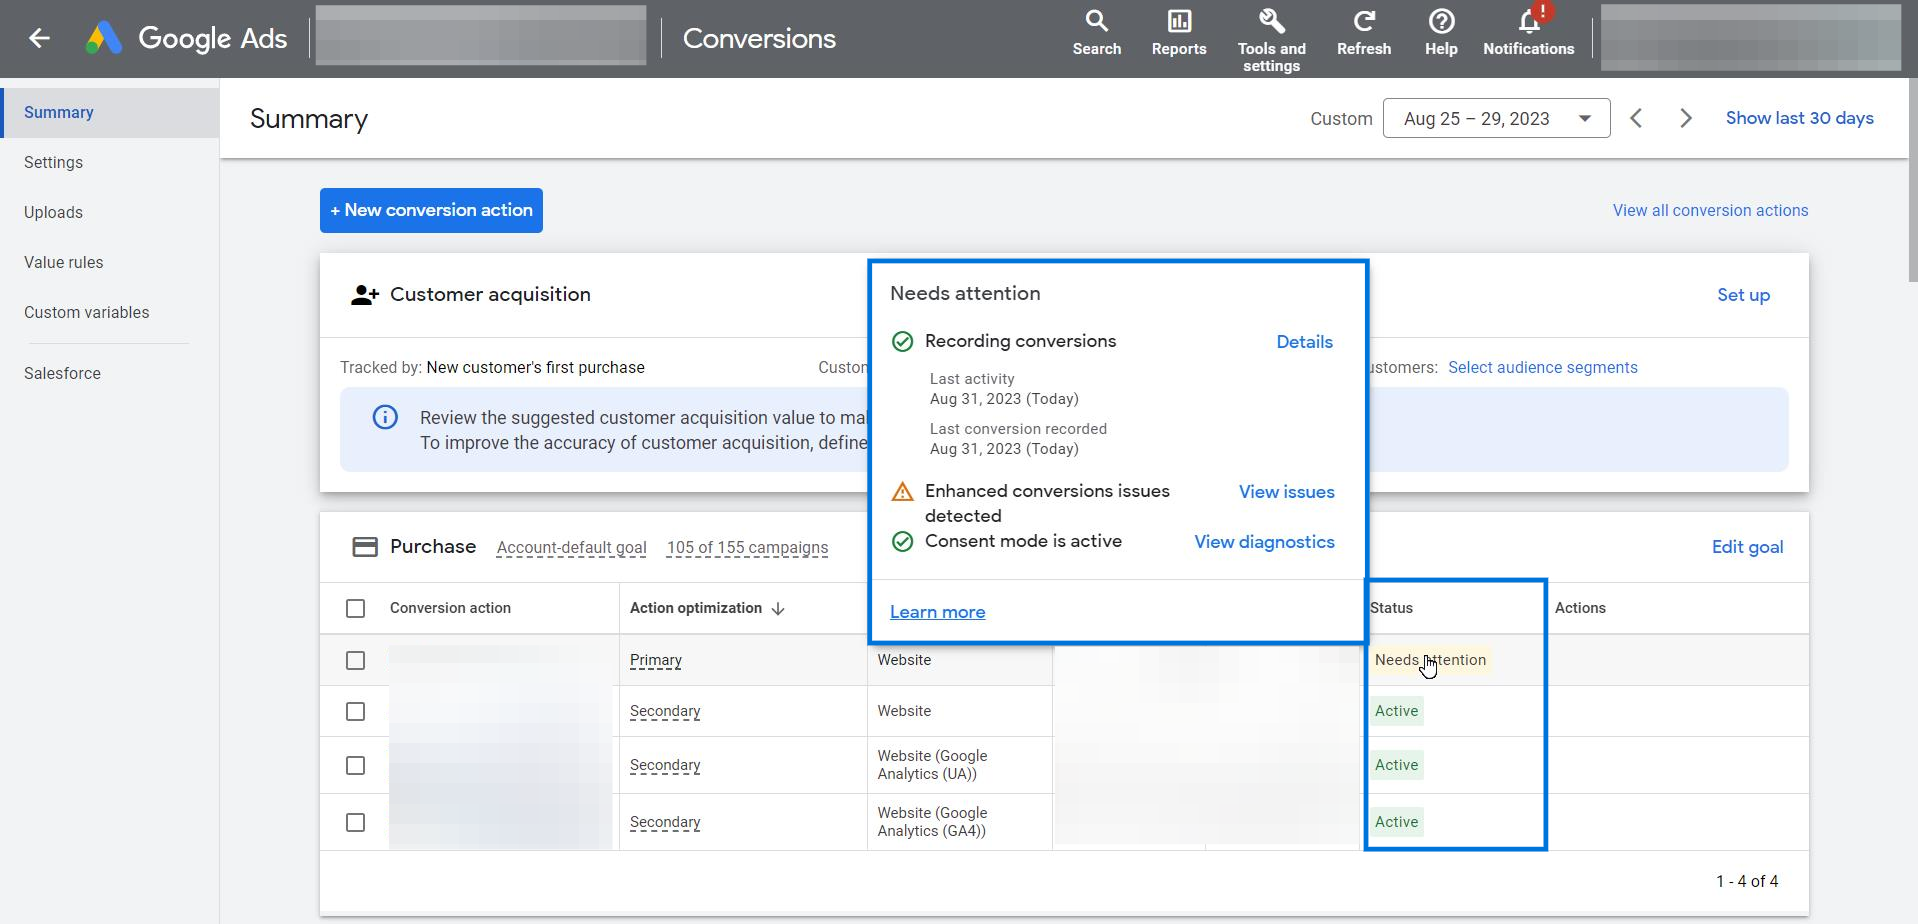
Go to your Google Ads account and find the “Tools” icon.
Click “Conversions” under “Measurement.”
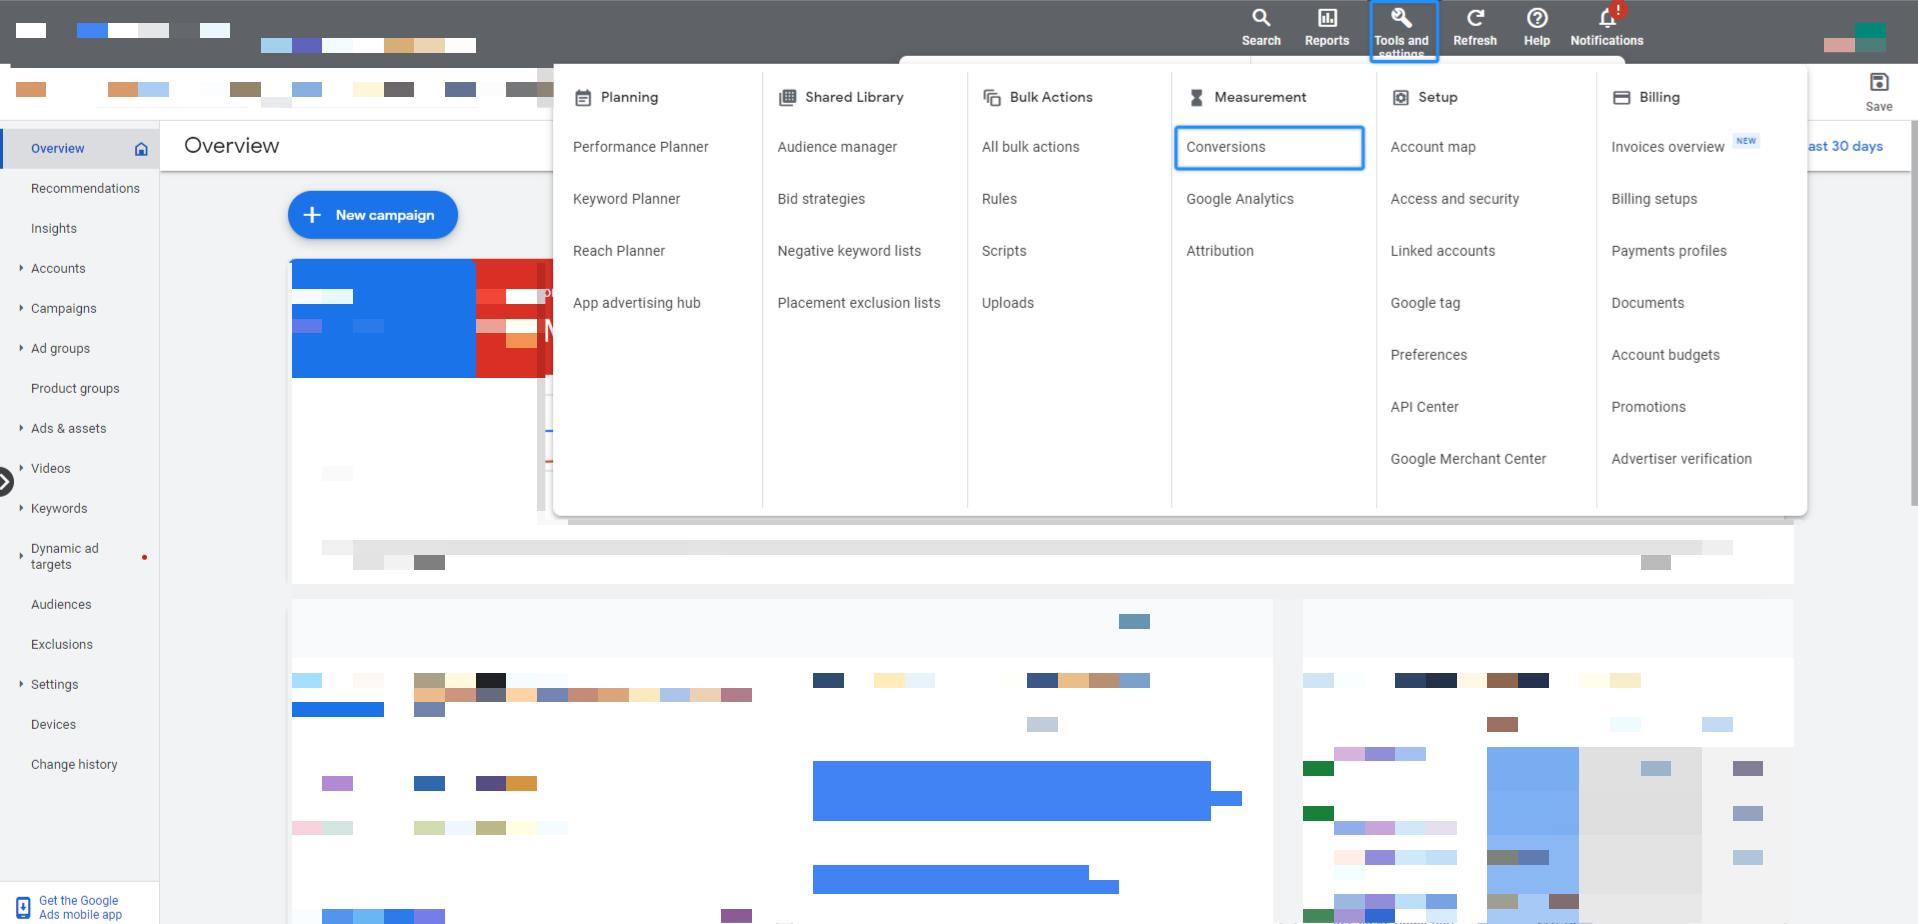
- Locate the conversion you want to check in the conversion action table. See its status in the “Status” column.
If you encounter any issues, download and use Google Tag Assistant. For Google Tag Manager, follow the Troubleshoot issues document.
How To Add Global Site Tag To WordPress?
While there are many handy plug-ins for the job, it’s possible to add a gtag to Wordpress without using one.
First, follow the instructions below:
Then, go to your Wordpress Admin,
Click on “Appearance” and “Editor.” Find the “Theme Header (header.php).” And open the file with “Editor.”
Paste the code block above the “head” in the header.php file
Click on “Update File” to save the changes.
How To Set Up Your Google Tag?
Here, you can discover how to set up your Google tag from Google Ads instructions.
Before you get on with the first step, make sure to set up conversion tracking for your website.
You’ll be forwarded to the Google Tag Setup page and presented with these options:
-
- Use the Google tag found on your website (Recommended)
- Use a Google tag you already have
- Install a Google tag
Use the Google tag found on your website (Recommended)
You can use a tag without any code changes if a tag is detected on your website. Click “Details” and view the tag information. If it looks okay, click “Finish.”
Install a Google tag
To manually install a Google Tag, refer to the “How To Add A Google Tag To Your Website?” section of this article. Other options will be covered below as well.
After completing the installation, you’ll need to configure your Google tag settings. Pick the relevant settings for your business.
Set up your Google tag from Google Analytics 4(GA4) instructions just as mentioned above earlier:
- In your account, go to “Admin” and find the “Property” column. Pick the data stream you want to set up your Google tag.
- Click “Data streams” and pick the data stream that you want to edit.
- Choose “View tag instructions”
- Pick one of the two options: “Install with a website builder” or “Install manually.”
- It’ll take about 30 minutes for the data to flow. Check the Real-time reports to confirm.
How To Manage Your Google Tag (Global Site Tag)?
You have successfully completed the setup and configured your Google Tag settings. After that, you’ll only need to manage your Google Tag. Let’s cover the options you have.
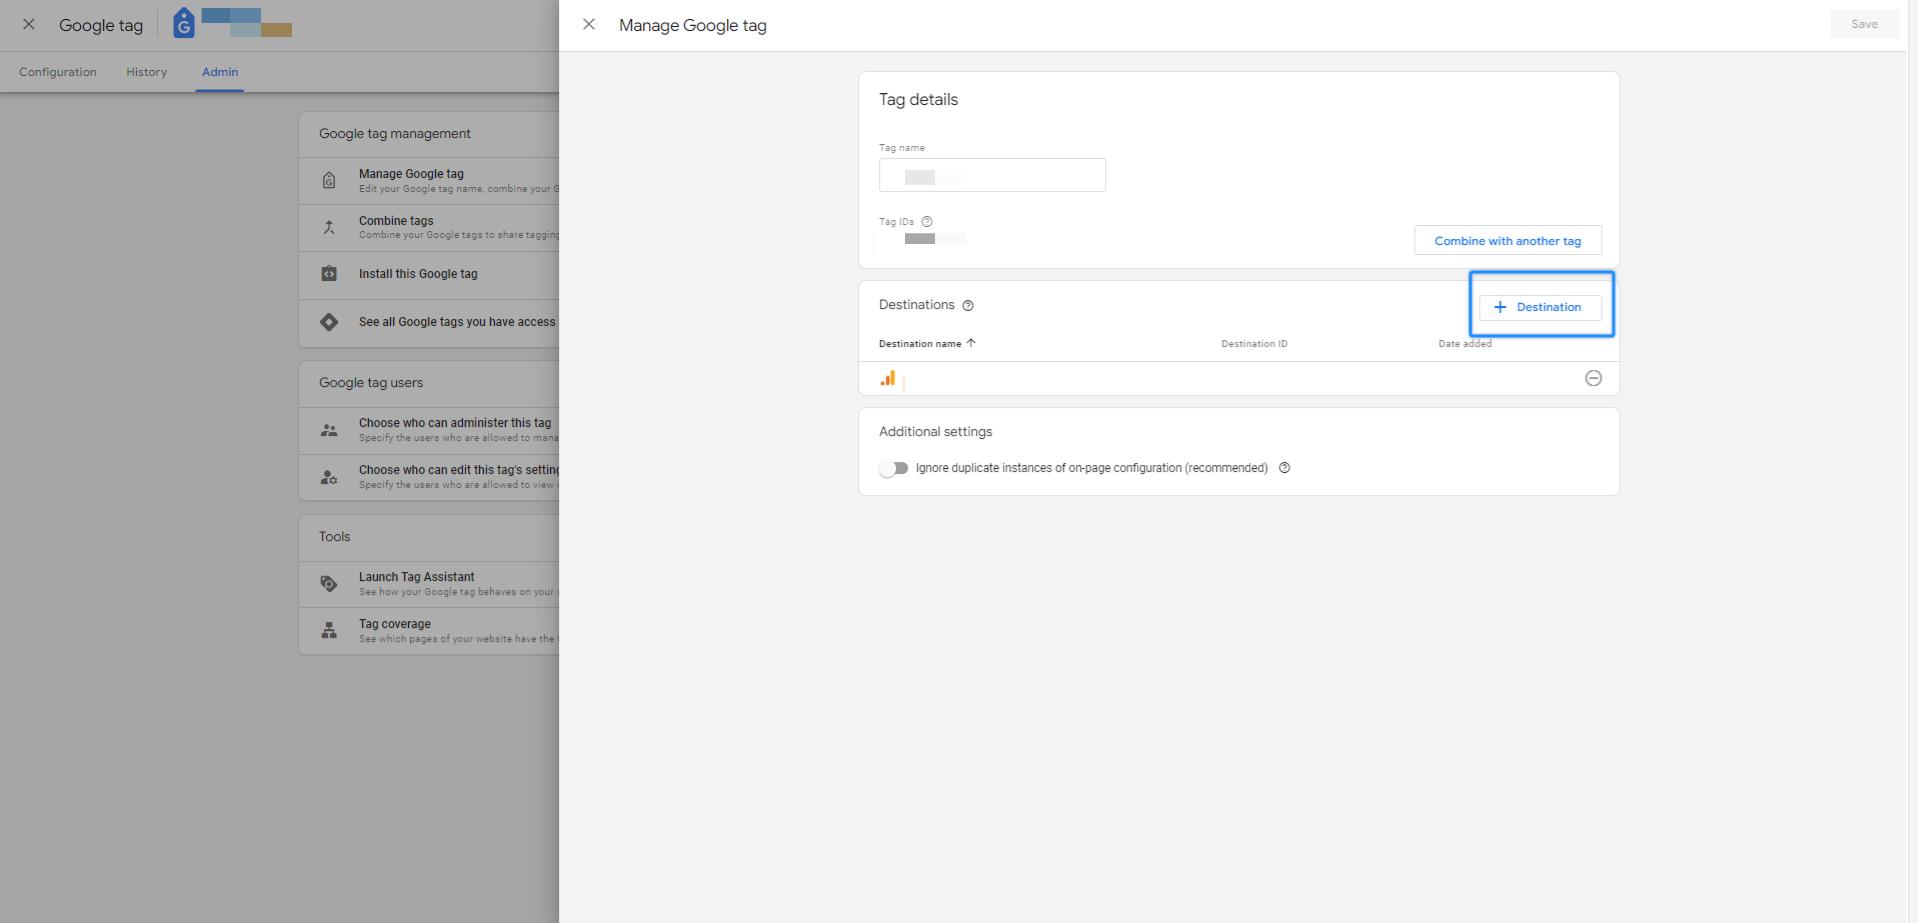
Manage your Google tag
- Edit your Google tag name
- Add/remove destinations
- Combine your Google tags. Combining tags allow you to:
- Share configurations
- Expand website coverage
- Share Google tag users
- Edit your Google tag name. Name your tag, and click “Save changes.”
- Combine your Google tags. Click “Combine with another tag.” We’ll cover it in detail below.
- Add/Remove destinations.
Click “+Destination.” Follow the instructions below for adding new destinations.
Combine Google Tags or Assign Tag IDs to a New Google Tag
Combine tags
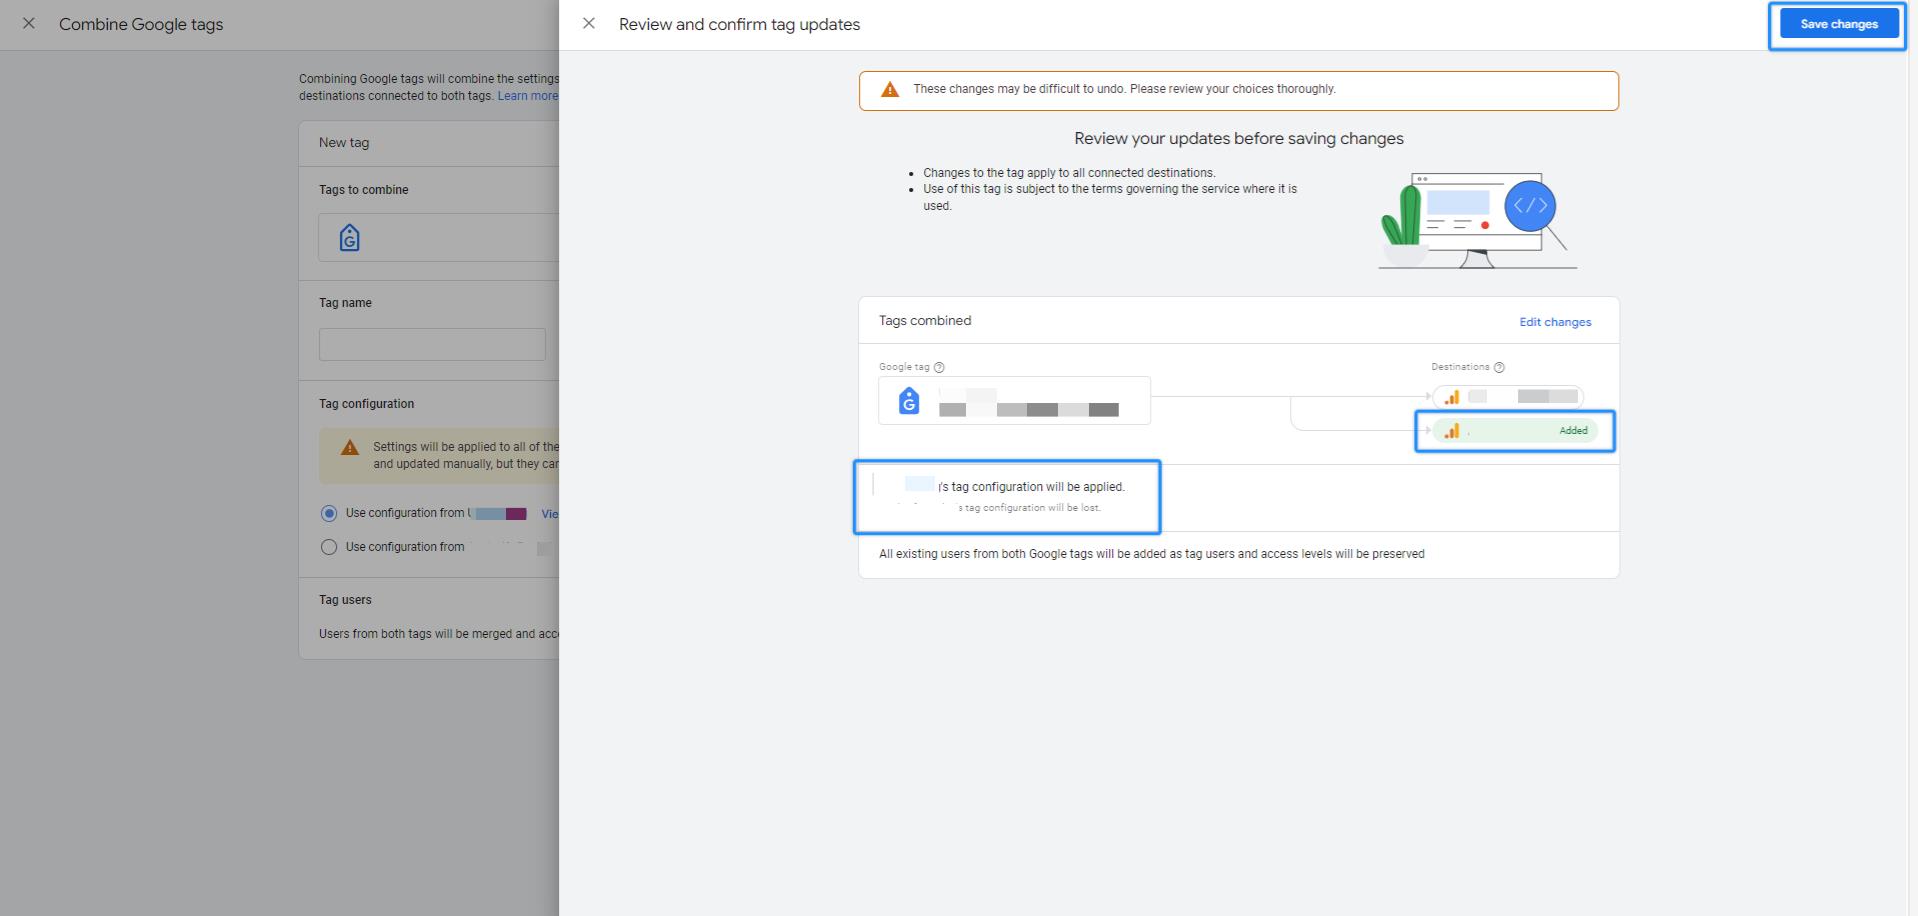
Once you combine a tag, you can’t undo that.
You can assign a tag ID to a new Google tag covered below. It means creating a new tag using one of the tag ID(s) from the existing tag.
You can choose to have the same configurations for the new tag.
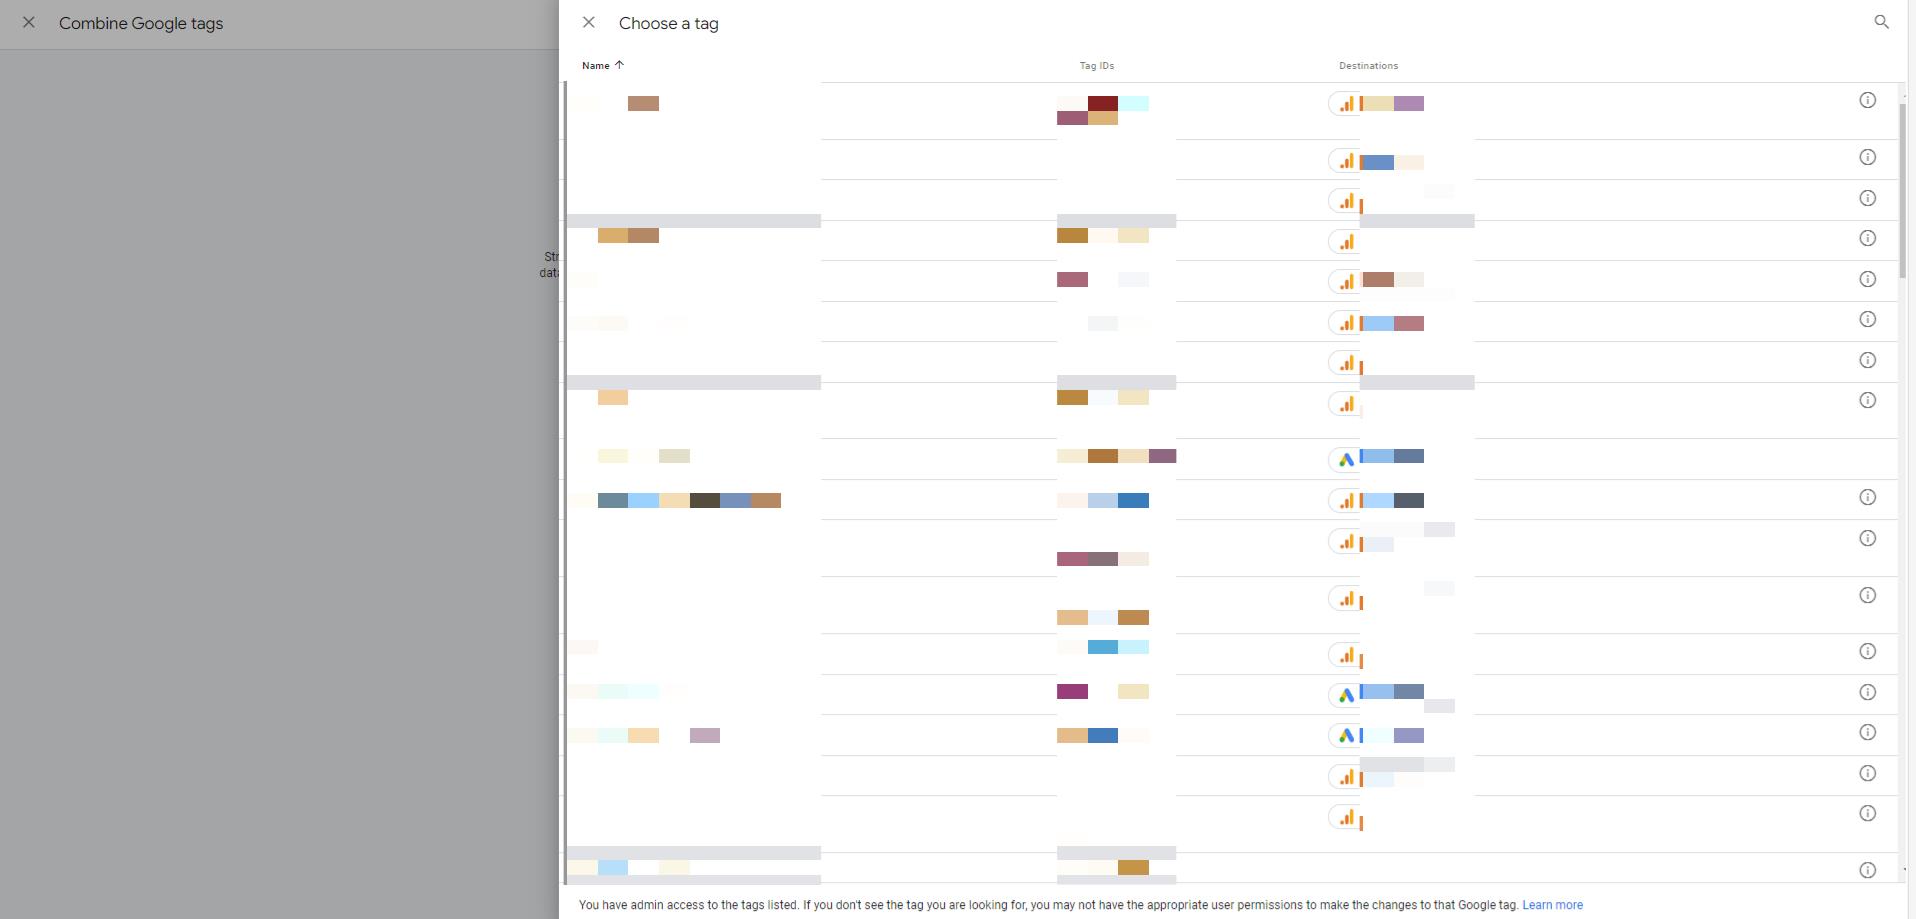
Step 1: Access your Google tag screen. In the “Admin” tab, locate Google tag settings and click “Combine tags.”
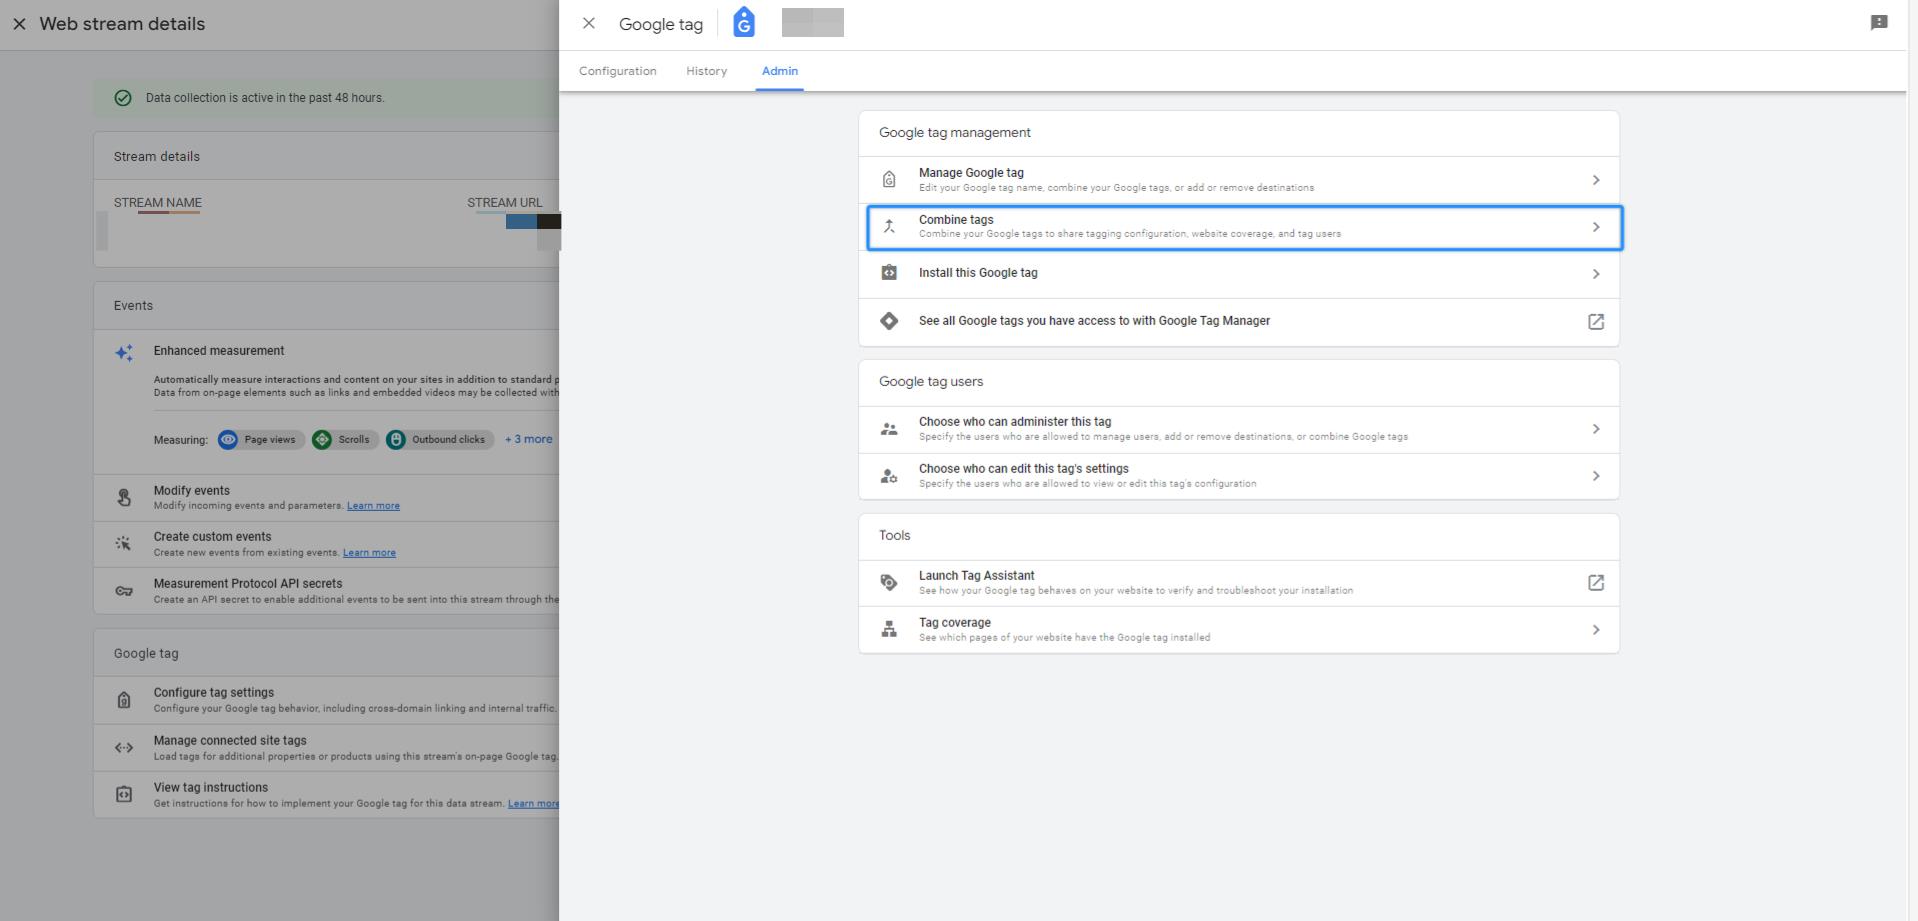
Step 2: Click “Choose a Google tag to combine.” This page will list all the Google tags to which you have access. Name the tag you chose.
Step 3: Under “Tag configuration,” select your desired configuration.
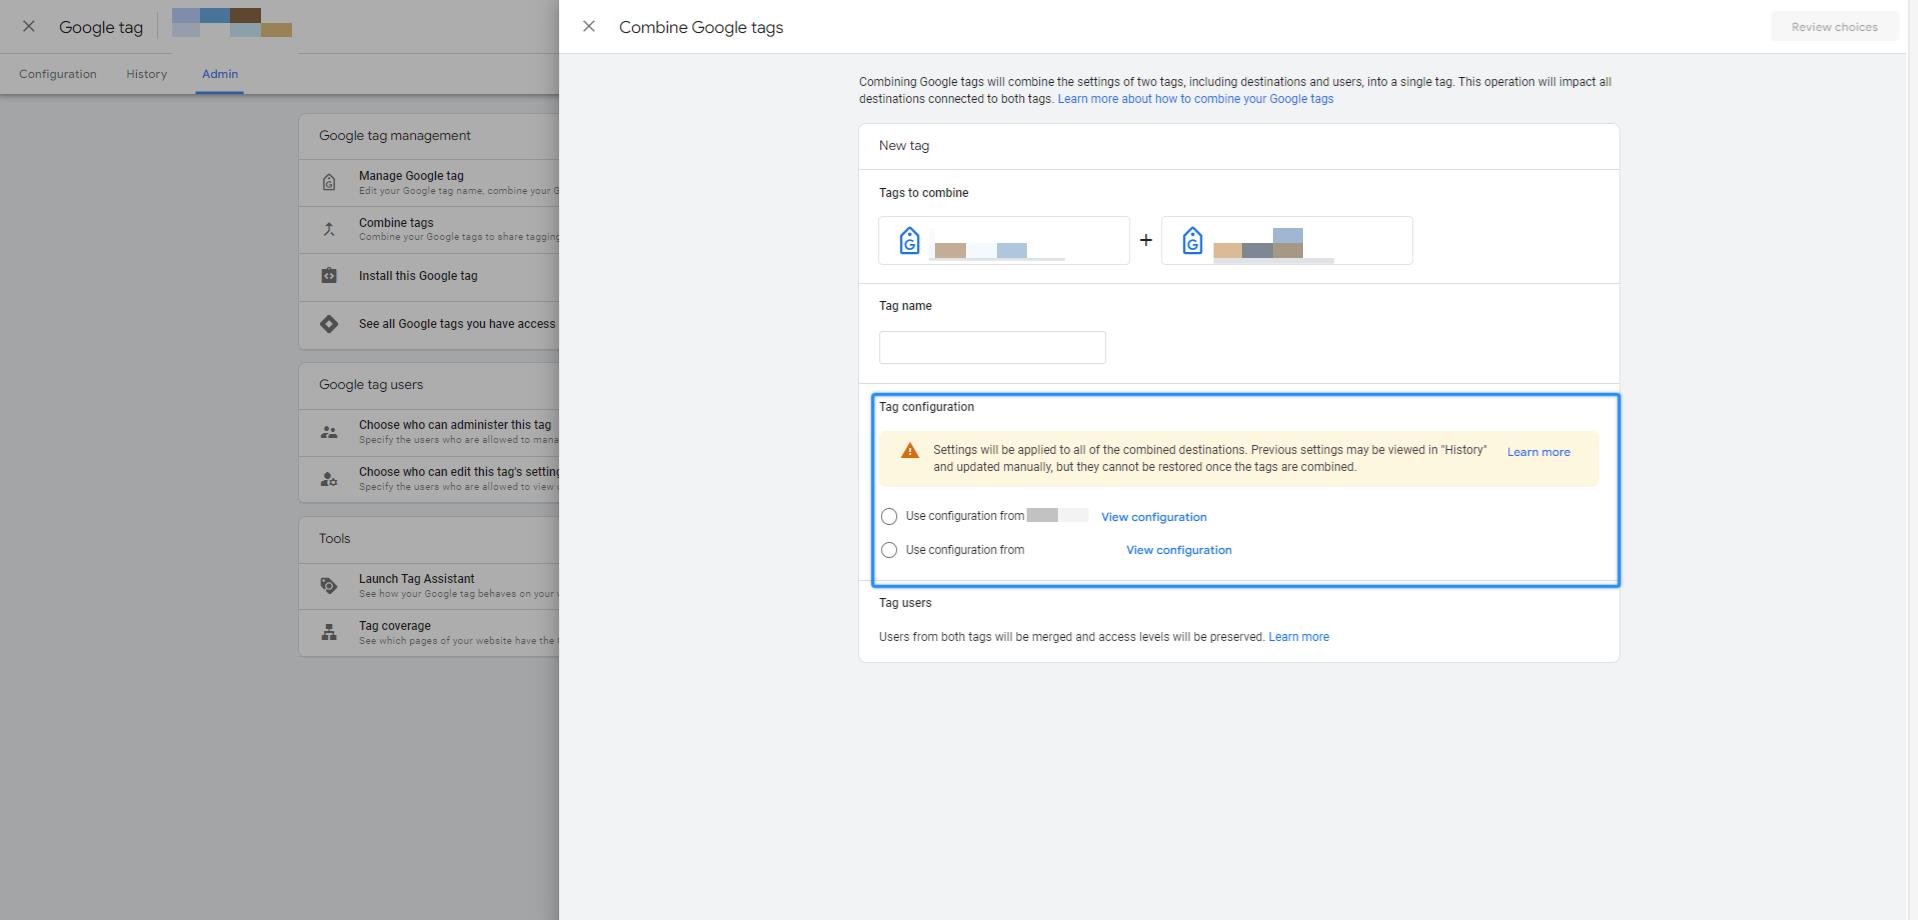
Step 4: Click “Review choices,” and if it’s all good, save the changes.
Assign tag IDs to a new Google tag
Assigning tag IDs means creating a new tag using one of the tag ID(s) from the existing tag. You can choose to have the same configurations for the new tag.
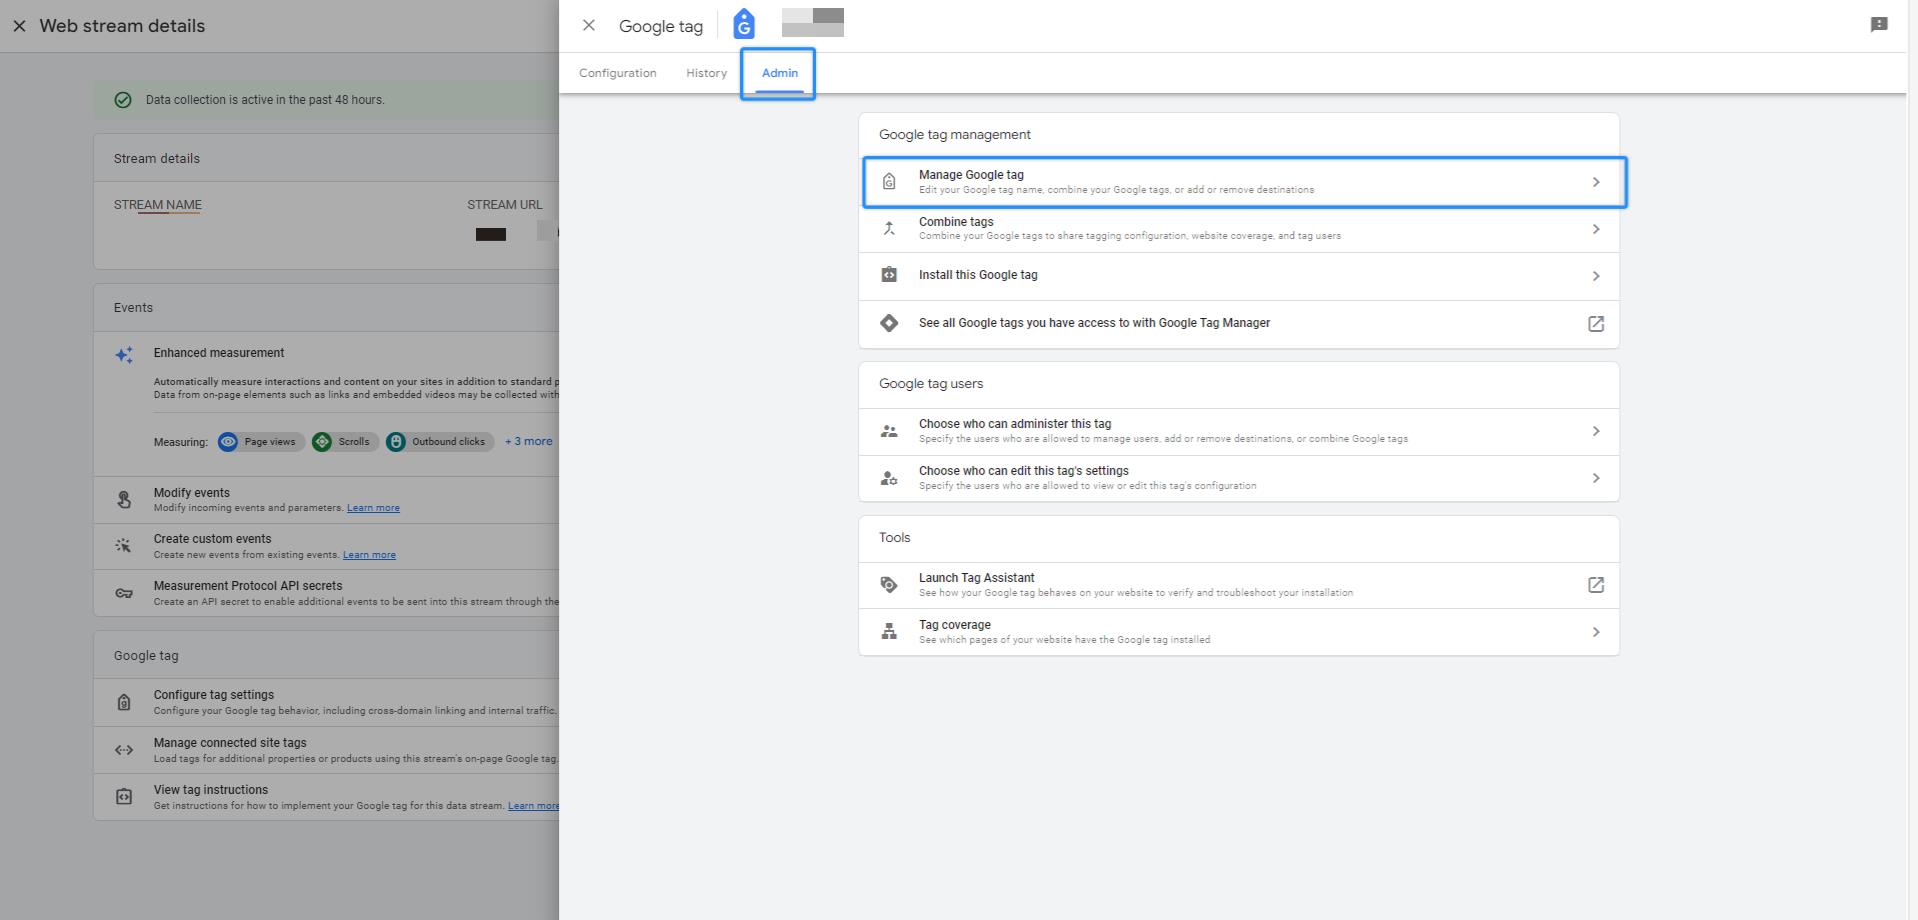
Go to your your Google tag screen. In the “Admin” tab, find “Google tag settings” and click “Manage Google tag.”
Choose the tag ID you want to move to a new tag and click the split icon. Name the new tag.
The next step is “Tag configuration,” where you have 2 options. “Copy the configuration from this tag” or “Use the default tag configuration” Pick the one that fits your needs.
The same logic applies to “Tag users.” Choose “Copy users from this tag,” or “Only I have access to this tag.”
Review the changes you made, and click “Save.”
How to Add a Destination to a Google Tag
First, let’s hear what a destination is, as per Google:
“A destination is a Google measurement product account that shares configuration with and receives data from a Google tag. You can add destinations to your Google tag to reuse your Google tag’s configuration and footprint on your site. Currently, only Google Ads and Google Analytics accounts can be destinations.”
A Google Tag must always have a destination to send accurate data flow. You can add destinations to avoid additional retagging on your site and reuse your existing tag’s configuration.
If you add a destination, you actively remove the destination from another Google Tag that has it.
It’s useful to add destinations when sending data to another product account without combining Google tags.
For instance, let’s say you’re working with an agency that uses its tag to send data to your account. You can add the destination to your Google tag instead.
Here’s how you do it:
Step 1: In your Google tag screen, go to the “Admin” tab.
Step 2: Find the “Google tag management” section, and click “Manage Google tag.”
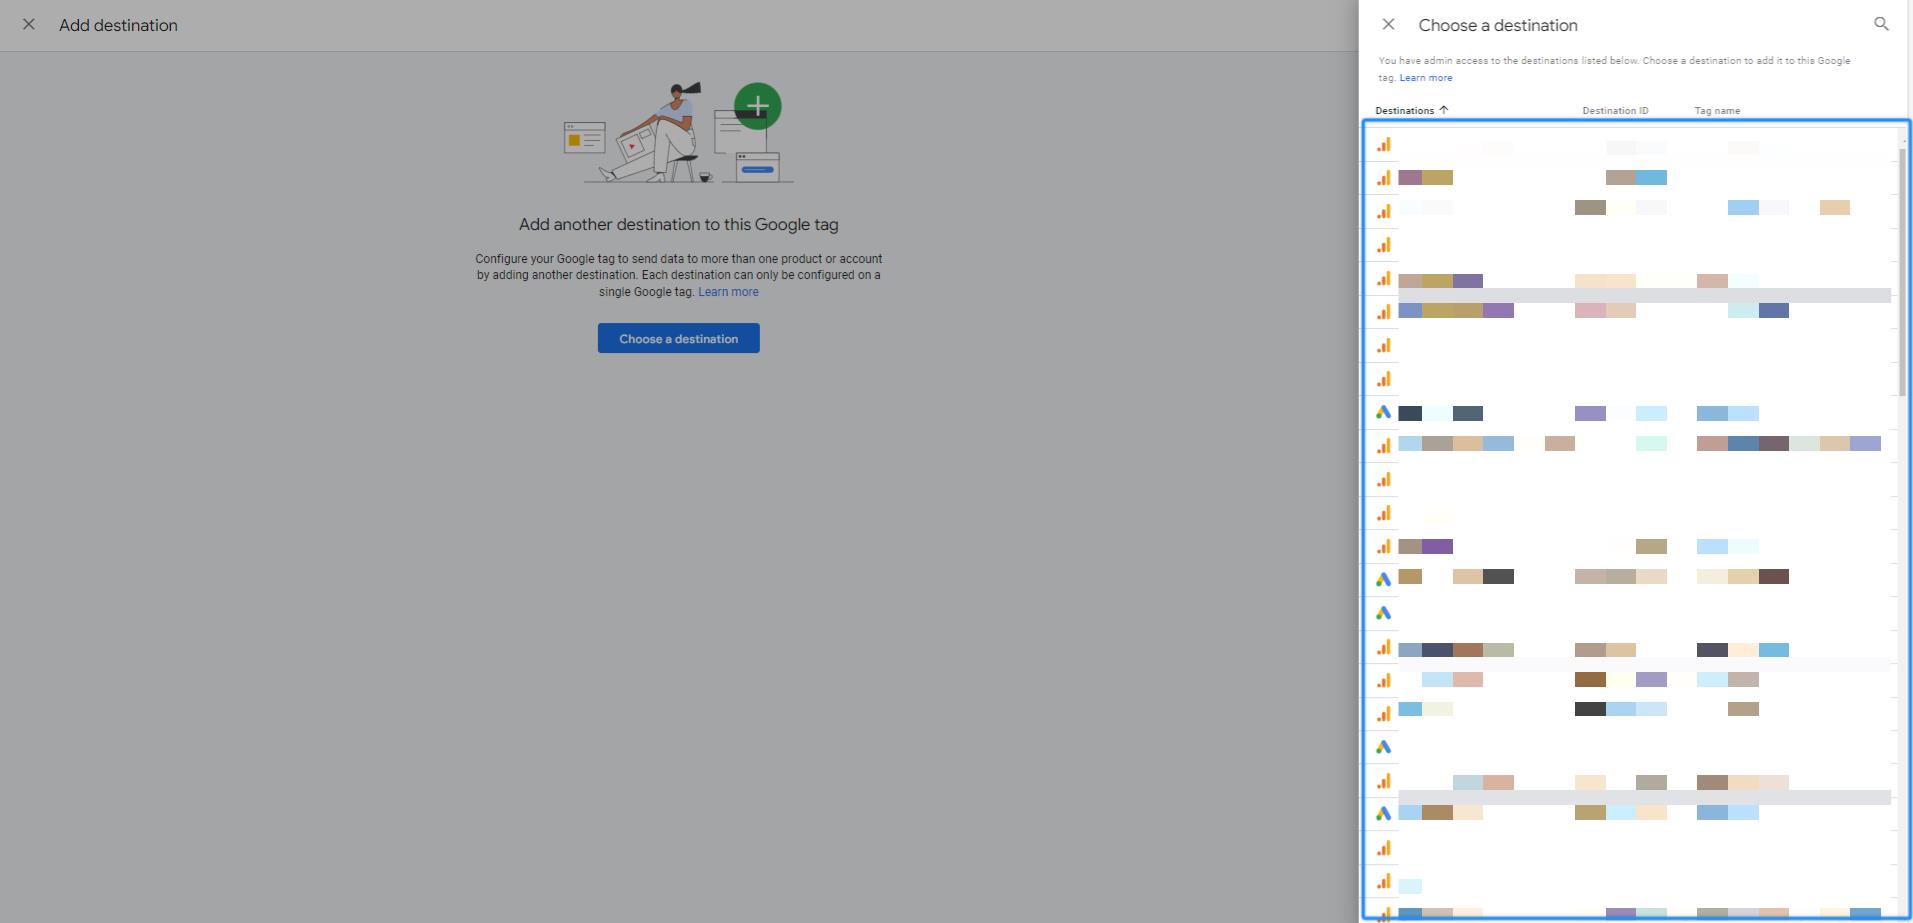
Step 3: In the “Destinations” section, click “+Destination.” Move forward with the “Choose a destination” option.
Step 4: Choose a destination to add to your Google tag. Find the destination you want.
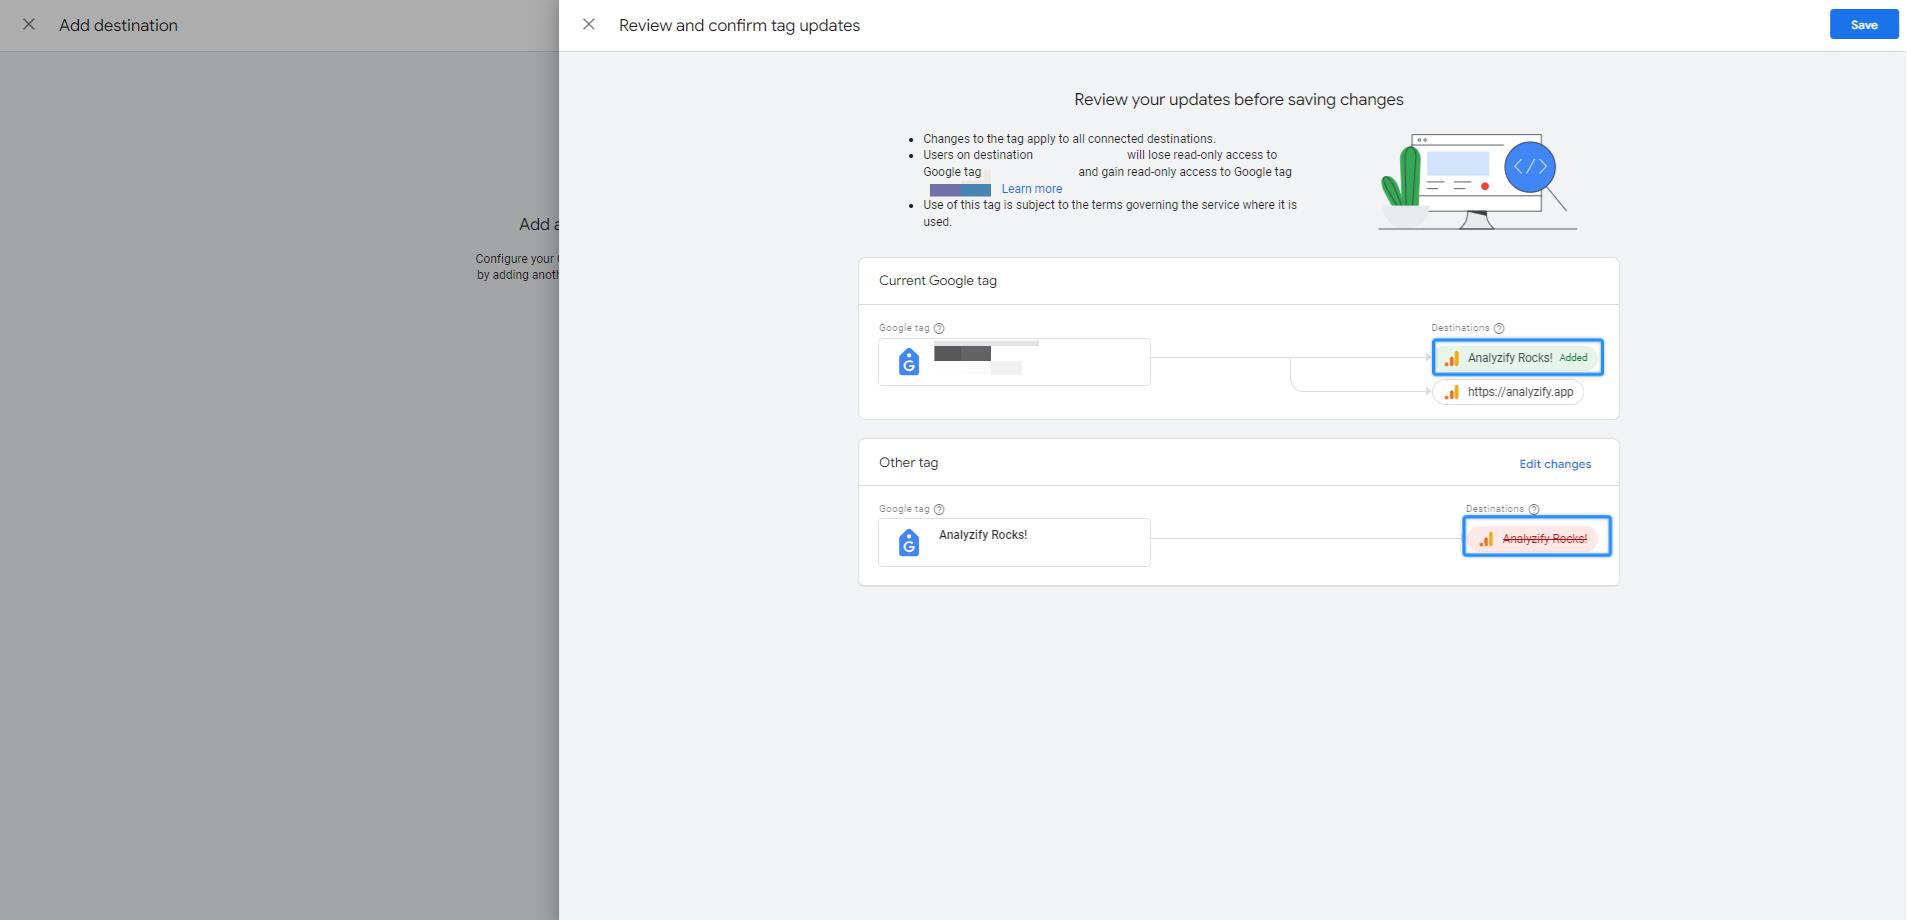
Step 5: Review your updates, and click “Save.”
How to Remove a Destination from a Google Tag
Step 1: In your Google tag screen, go to the “Admin” tab.
Step 2: Find the “Google tag management” section, and click “Manage Google tag.”
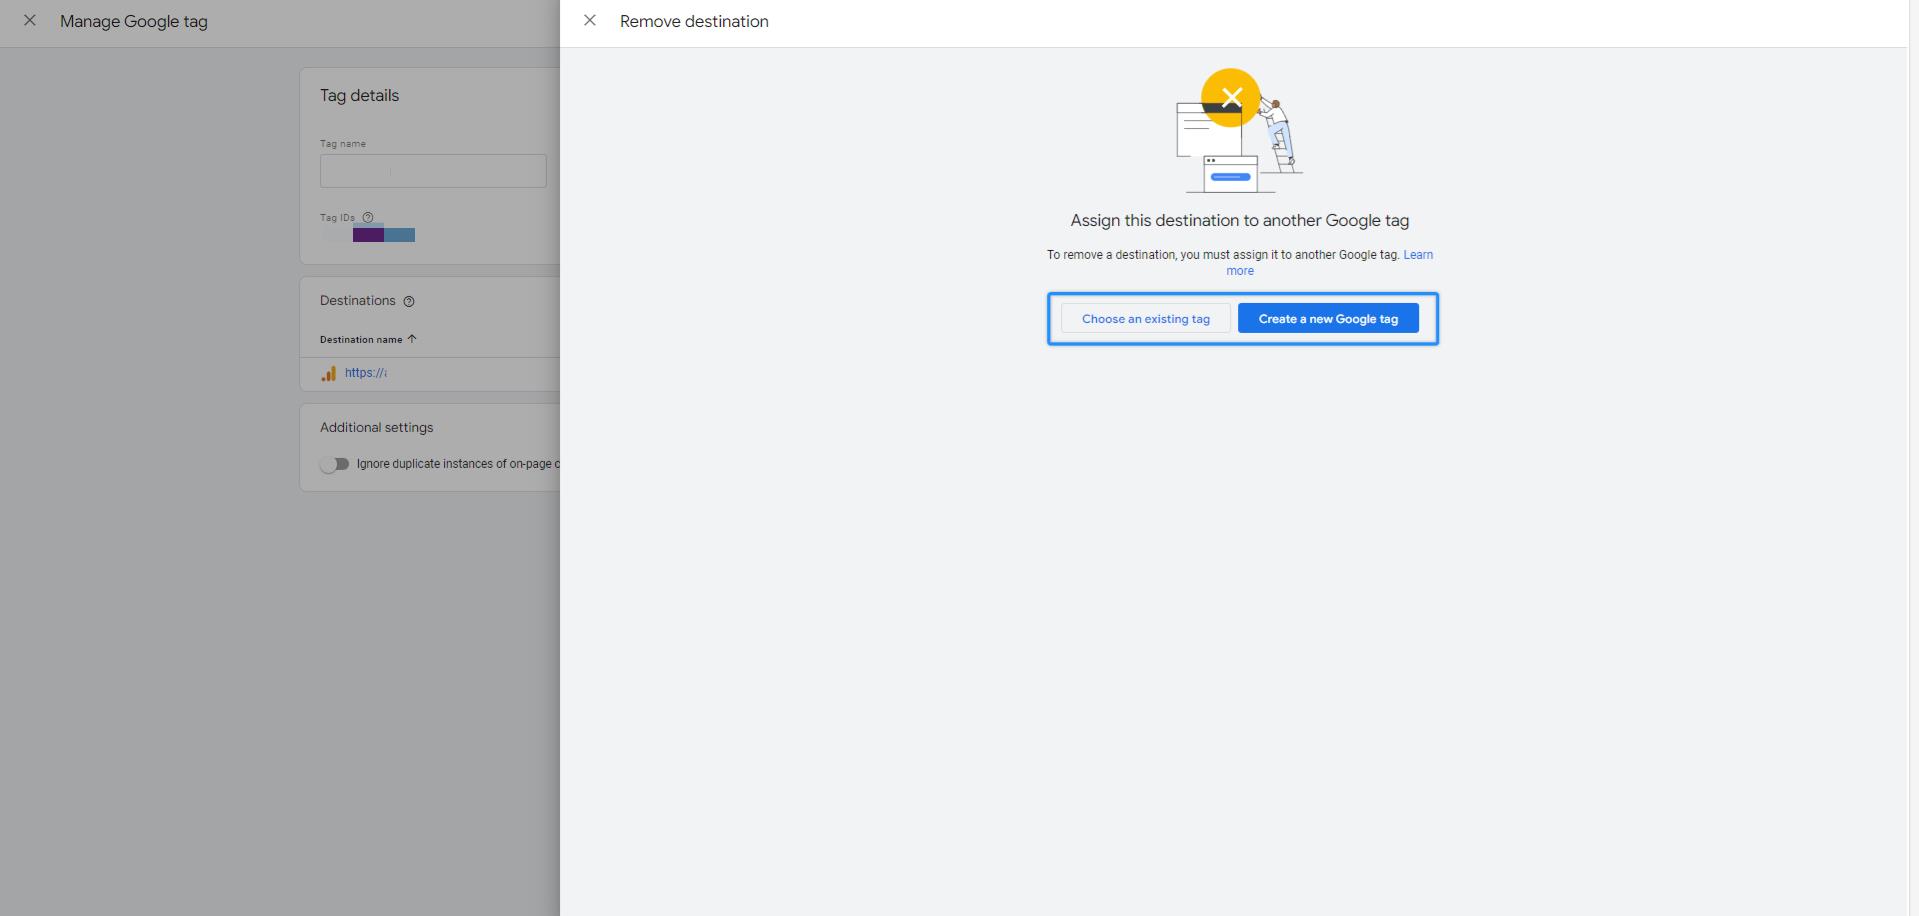
Step 3: Under “Destinations,” find the one you want to remove and click the “Remove destination” icon.

Step 4: On the “Remove a destination” screen, click “Choose an existing tag” or “Create a new tag.”
Note: If you deleted a tag or destination more than 30 days ago, you will see a “No tag ID” error message because the tag has no destination attached.
When you open the Google tag section, you’ll see the options to add a destination to a new Google tag or an existing one. You can restore your destination by adding it to an existing Google tag or creating a new one.
View your tag destination
In your Google tag screen, go to the “Admin” tab.
Locate the “Google tag management” section, and click “Manage Google tag.”
In this section, your Google tag’s destinations are listed below.
Conflicting on-page code Your Google tag processes on-page gtag() commands to load and configure settings for your Google tags.
Duplications or inaccurate settings may occur if the same Google Tag is configured multiple times on the same page.
You can ignore duplicate instances of on-page config commands by enabling the option “Ignore duplicate instances of on-page configuration” in the “Manage Google tag” section.
When you combine two Google tags, this option is enabled automatically.
How To Install Your Google Tag With A Website Builder Or Cms
You have a couple of options when it comes to installing your Google Tag with a website builder or CMS. Here are some more insights:
How To Set Up Your Google Tag (Global Site Tag) Via Shopify?
As you know, your tag ID starts with “AW-” or “G-“. For now, we need to follow separate steps for Google Tag Setup on Shopify.
If your tag starts with “G-“
Step 1: Navigate to Sales channels > Online Store

Step 2: Under “Online Store,” find “Themes.” Here, click on the “Actions” dropdown menu and select “Edit code.”
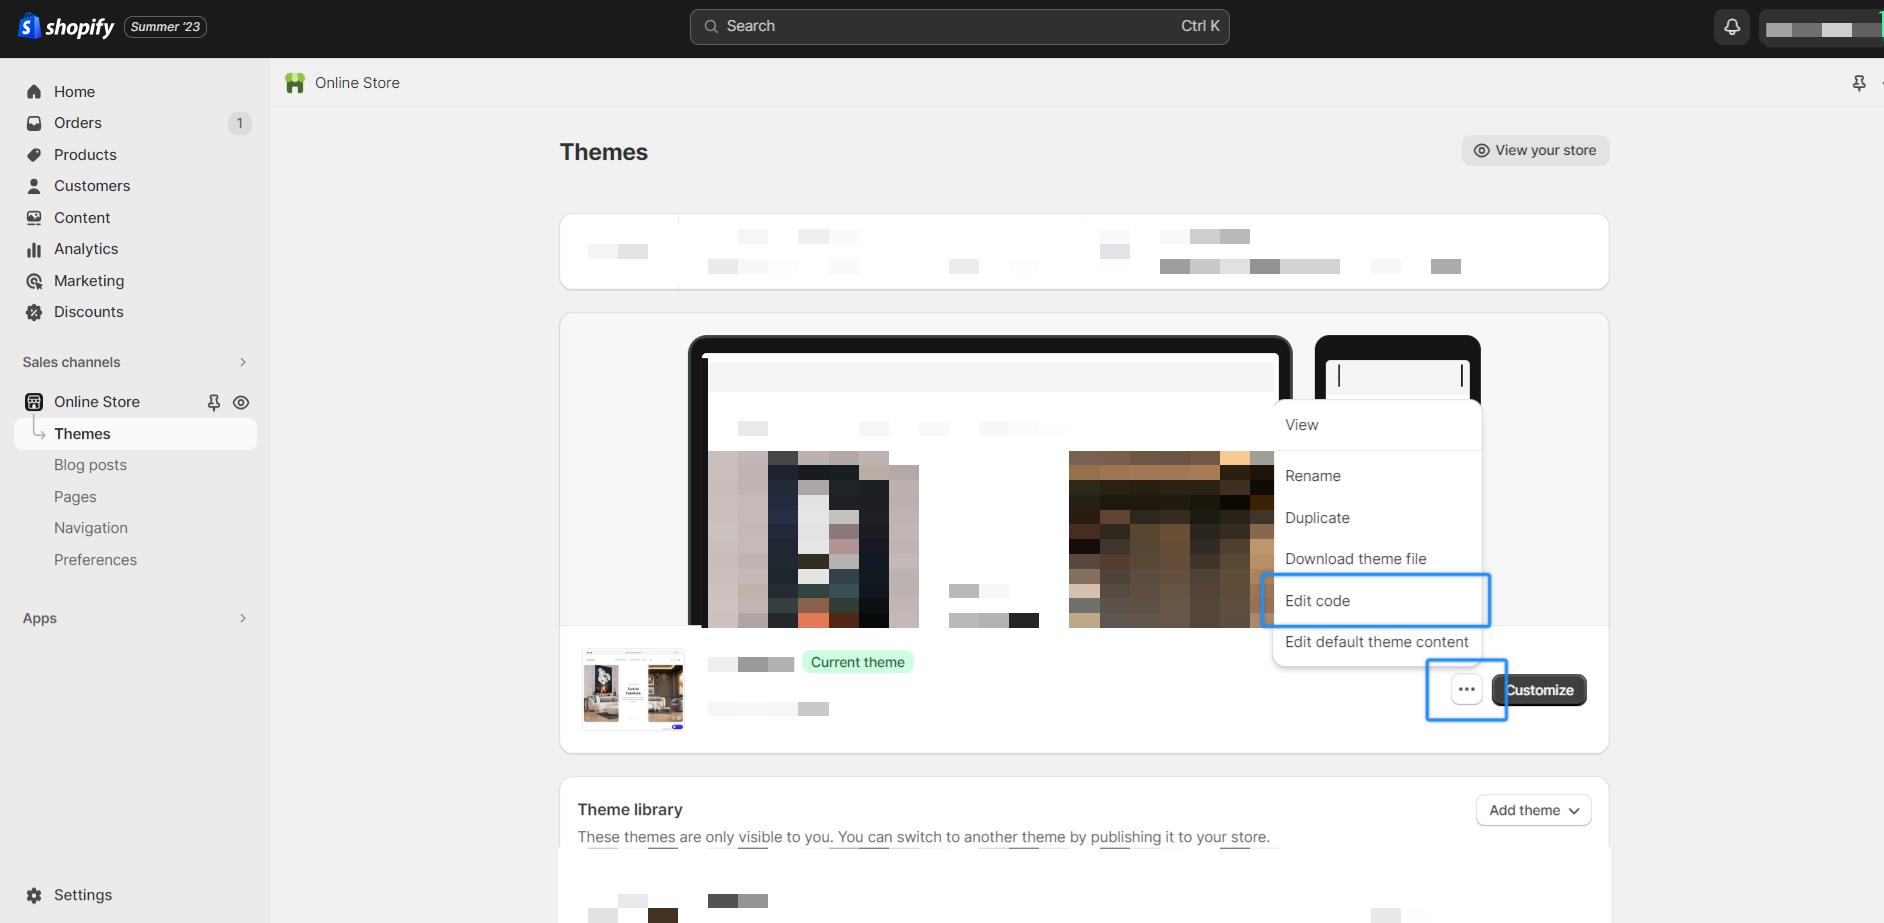
Step 3: Select “{/}theme.liquid.” under “Layout” Make sure there aren’t any tracking tags in this file.
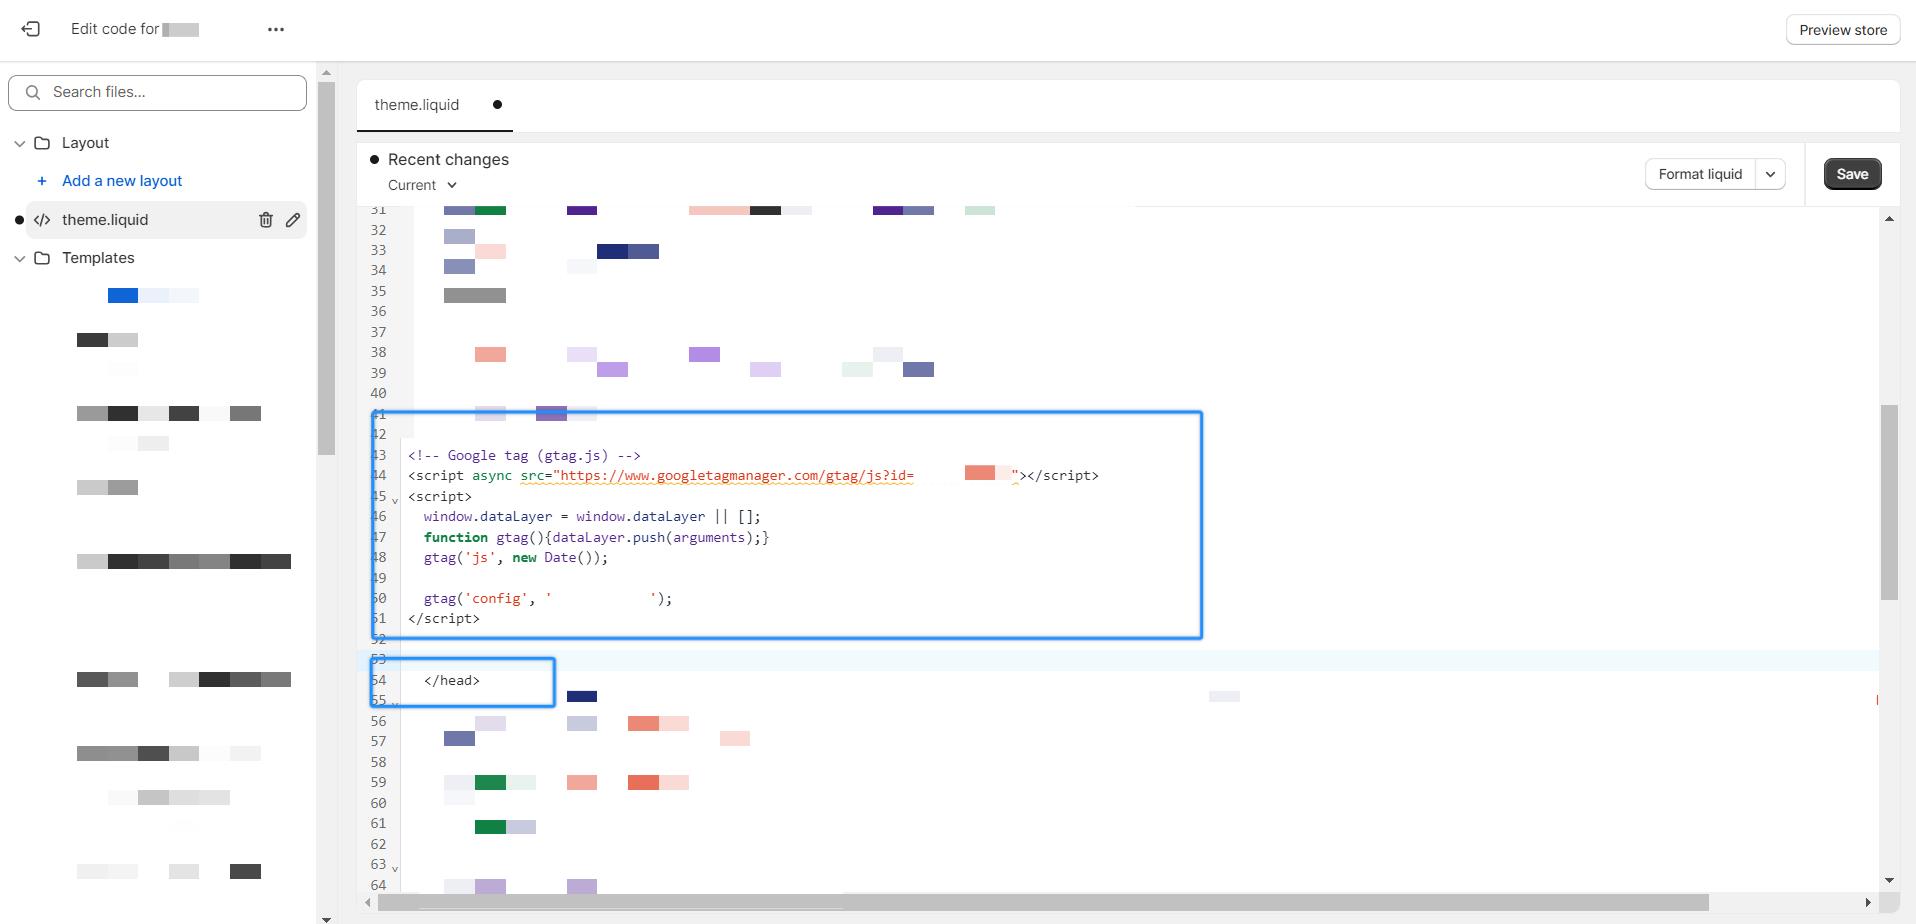
Step 4: If you have any ga.js, gtag.js, or analytics.js files listed, it means you’ve installed Google Analytics. Verify this installation’s accuracy before making any changes.
Step 5: Locate the file’s closing head tag () and paste the Google Analytics code above it. Click “Save.”
If your tag starts with “AW-“
Add the Google Channel app to your Shopify account.
-
In your Shopify account, find “Sales channels” on the left menu.
Search for “Google & Youtube” (Google Channel) and click “Add app.”
-
- In your Shopify account, go to the “Google Sales channel” page.
- Confirm that the email address for the Google Sales channel matches the email address used in your Google Ads and Merchant Center accounts.
-
- You have an existing account.
- You have an Administrator role and can link to Shopify.
- Either your Customer ID (found in the top right corner of your Google Ads account) matches the ID linked to your Shopify account, or you’ve chosen the correct Google Ads account (if multiple accounts are present)
- Add to cart
- Begin checkout
- Purchase
- Page view
- View Item
- Search
- Add payment info
In your WooCommerce account, find “Plugins” on the left menu.
On the “Plugins” page, click “Add New.” Search for “Google Listings & Ads” and click “Install Now.”
You’ll be directed to the setup process. Click “Start Listing Products” to begin.
Click “Connect” to connect your site to WordPress. Enter your information and “Continue.” Log in.
Approve the connection to WordPress. Connect to Google by clicking “Connect.” Find the Google Account you want and Grant permission for WooCommerce to access your account.
Choose your catalog to use and click “Connect.” Choose an audience, enter shipping details, and finish the setup.
In your WooCommerce account, find “Plugins” on the left menu.
On the “Plugins” page, click “Add New.”
On the same page, search for “WooCommerce Google Analytics” and click “Install Now.”
Once downloaded and installed, “Installed Plugins” under the “Plugins” dropdown.
Click “Activate” Under “WooCommerce Google Analytics Integration”
Enter your Google tag ID and confirm that “Use Global Site Tag” is checked. Click “Save Changes.”
Follow these steps to complete any of the actions above. Access your Google tag screen:
Access your Google tag screen. In the “Admin” tab, find “Manage your Google tag.”

Here, you can do the following actions:
Verify your email and Google account details
Now, we need to confirm that the correct Google account appears when you visit the “Google Ads account” section of Shopify.
-
- In your Shopify account, find the “Google Ads account” section.
- Confirm the following details:
When the accounts are linked, the following conversion actions will be created automatically in Google Ads:
How To Set Up Your Google Tag (Global Site Tag) Via Woocommerce?
For Woocommerce, we’ll follow the same logic for different tag IDs. The ones starting with “AW-” are usually Google Ads accounts. And those beginning with “G-” are usually Google Analytics properties.
For Tag IDs starting with AW-
If you have a tag ID starting with “G-”
Conclusion
The evolution of Global Site Tag to Google Tag points to Google’s solid attempts to address privacy concerns while streamlining the tag management process. Its features, like no-code ad conversion tracking and working with multiple destinations, will surely come in handy for many marketers. Still, Gtag users don’t need to rush to switch. But it’s essential to keep an eye out for all Google Tag updates.