
Google Ads Enhanced Conversion helps you improve your conversion tracking by sharing more detailed conversion data with Google Ads.
Here, you will get a fully functional solution to set up Google Ads Enhanced Conversions in a few steps.
Before moving on to setting up & optimizing, you are recommended to check out our article on the key benefits of setting up Google Ads Enhanced Conversions.
Key Takeaways:
- Use Analyzify’s open source code block to set up Google Ads Enhanced Conversions on Shopify (below)
- Google Ads Enhanced Conversion allows sharing more detailed conversion data with Google Ads, by including customer information like email, name, address, and phone number.
- Accurate conversion tracking is crucial for optimizing advertising spending, especially given changes in data tracking due to iOS, Safari ITP, and ad blockers.
- There are now three ways to set up Google Ads Enhanced Conversions on your Shopify store:
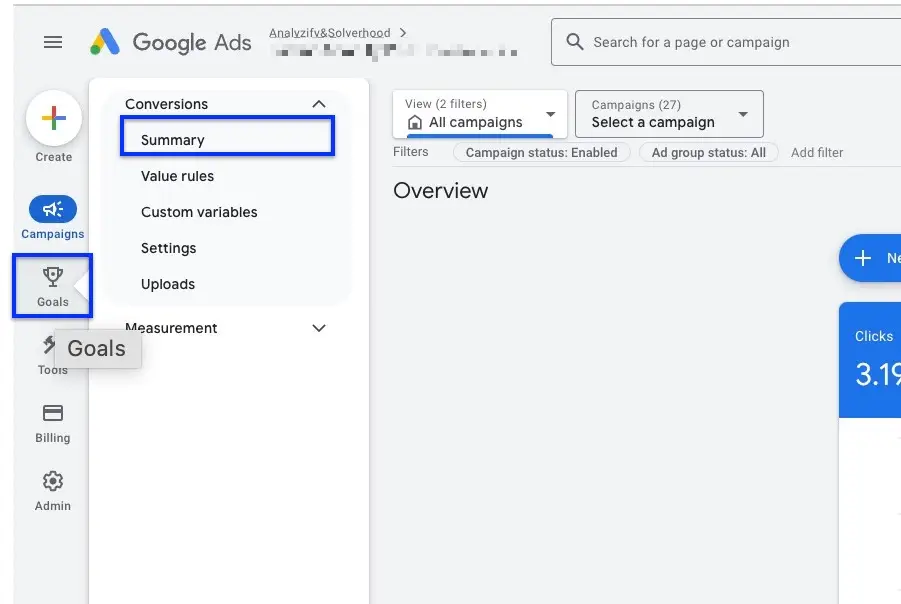
- Step 1: Navigate to Google Ads > Goals > Conversions > Summary
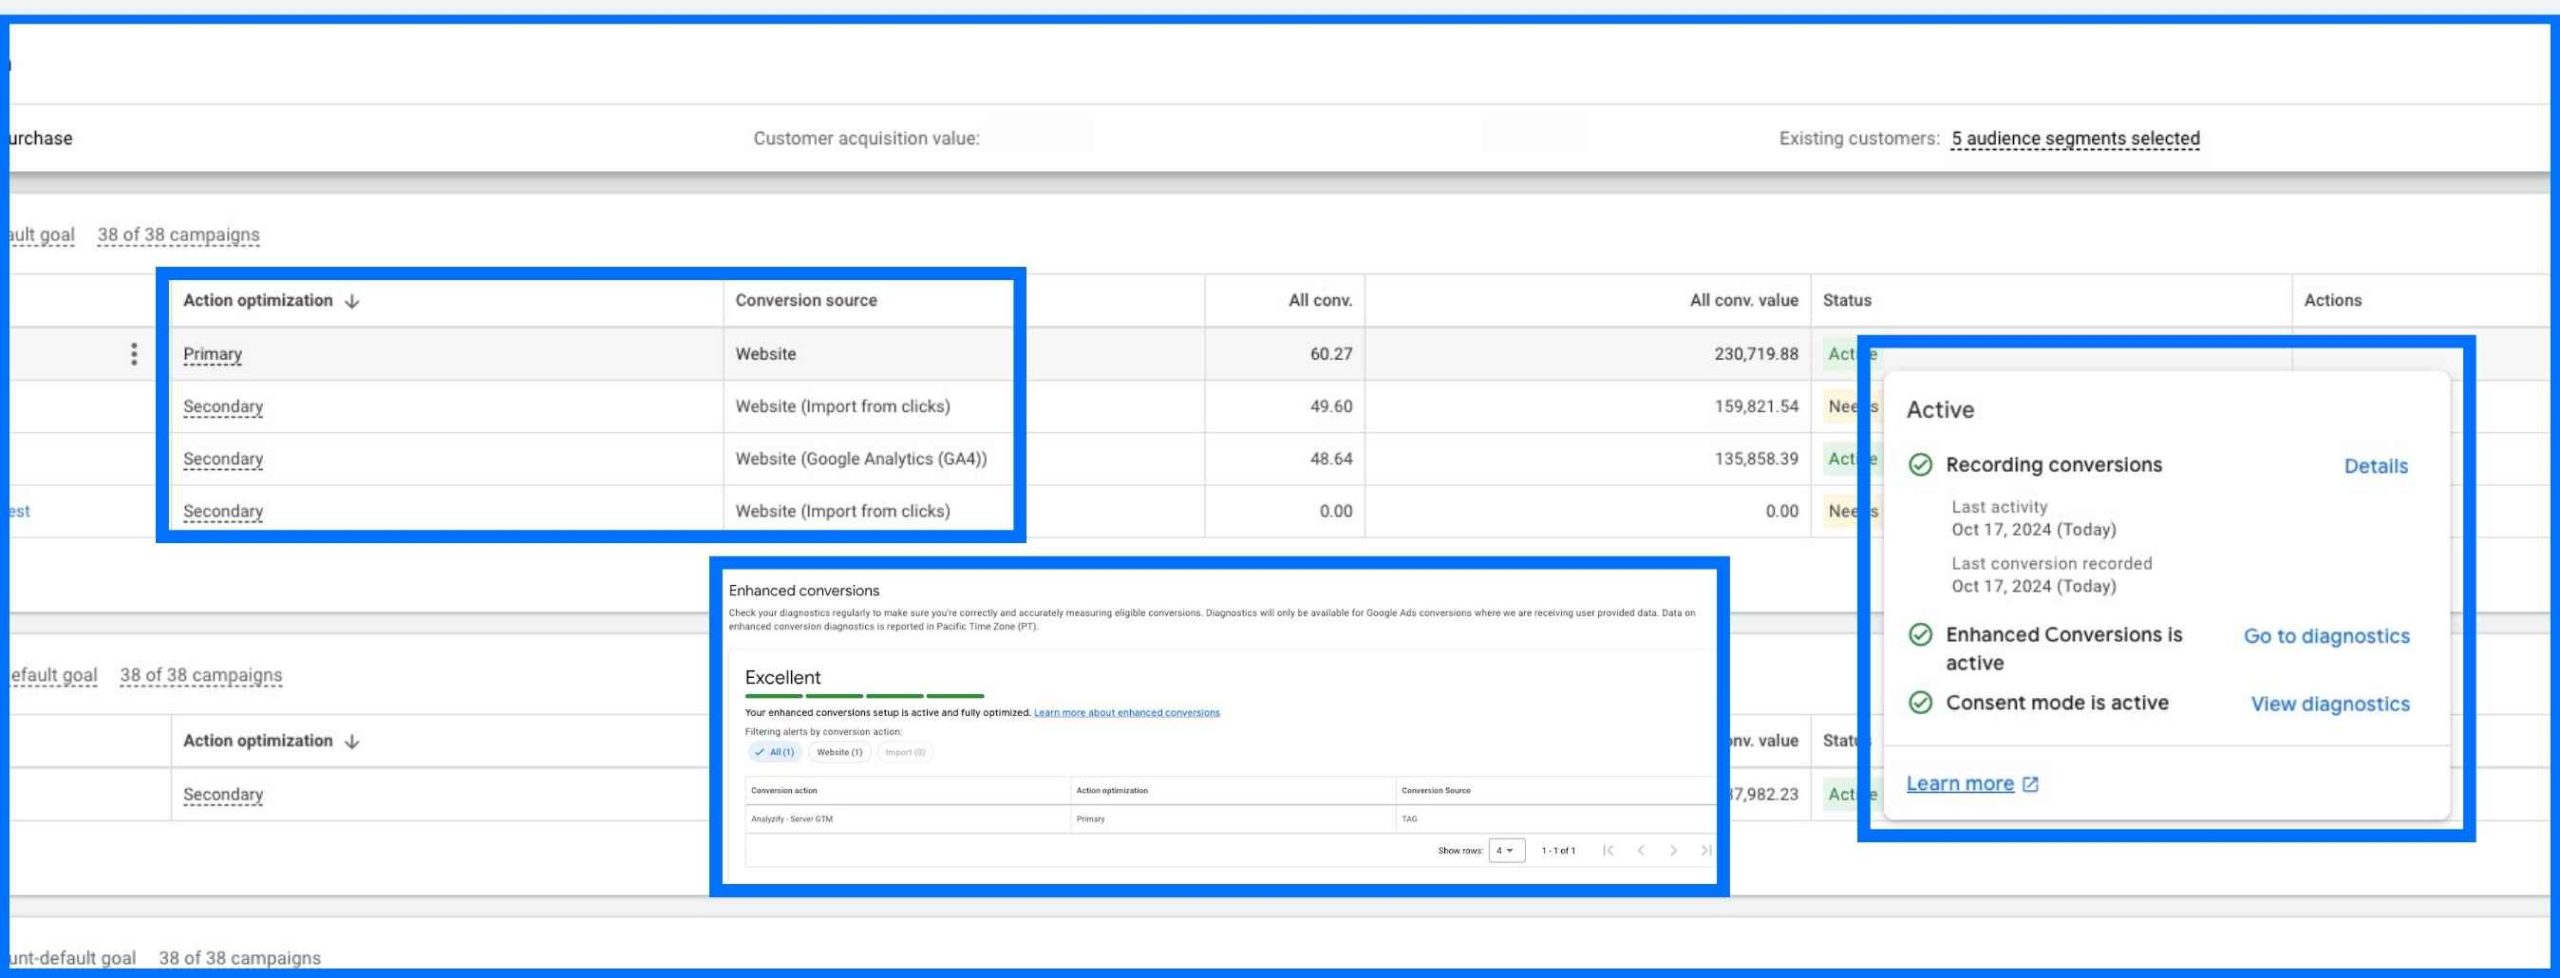
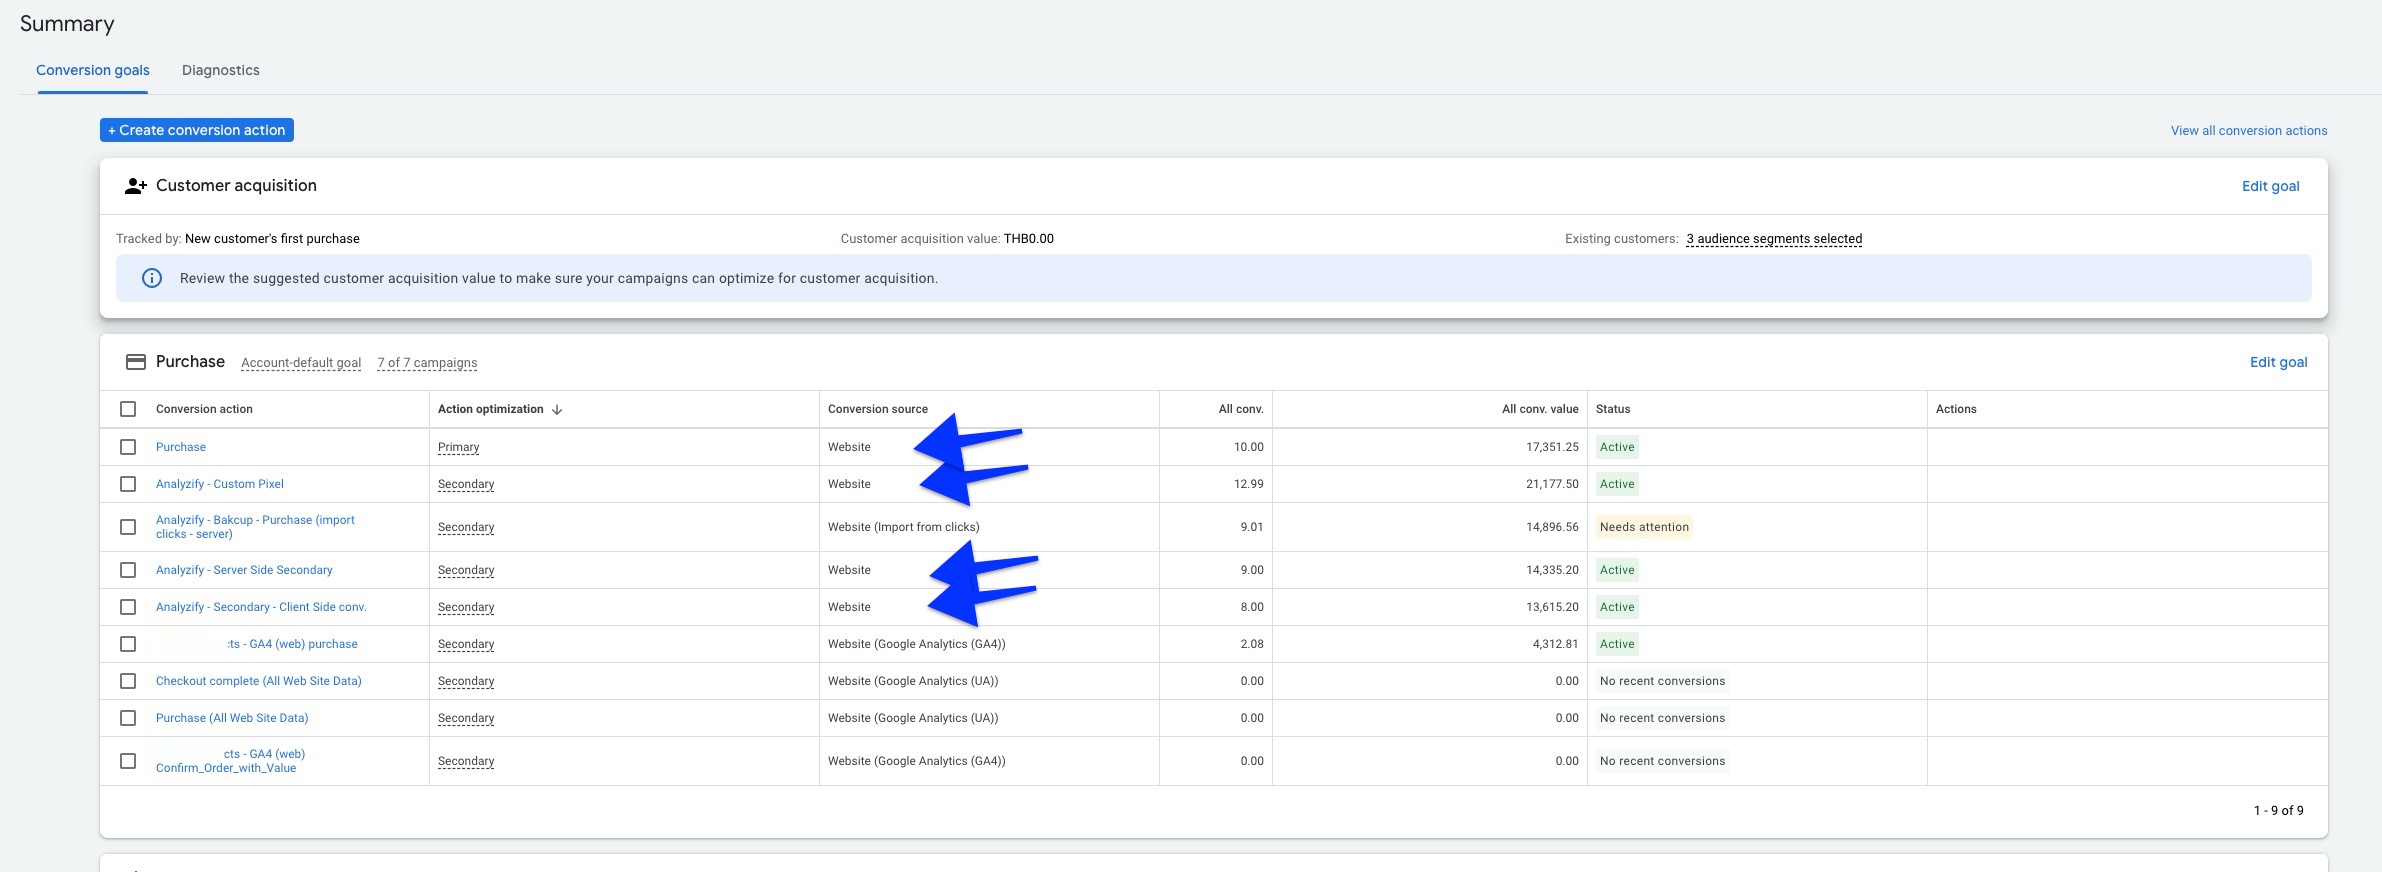
- Step 2: Locate your Purchase conversion. Make sure the conversion source is set to “Website” because enhanced conversion tracking on Shopify cannot be applied to conversions sourced from Google-hosted or GA4 data.
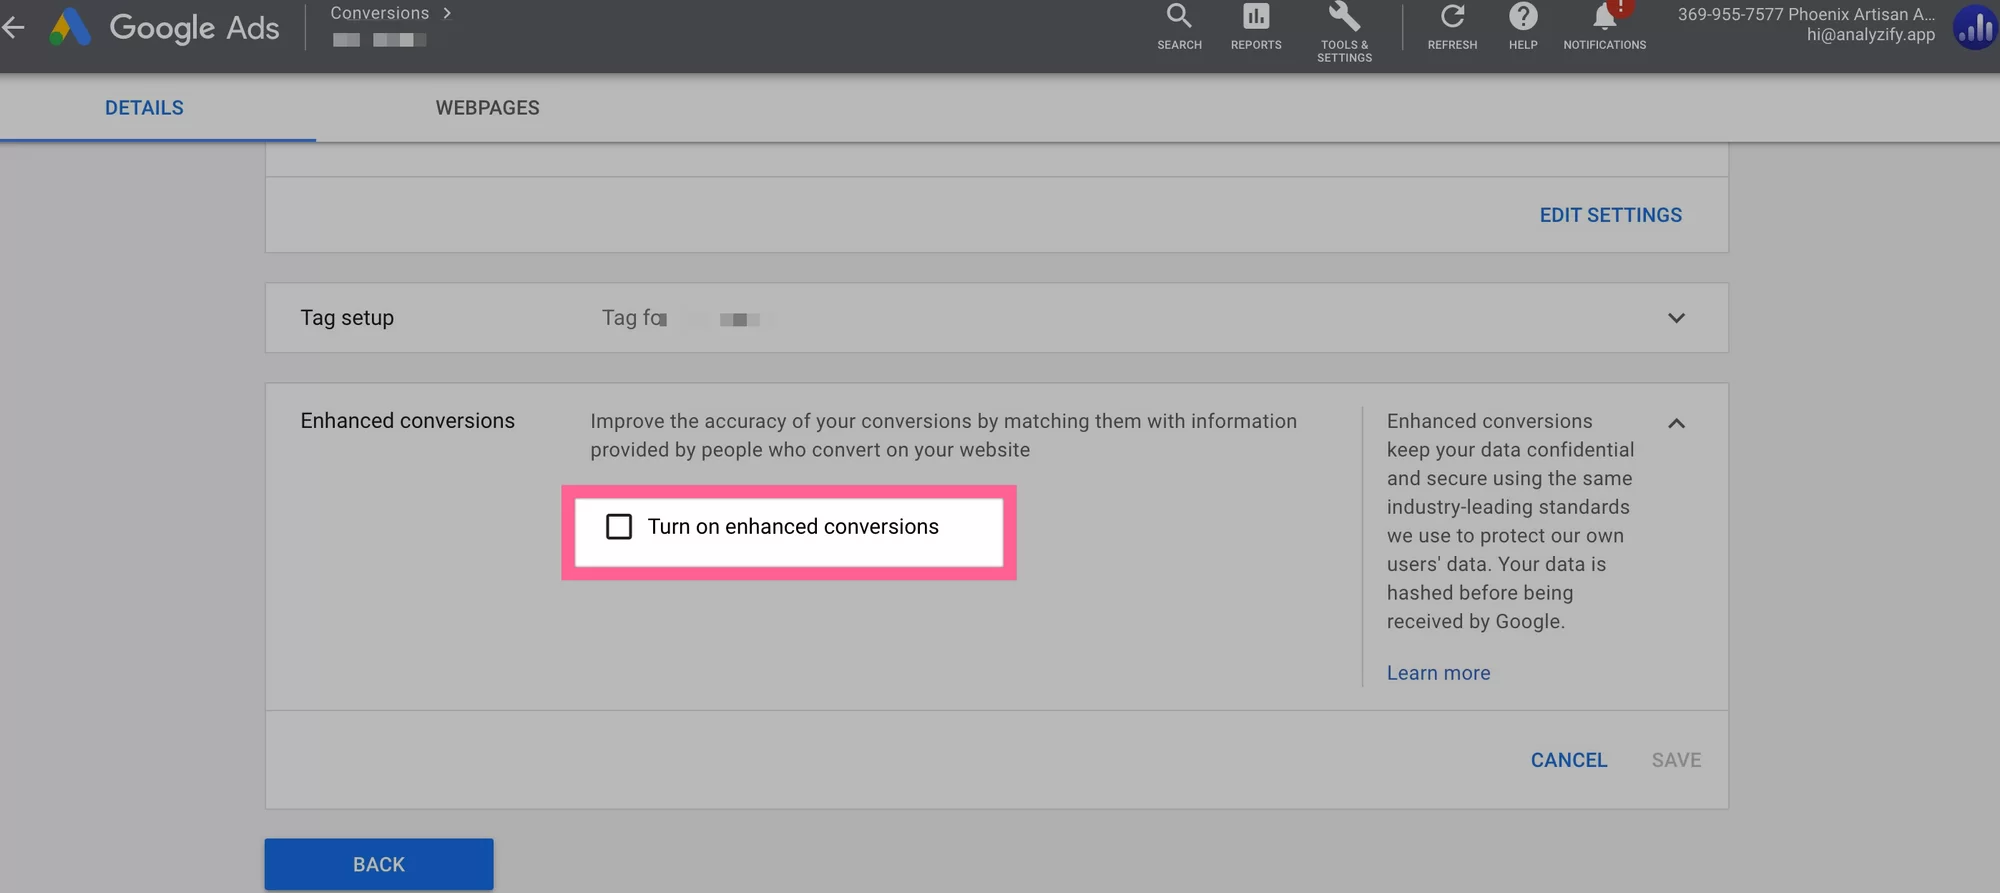
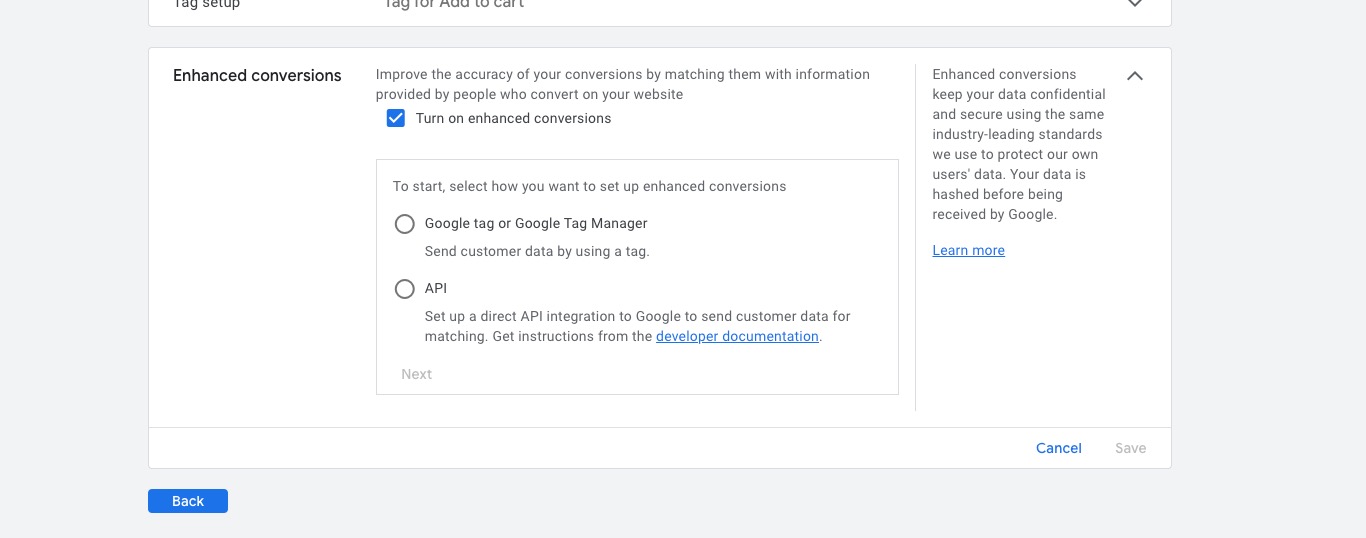
- Step 3: In the “Enhanced Conversions” section, found just below “Tag setup,” check the box to enable it.
- Step 4: After enabling Enhanced Conversions, a new screen will appear. Select “Google Tag or Google Tag Manager (GTM)” or “API” as your setup method. Click on the “Google Tag or GTM” option and save your changes.
- Your conversion tracking wasn’t already working properly. In this case, just continue to the next step because our code snippet will already include the conversion tracking script as well.
- Your conversion script is managed via Customer Events > Custom Pixel. In this case, disconnect the relevant Custom Pixel and follow the instructions in this article to properly set up the latest enhanced conversion tracking.
- You are using Google Tag Manager to track conversions. In this case, you can either pause your conversion tag in Google Tag Manager or use Method 2 to implement the enhanced conversions.
- Update the code block with your Conversion ID, Label, item ID format, and feed region in the next step. Avoid copying and pasting the block without these updates—completing the next step is crucial.
- user_data: ‘email’, // options: all and email If you want to send only the “email” variable of customers as Enhanced conversion data to Google Ads, you can leave this variable as it is. However, if you are also collecting phone numbers and any address information from your customers, you can change this variable to “all” from the options listed in the variable.
- debug: false, // options: true, false Use this variable only for testing purposes.To ensure that your code is working properly, you can change this variable to true and perform a test order. To ensure that the data is transmitted correctly, you can follow the activated console logs or check the Network signals in DevTools.
- “px_config.GADS.id”: Add your conversion ID (from Step 2) right after “AW-“. Only replace the numbers while keeping “AW-” intact. For example, if your conversion ID is 123456789, the updated code should read AW-123456789.
- “px_config.GADS.conversions.purchase”: This is where you add your conversion label (from Step 3).
- “item_id_format”: Use the item ID format that corresponds to your Google Ads feed. This will be further explained in the item ID format section below.
- “feed_region”: If you use Shopify’s native app for uploading your Merchant product feed data, your item ID format might look like shopify_{feed_region}{product_id}{variant_id}. In this case, you must update the feed_region variable with your region’s ISO code.
- “totalValue_option”: You can adjust the total value option to modify the conversion value sent to Google Ads. Options include values with no shipping, no tax, or net. By default, it includes the total price with shipping and tax.
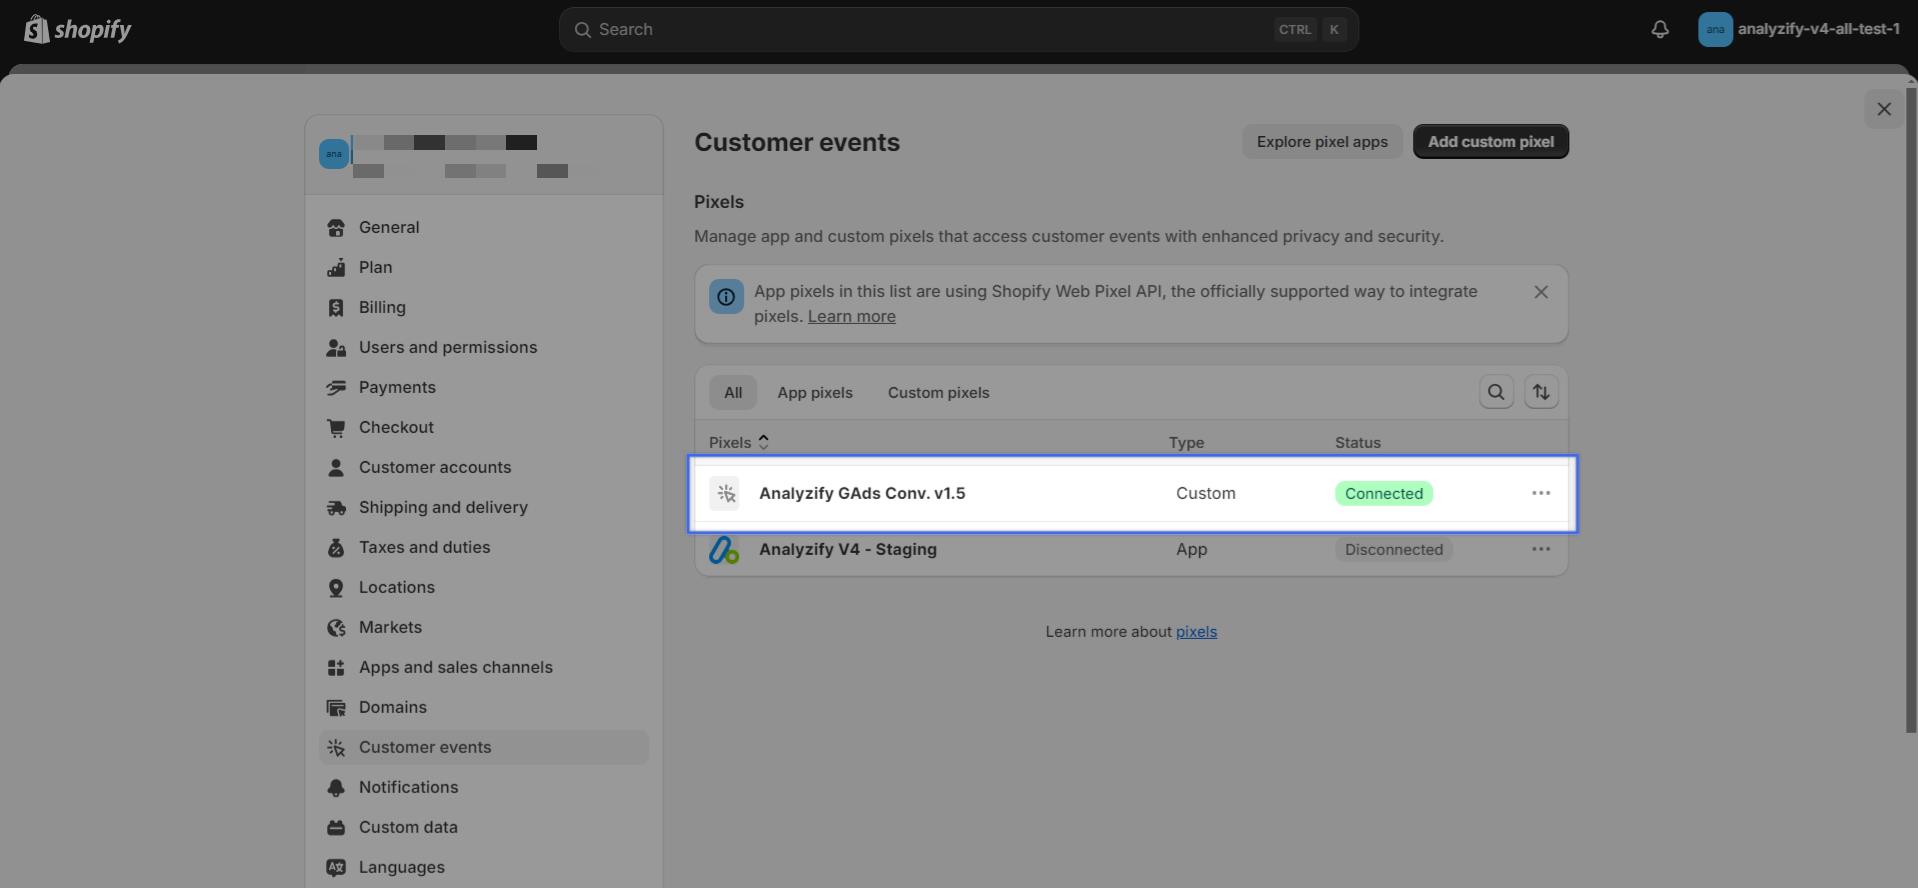
- Go to Shopify Admin > Settings > Customer Events > Add Custom Pixel.
- Name the new Custom Pixel as “Analyzify GAds Conv. v1.5” and click Add Pixel.
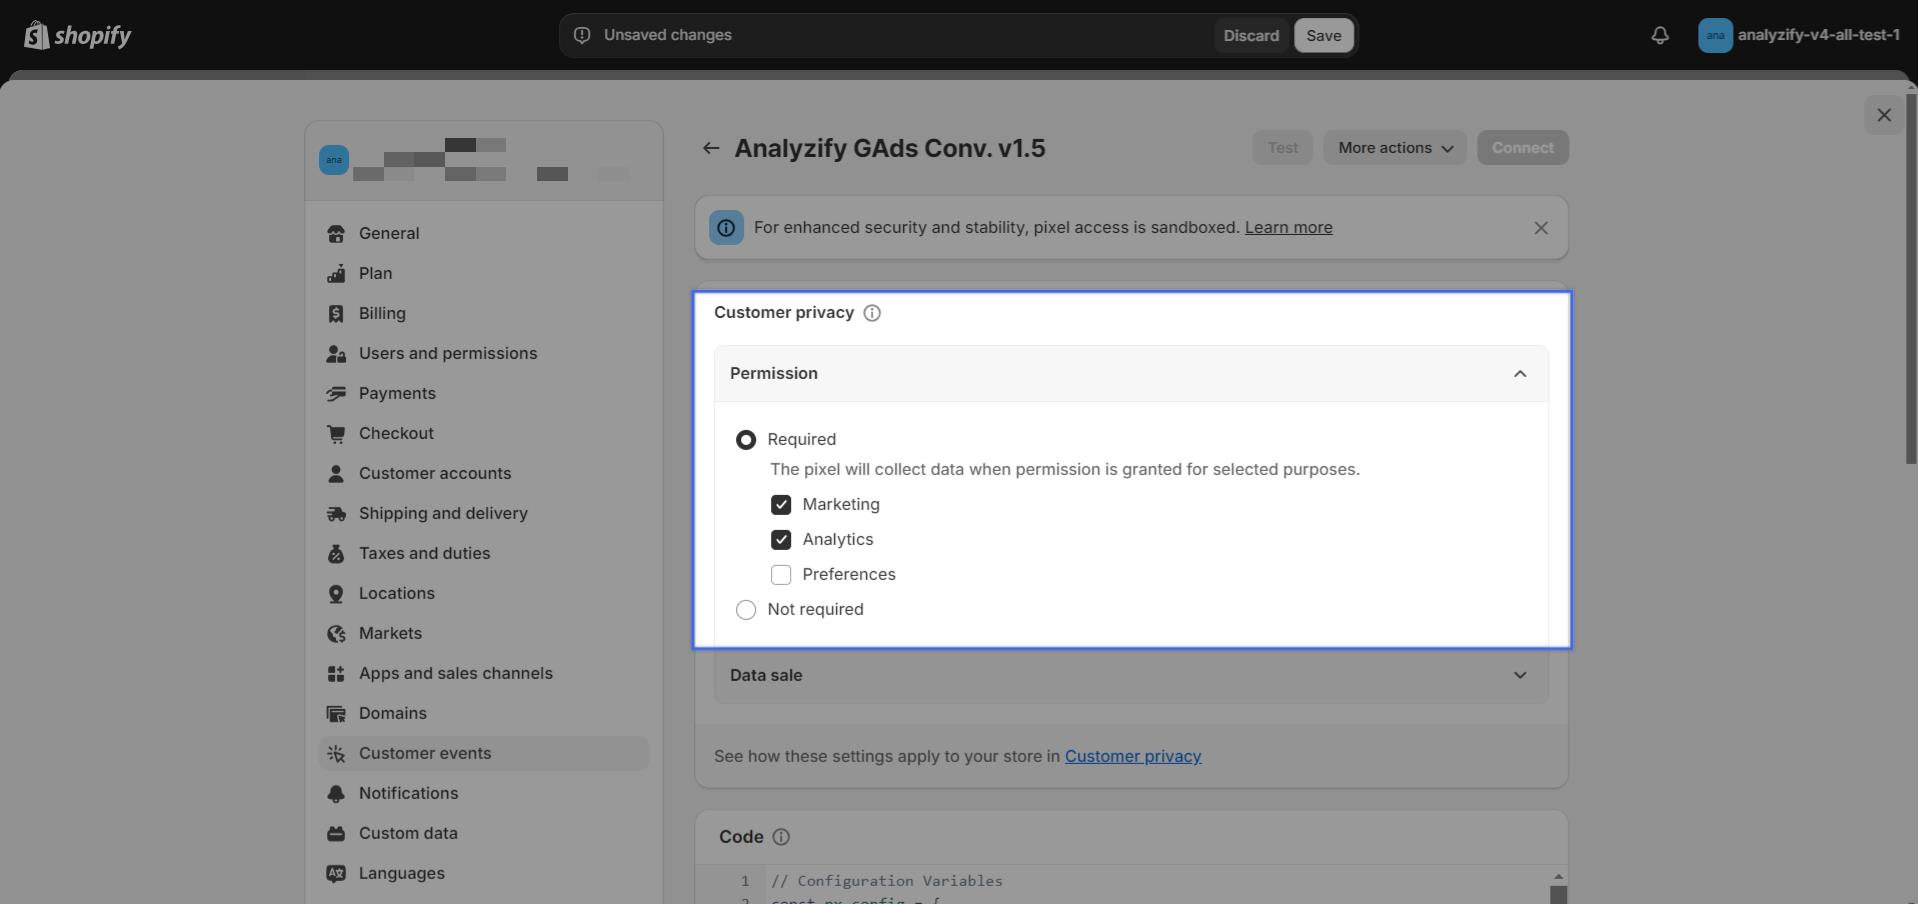
- If you use a consent banner, you can select the Required option to ensure conversion data is sent according to customer consent preferences. Adjust this under Customer Privacy > Permission at the top of the Custom Pixel configuration.
- Alternatively, you can select Not Required if you wish to collect conversion data from all users without needing consent.
- Paste the entire code and click Save
- Lastly, we should click the Connect button to activate the Custom Pixel.
- You can check https://support.google.com/google-ads/answer/12785317?visit_id="638158530353555601"-3796572204&rd="1”” rel=”nofollow noopener” target=”_blank”>the official documentation and follow the steps there.
- You can purchase Analyzify, and our support team will complete your setup at no extra cost. Analyzify provides countless benefits for your Shopify store. You can check the features on our Analyzify Features page.
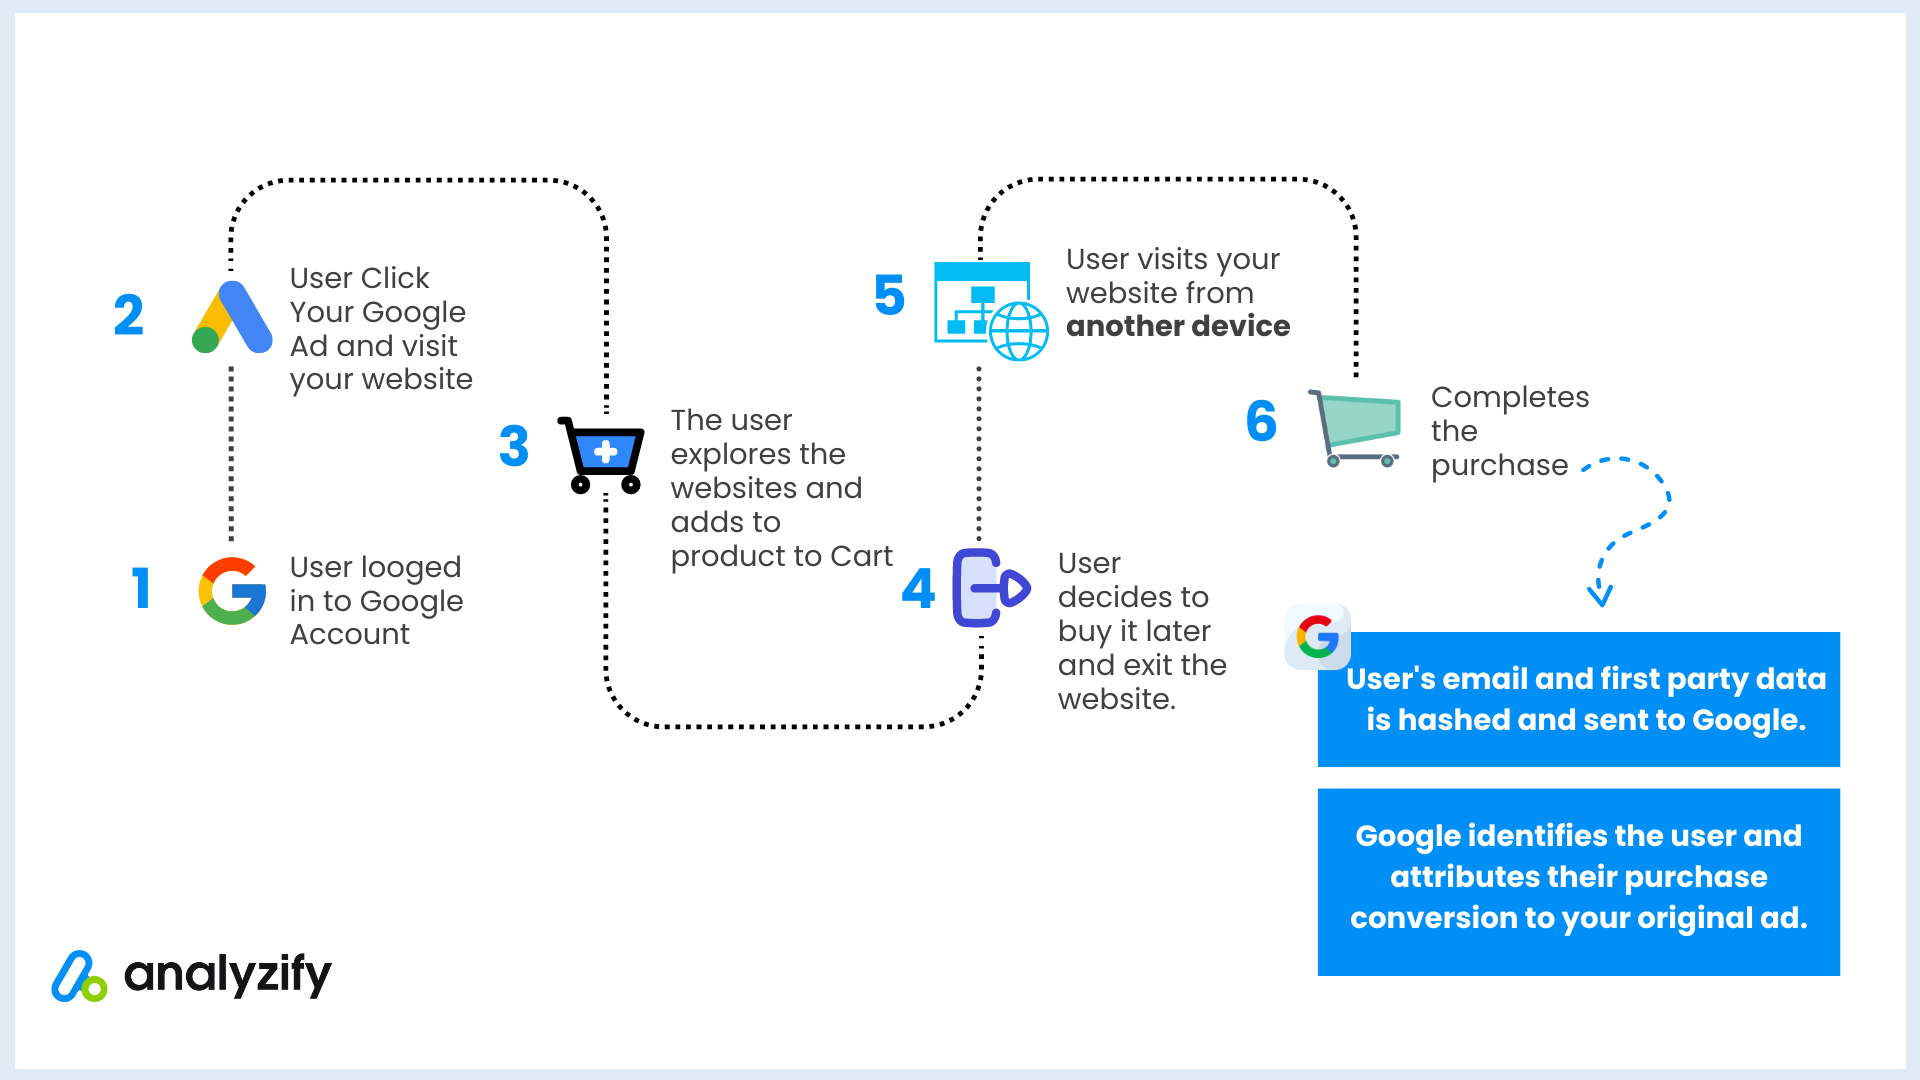
- Imagine you run an online bookstore and advertise it using Google Ads with Enhanced Conversion tracking. One of your keywords is ‘buy books online.’
- A potential buyer, logged into their Google account on Chrome, searches for this keyword and sees your ad on the first page. They click on your ad and visit your website. On your site, they explore different genres, read reviews, and add a book to their wishlist but decide to purchase it later.
- A few days later, the same buyer returns to your website and buys the book from their wishlist. Enhanced Conversion Tracking captures this interaction by securely hashing customer data (like an email address or phone number) and sending it to Google. The hashing process ensures data is anonymized before being matched with logged-in Google accounts, helping attribute the conversion to your ad interactions.
1. Google Tag (Gtag): If you have the Google tag on your store, you can enable enhanced conversions by adjusting your existing tag setup. This method sends customer data like email addresses securely to Google for better conversion tracking.
2. Google Tag Manager (GTM): If you use GTM, you can enable enhanced conversions with a few changes to your setup. This method is great if you want more control over how the data is sent to Google.
3. Google Ads API: This method is for advanced users. It allows you to send customer data directly to Google using their API. It is used to send your offline conversions to Google Ads and to increase the accuracy rate in your online conversions.
Are you using an ad blocker? The tutorial contains many images- most image names include “Google Ads” or “Ads”. Ad blockers think that it is an ad and blocks those. So make sure to temporarily disable your ad blocker to properly view the content.
🎉 Bonus Content: Explore the best Shopify Google Ads apps to optimize & improve the quality of your campaigns.
How to set up Google Ads Enhanced Conversions on Shopify
There are several methods available for setting up Google Ads Enhanced Conversion.
You can easily handle it yourself with the first method.
If you prefer more control over your data, you might choose the Google Tag Manager method.
For those requiring greater flexibility, the Google Ads API is an option.
Our focus is primarily on Purchase tracking, as it’s the key area where user data like email, phone number, and address is available for enhanced conversion tracking on Shopify. We mainly guide you through the Google Ads setup process here.
Before Starting: Enable Enhanced Conversion Setting on Google Ads
You can either create a new conversion or apply enhanced conversion tracking to an existing one.
In this tutorial, we’ll use an existing Google Ads conversion. The steps will be very similar if you decide to set up a new conversion instead.
Note: Google frequently updates its interface, and settings may appear in different locations depending on your account type. If you cannot find the “Enhanced Conversions” setting in this location, try these alternatives:
-
- Go to Goals > Conversions > Summary > Settings. You should see the “Enhanced Conversion” option below “Attribution”
- Go to Goals > Conversions > Settings > Enhanced Conversions
Now that you have enabled Enhanced Conversions, let’s move on to the next section. I will explain how to set up Google Ads Enhanced Conversion on Shopify using the Google Tag method.
Method 1: Set Up Google Ads Enhanced Conversion with Google Tag
Here are the steps and code blocks you’ll need. You can check this official article if you are not using Shopify or if you want to learn more about it.
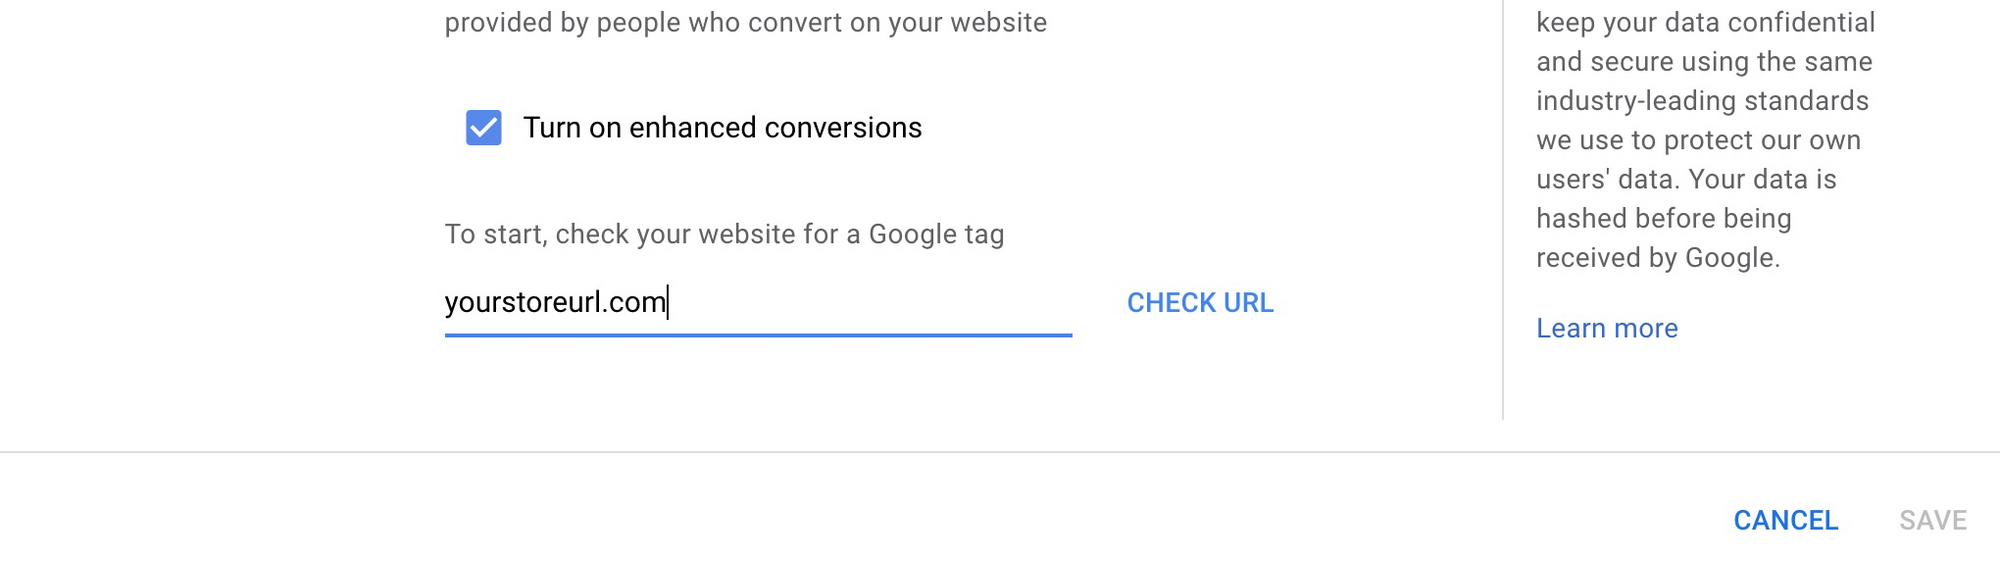
Step 1: Verify Your Google Tag Installation
To proceed, make sure that the Google Tag (gtag.js) is installed on your Shopify store. Enter your URL and click “CHECK URL.” If the Google Tag isn’t installed, you will only see the option for Google Tag Manager. In that case, proceed to Method 2. Alternatively, you can learn https://help.shopify.com/en/manual/promoting-marketing/analyze-marketing/tracking-adwords-conversions#_ga="2".19042360.1459774467.1673954990-978512443.1670319434” rel=”nofollow noopener” target=”_blank” rel=”nofollow noopener” target=”_blank”>how to install Google Tag on Shopify.
Step 2: Choose The Setup Method: Edit Code/Event Snippet
If the Google Tag is installed on your Shopify store, you should see the setup options.
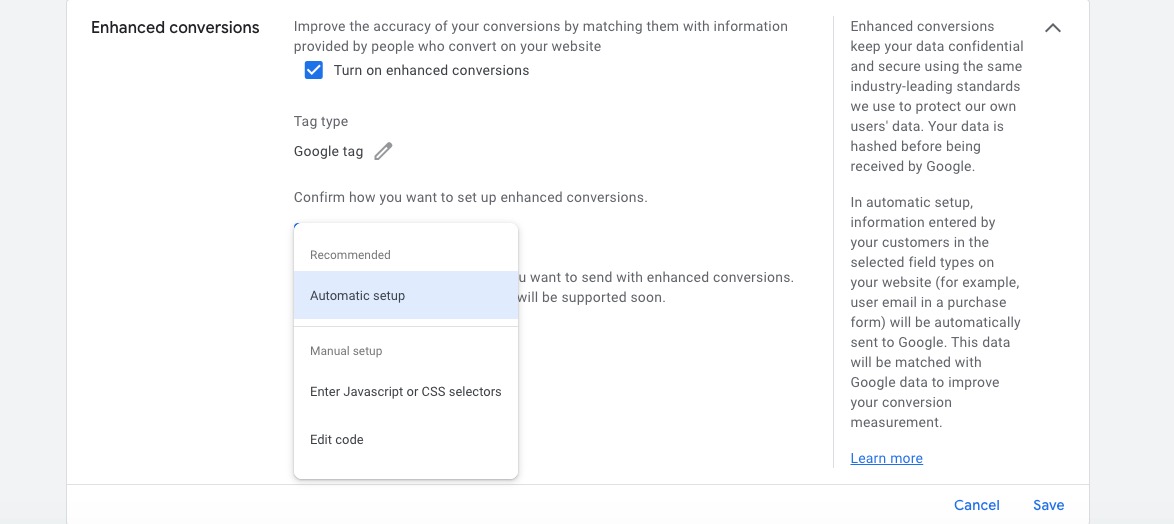
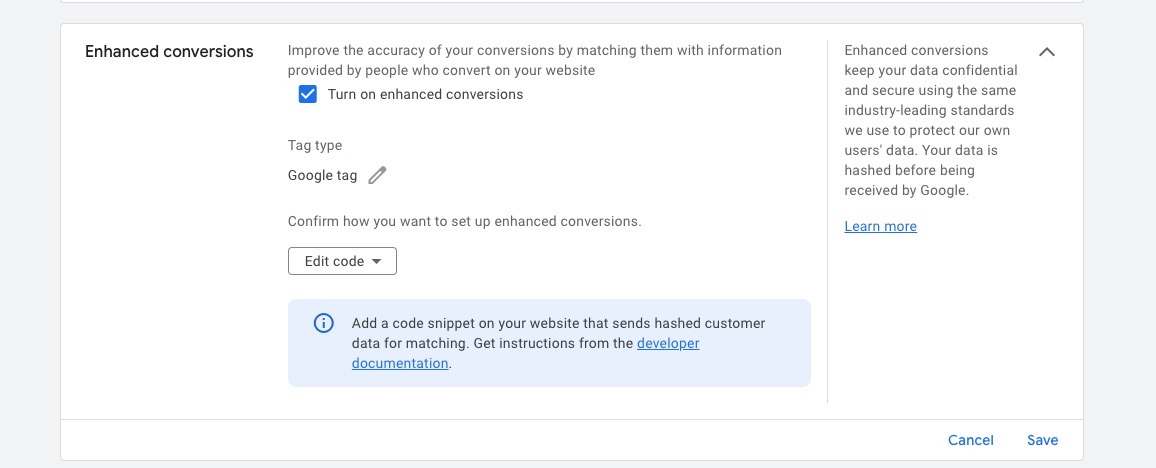
Step 3: Select and Save Your Settings
Click on “Confirm how you want to set up enhanced conversions” and select “Edit Code.” Click “Save” to proceed.
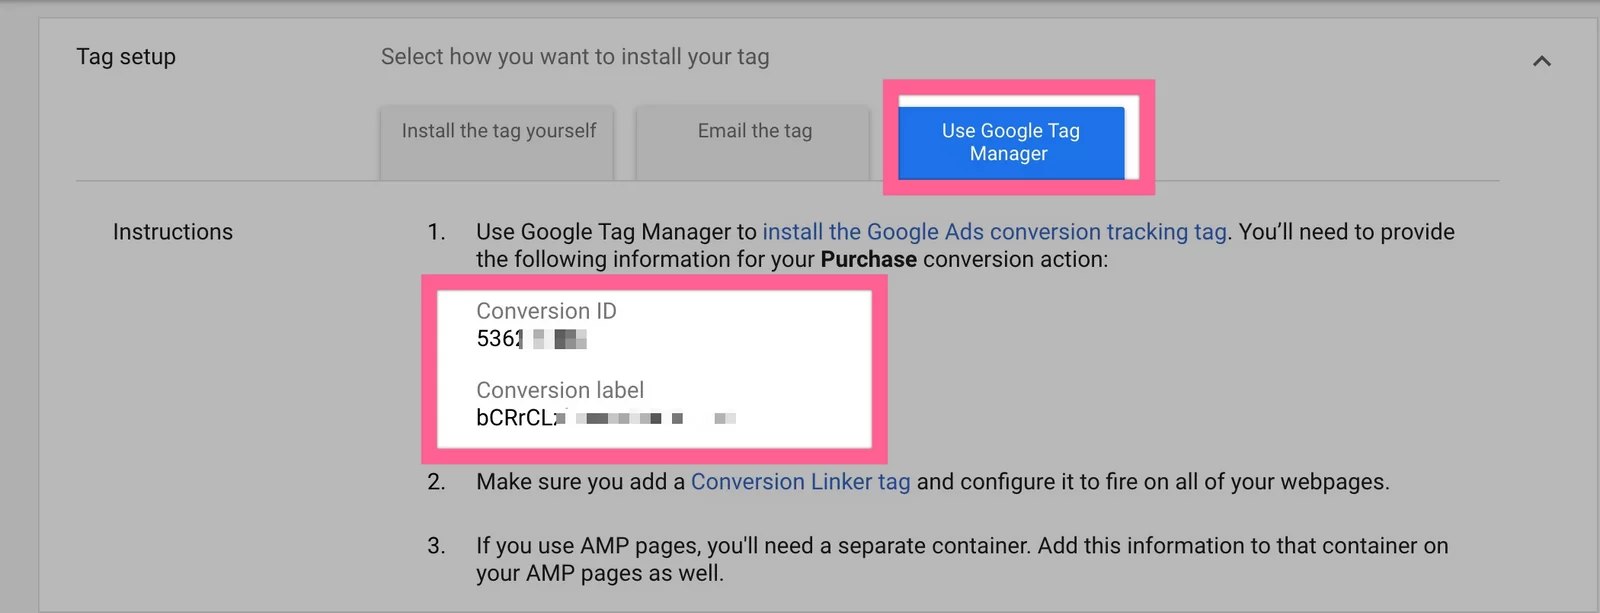
Step 4: Find and Copy Your Conversion ID and Label
Next, you need to retrieve your Conversion ID and Label. Scroll up to the “Tag Setup” section and select Google Tag Manager. We won’t be using Google Tag Manager, but this will help you easily access your Conversion ID and Label. Copy these details before moving to the next step.
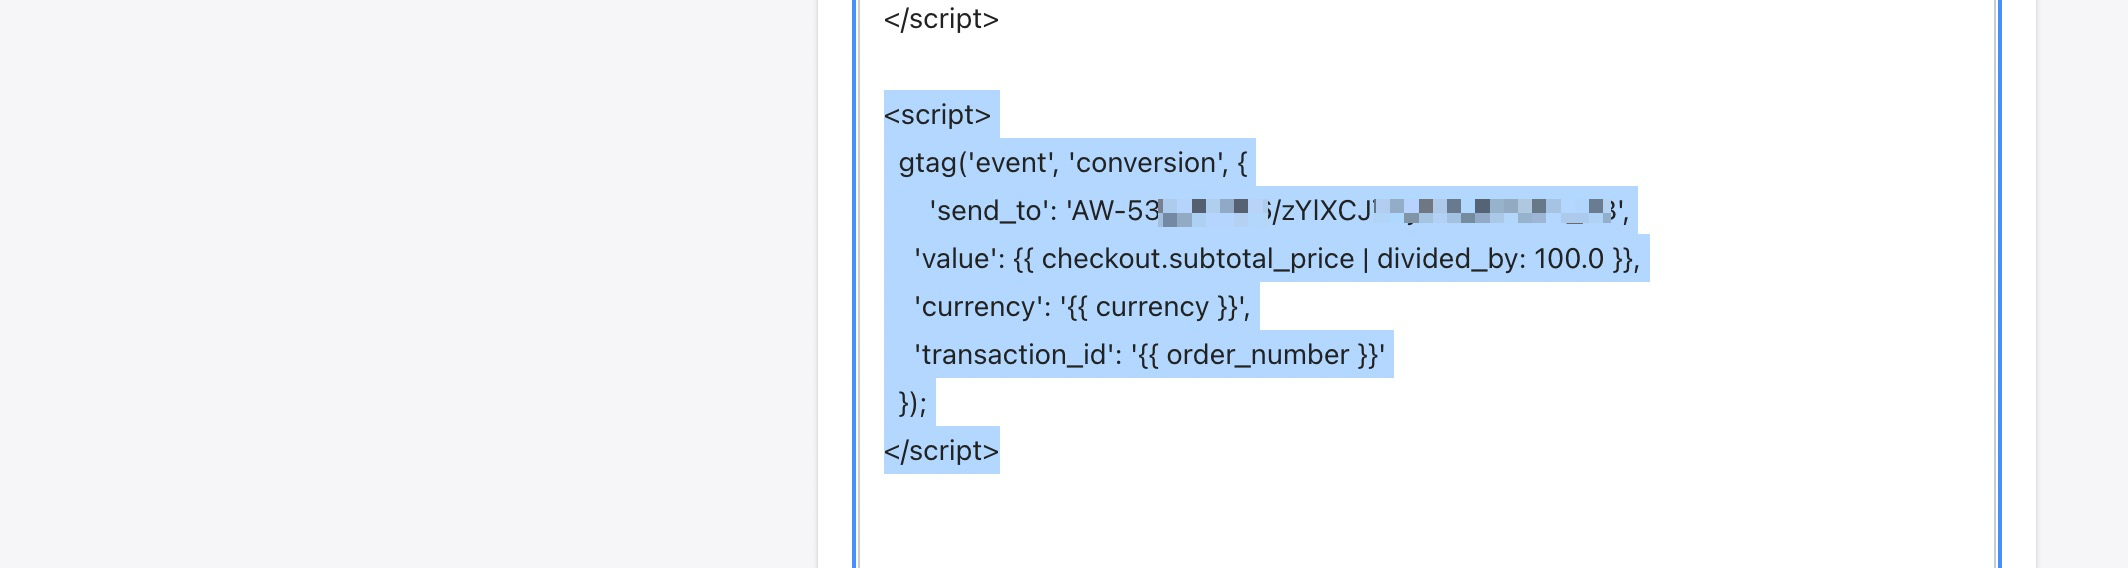
Step 5: Find Your Existing Conversion Script
You likely have a conversion script located in Admin > Settings > Checkout > Additional Scripts. If you don’t see it immediately, search for “AW-” and it should guide you to the script. It should look something like this:
If the script isn’t there, here are three possibilities:
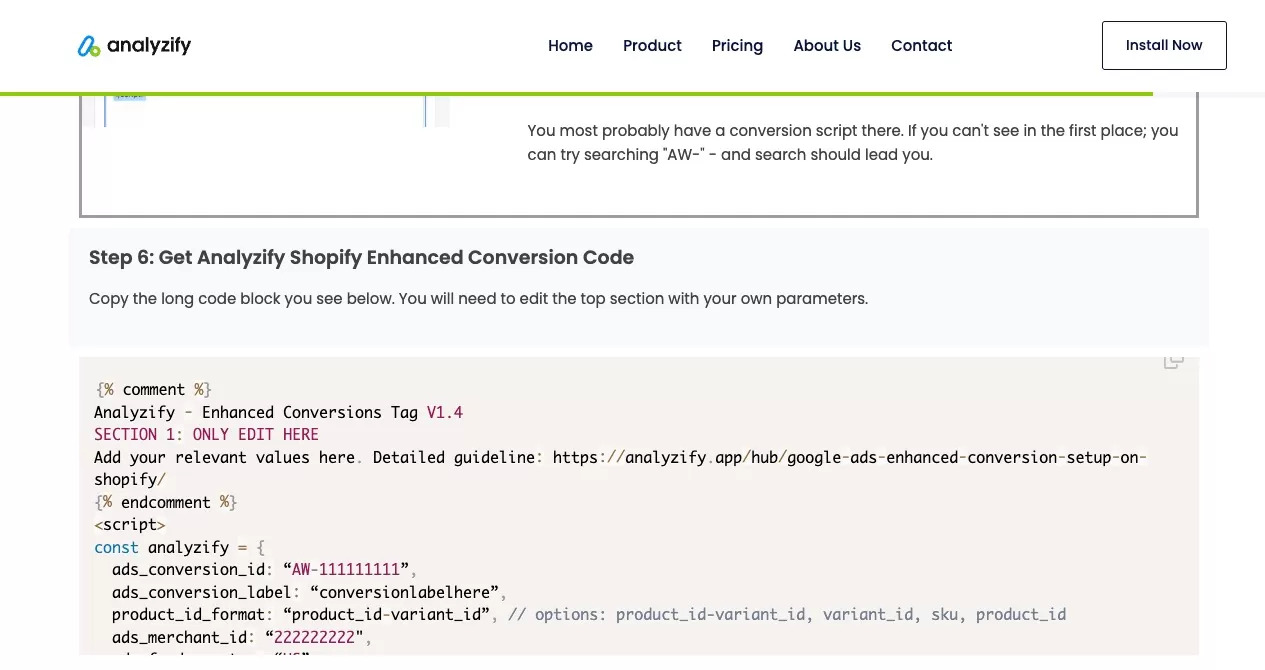
Step 6: Add the New Enhanced Conversion Tracking Code on Shopify Checkout
Navigate to Customer Events > Custom Pixel on your Shopify store and add the code block provided below. Before implementing, read these points carefully:
Ready? Great! Now copy the code block below and proceed to the next step.
IMPORTANT:
Once again, ONLY copy; don’t paste it yet.
Before you move on, we have an important note. We keep updating these code blocks with the latest information. Please make sure to checkout the Shopify - Google Ads Guidebook to make sure that you have the latest code.
Step 7: Update the Variables in the Code
In this step, you’ll need to update specific sections of the code with your unique information. Do not change any other parts of the code. Here are the details:
Step 7: ItemID Format
Let’s quickly double-check your Google Feed item ID format.
Visit Google Ads and click PRODUCTS on the left menu. You will see the merchant ID as marked below - and your item ID format next to that. In our example it starts with “shopify_AU_…” because the native Google Sales Channel is used for product feed on Shopify.
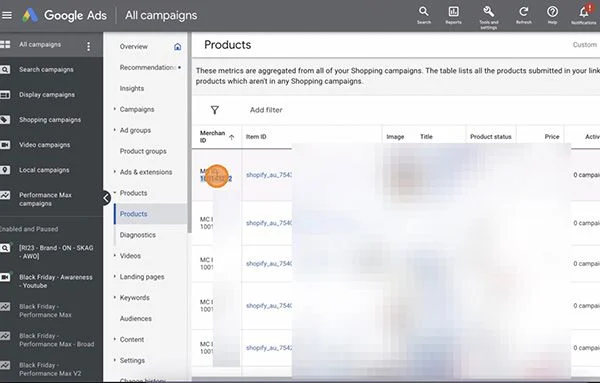
If you are using a different format here, you should adjust our codes accordingly.
After you replace all these values - now it is time to use this code.
Step 9: Add the Updated Code to Shopify Checkout Additional Scripts
We are done! The enhanced conversion data should be coming into Google Ads shortly.
Method 2: Set up Enhanced Conversions with Google Tag Manager
This is a more complex setup and it requires your store to have a set of data layers and a correctly structured Google Tag Manager container to make it work. We will add a separate series of tutorials for this.
For now, we recommend you use the method explained above. If you still want to use Google Tag Manager;
What is Google Ads Enhanced Conversion?
Google Ads Enhanced Conversion is a feature that allows you to share more detailed conversion data with Google Ads, improving the accuracy of your conversion tracking. It functions similarly to the Facebook Conversion API.
In standard Google Ads conversion tracking, data like order ID, revenue, and optionally purchased products are sent to Google.
With Enhanced Conversion Tracking on Shopify, you can also share customer details such as email, name, address, and phone number for better attribution.
Let’s consider an example:
Google’s Explanation:
The feature uses a secure one-way hashing algorithm called SHA256 on your first party customer data, such as email addresses, before sending to Google. The hashed data is then matched with signed-in Google accounts in order to attribute your campaign conversions to ad events, such as clicks or views. Source
Do I need Google Ads Enhanced Conversion?
Conversion tracking has become significantly hard after the new changes in the world of data tracking such as iOS updates, Safari ITP, and with arise of adblockers. You can’t optimize and measure your advertising spending if you don’t measure them well. So, the answer is yes if you want to count and attribute more conversions.
Note: After activating Google Ads enhanced conversions, don’t forget to import your Shopify customer data into Google Ads.
Final Words
Setting up Google Ads Enhanced Conversions on Shopify is vital for accurate conversion tracking, especially in the face of recent changes in data tracking. This feature allows you to share comprehensive conversion data, including customer information.
The tutorial offers two methods:
Editing Code Directly: This is a straightforward approach for those comfortable with coding.
Google Tag Manager: A more advanced setup requiring a structured container and data layers.
With Enhanced Conversions, you not only track order details but also capture valuable customer information, enabling more precise attribution of conversions to your advertising efforts.
In a landscape where accurate measurement of advertising ROI is paramount, adopting Google Ads Enhanced Conversions is a vital step toward optimizing your advertising spend.