⚠️ Due to recent Shopify updates, we have prepared updated sources on the subject matter.
Please check out our most up-to-date sources here:
👉🏻 Shopify Checkout Extensibility with Analyzify
👉🏻 Customer Events & Custom Pixels in Shopify
👉🏻 Analyzify & Shopify Pixels - Checkout Module
🔔 Important Reminder: The section below contains information related to Shopify Pixels & Customer Events when it was first announced.
Shopify announced a super exciting feature: Shopify Pixels.
It has been one of the most significant pain points for Shopify merchants to manage their pixels and get accurate data.
Shopify didn’t have a native option to manage pixels except for the native integrations with some channels such as Universal Analytics, Facebook, etc. That’s why apps (like Analyzify) created their codes and injected them into the theme files. While benefits outweighed the risks, it was still a challenging process with risks of instability.
Shopify Pixels allows merchants to manage & trigger pixels through Shopify Settings. The new section is called: Customer Events.
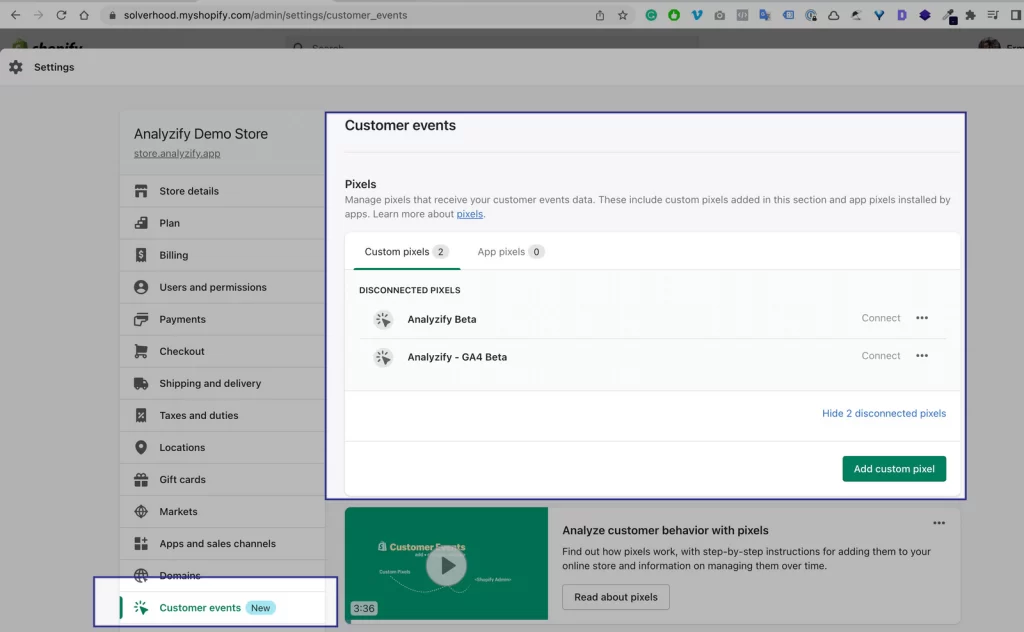
We see two tabs, Custom Pixels and App Pixels. We immediately see the following warning once we try to make a new custom pixel. Shopify still recommends using apps because it is a technically complex and risky process.

Apps like Analyzify adjust their code base to this system and work much more stable.
More importantly, we do not need to inject code blocks into your Shopify themes. The new feature gives apps many opportunities to provide more accurate solutions.
Merchants that have technical teams can also take advantage of these customer events sections, and they can create their own tracking mechanisms.
Complete Guide on Shopify Pixels
Set up GA4 using Shopify Pixels

Benefits of Shopify Pixels
Here are the main benefits of Shopify Pixels:
- All events (such as product view, add to cart, purchase, page view, etc.) are available without needing to tinker with the code and additional Javascript. It makes tracking more reliable, smooth, and accurate.
- Merchants have more control over the data being sent to 3rd parties, see which pixels are shared in these settings, and easily disable, delete or manage.
- 3rd party apps do not need to inject codes into your theme files but only use Pixels API to get the relevant event data.
- Privacy compliance is much easier with a streamlined data collection and sharing method.
- Some stores have unique events to be tracked. It’s possible and easy to create custom pixels as needed.
Your next steps
What should you do at the moment?
We recommend not taking any action yet. Most of the features (including the app pixels) are still in a sandbox environment and are unavailable to use. Allow some time for industry experts (like the Analyzify team) to test, play around with these features, and get and test the results.
We will be sharing our test results along with detailed, in-depth tutorials. In the meantime, a newer version of Analyzify (powered by Pixels API) is on its way.
![]()
We will keep updating this page and provide more content on this topic. Make sure to follow us on social media: Twitter, Linkedin, Instagram, and Facebook.
Shopify Pixels Practice: Facebook Pixel
We have tried to make Shopify Pixels work through Shopify Admin > Customer Events section. Most of our attempts failed. Some codes work in a couple of stores but not in all of them.
This is expected as it is still in the sandbox environment. Analyzify product team (lead by our remarkable product manager, Esad)
- found some problems with the example codes that Shopify provides
- fixed the problems and made an updated version of the test codes
- and made Facebook Pixel events work in the documentation 🎉
- https://www.youtube.com/watch?v=o82QdfHIwt8&t="7"s&ab_channel=Shopify” rel=”nofollow noopener” target=”_blank”>⎋Shopify Announcement Video
- ⎋Pixel and Customer Events - Shopify Documentation
- ⎋App Pixels - Shopify Documentation
- ⎋Post-Purchase Pixel Tracking on Shopify
🎯An important note:We have made this tutorial just for you to understand and play around with Shopify Pixels feature. We DO NOT recommend using any pixel through these settings yet, as it is too early. Facebook Native integration still is the best solution. Step 1: Copy our updated code block
Shopify has a Custom Meta Pixel code example on this page. Unfortunately, it didn’t work for us, and we needed to change some elements.
Step 1: Copy our updated code block
Shopify has a Custom Meta Pixel code example https://help.shopify.com/en/manual/promoting-marketing/pixels/custom-pixels/code#_ga="2".168807784.816425394.1674464837-978512443.1670319434” rel=”nofollow noopener” target=”_blank”>on this page. Unfortunately, it didn’t work for us, and we needed to change some elements.
![]()
Here is the updated code block for you to test:
Copy the code and update “111111111111” with your pixel ID.
Step 2: Create a new Shopify Pixel through Shopify Admin
Go to Shopify Admin > Customer Events > Add New. You can name the pixel as you wish. Make sure to add “Test” so that you don’t forget.
![]()
Step 3: Paste the code, save, and connect.
Now, paste the code here in the “Code” section. Click SAVE and then click CONNECT. Once again, don’t forget to update your Facebook Pixel ID. You can also type a random Facebook Pixel ID, as we are just testing out here.
![]()
Step 4: Test, test, test.
We need to test this out now. Once again, it didn’t work for some of our stores either. So don’t stress out if that’s the case for you. You can use Facebook’s Pixel helper to see if the events are being pushed.
We will keep adding more details & steps to this tutorial.
More resources on this topic: