
Google Analytics 4 is here for good, making Universal Analytics a thing of the past. Having replaced UA, GA4 is now your default solution to data analytics with powerful features and a completely different structure.
- But what does this mean for you as a website owner or marketer?
- How can you migrate to GA4 and keep getting insightful data?
- And what are the benefits and challenges of migrating & using GA4 for your website analytics?
These questions shouldn’t be a source of worry for you anymore, though. In this ultimate guide, you will get your answers to all such questions and more - discovering what you are provided with Google Analytics 4.
Here’s a shortcut to mastering the migration from UA to GA4:
- Exploring GA4 and what makes it different
- Migration process with all important steps included
- Important settings after completing your migration
We will explain everything you need to know so that you can secure a smooth switch between the old and the new. By the end of this guide, you will have a clear understanding of how to migrate from UA to GA4 successfully, and how to leverage the new features and capabilities of GA4 to improve your website analytics & performance.
Let’s get started!
What is Google Analytics 4 (GA4)?
It is designed to provide a more holistic and integrated view of the customer journey across devices and platforms. With the latest features and updates, you are provided with more flexibility and customization options to tailor your analytics to your specific needs and goals, as well as improved privacy and compliance features. Here are some of the key features of Google Analytics 4:
1- Cross-device and cross-platform tracking You are allowed to combine your website and app data in one place, so you can see how your customers move and engage with your website or app across different devices and platforms.
2- Event-based data collection Events are considered as the main way of measuring user interactions, rather than sessions or pageviews. To be more specific, events are actions that users take on your website or app, such as clicking a button, watching a video, or completing a purchase - and you can create & customize events according to what matters most to your needs.
3- Custom reports GA4 presents a new way of reporting which lets you utilize advanced reporting capabilities that go beyond the standard reports. You can use explorations, funnels, path analysis, and more to uncover deeper insights about your users’ behavior and the customer journey.
4- Ecommerce reports You can use this platform to measure and optimize your online sales and revenue as you are allowed to collect and analyze data about the shopping behavior of your users. In addition to standard ecommerce reports, you can enrich your data inventory with all the important GA4 ecommerce reports once you set up the ecommerce events correctly.
5- Machine learning insights It leverages machine learning to automatically provide insights and trends that are relevant to your data analytics needs, such as changes in user retention, revenue, or conversions. You can also use predictive metrics, such as purchase probability to identify users who are likely to buy or leave your website or app.
6- Data control You are provided with more control over how you collect, retain, and use your data. You can adjust your data collection settings to comply with different privacy regulations, such as GDPR. You can also use consent mode to respect user consent choices for analytics cookies. You dig deeper and learn more about the features & the differences between GA4 and Universal Analytics here.
How to Migrate from UA to GA4?
Many people think that migrating to GA4 means moving all your data from Universal Analytics.
But that’s not the case.
According to Google’s statement, you will be able to keep your data in Universal Analytics for another year, but that does not mean that you can use all your UA data in GA4.
In addition to that, it’s not possible to make this switch by using a one-click automated migration option/tool.
However, you can easily migrate your audiences and goals by following the step-by-step instructions below:
Migrating Audiences from Universal Analytics to Google Analytics 4
To migrate your audiences, you can use Google’s handy tool called GA4 Migrator, which lets you transfer your audiences from Universal Analytics to Google Analytics 4.
But keep in mind that some of your audiences might not be eligible for migration. That’s because they have certain conditions that prevent them from being switched over.
Here’s how you can do that:
Migrating UA Goals to Google Analytics 4
It is possible to import goals from UA into Google Analytics 4 as conversions. Also, you can do this without needing to use any external tools.
Here’s how you can do that:
If you want to discover more about the topic, you can watch this comprehensive tutorial full of valuable insights on how to migrate from Universal Analytics to GA4:

Migrate from Universal Analytics to GA4
8 Things You Should Do After You Migrate to GA4
After completing the migration, you need to apply some GA4 settings to make sure collect data more accurately and benefit from its advanced features more effectively.
Here’s a list of things you should after you migrate to GA4:
1- Set Referral Exclusions (Shop.app, PayPal, Stripe)
A payment gateway such as PayPal or Stripe is not a referral source that reflects the origin or quality of your website traffic or conversions.
Therefore, you should exclude it from your GA4 reports to avoid misleading data.
Follow the steps below to set referral exclusions:
2- Enable Google Signals
If you utilize Google Signals, you can access data from various devices of users who have signed in to their Google accounts and consented to Ads Personalization.
This allows you to obtain more precise reports on cross-devices and more insights about your visitors.
Follow the steps below to enable Google Signals:
3- Integrate with Google Search Console & Ads
By connecting GA4 with Google Search Console and Google Ads, you can discover more about the actions of users on your website following an ad click, and the position of your website in search results.
Follow the steps below to integrate with Google Search Console and Google Ads:
4- Apply UTM Settings (External)
By utilizing the appropriate UTM settings, you can effortlessly measure the performance of your online marketing campaigns across traffic sources.
Here’s a detailed breakdown of ideal UTM setup for Shopify stores.
5- Disable GA4’s Built-in Form Interaction
GA4’s default form interaction feature records other interactions such as add-to-cart as form interactions, too.
This does not directly affect your data but it becomes a burden for your tracking setup, raising your total event count - which might result in inaccuracy & malfunction.
Follow the steps below to disable form interaction:
6- Re-adjust Session Timeout
According to the default settings, a session expires after 30 minutes of no activity.
However, users can return to your website multiple times in a few hours on the same day. So, all these user actions should be part of the same session, which means GA4 should register only one session.
To ensure that, you can adjust the session timeout to 7 hours and 55 minutes by following these steps:
7- Re-adjust Timer for Engaged Sessions
An engaged session shows a high degree of user engagement with your website.
Therefore, instead of the default 10 seconds, it’s wiser to see if a user stays on your website for at least one minute to count as engaged.
Follow the steps below to re-adjust timer for engaged sessions:
8- Filter Out Internal Traffic
Internal traffic, which is generated by your internal staff, such as developers, testers, marketers, or managers, might have a negative impact on your data quality and accuracy.
To avoid this, you should exclude internal traffic by following the steps below:
Top 3 Questions About UA to GA4 Migration
You might have a lot of questions regarding this migration process as Google has already announced the end of Universal Analytics.
Here are the top 3 questions and their answers related to the topic:
Q1- Will I lose my data moving from Universal Analytics to Google Analytics 4?
No, you will not. As GA4 and UA are completely different properties, you will not lose your existing data in UA. However, keep in mind that your UA won’t be carried over to GA4.
Q2- What makes GA4 better than UA?
Google Analytics 4 is the latest and standard version of Google Analytics. It already has many features, such as mentioned above, that were not present in Universal Analytics (UA). Also, Google keeps updating it to improve over time.
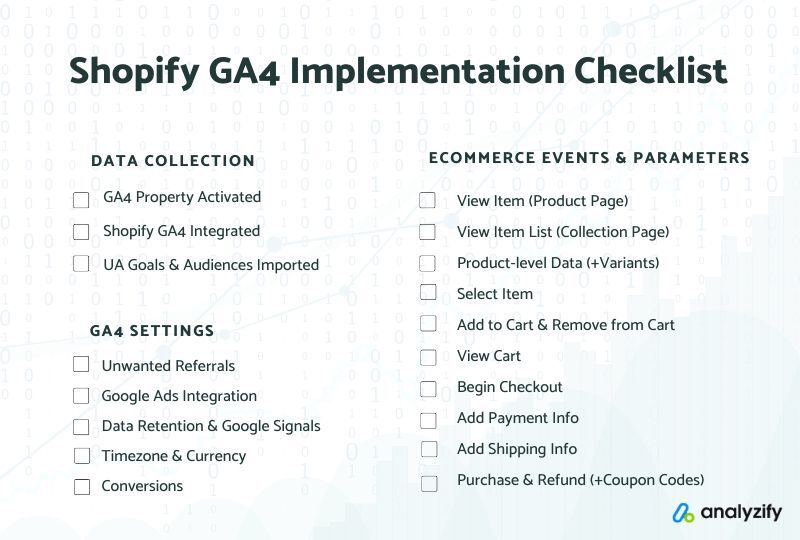
Q3- What can I do for my new GA4 setup and Shopify to work well together?
Here’s a list of things you should make sure to complete so your GA4 & Shopify integration works perfectly well:
Conclusion
In conclusion, migrating from Universal Analytics to Google Analytics 4 is not only a recommended but a necessary step for any website owner now.
Although it requires careful planning, preparation, and execution to ensure that you don’t lose any valuable data or insights, you can apply all what’s mentioned above to secure a seamless switch.
By following this complete guide, you can avoid common pitfalls and errors, and ensure that your new Google Analytics 4 property is set up correctly and efficiently.
As Google Analytics 4 is the future of web analytics, it offers many new and improved features and capabilities that will help you gain deeper and more actionable insights into your website performance and user behavior.
Once you follow these recommendations, you can make sure that your setup is configured properly and optimally, and that you don’t miss out on any of the benefits that Google Analytics 4 has to offer.