Choosing the Right Server-Side Tracking Setup for Your Shopify Store
The tool you choose as a tracking solution determines how reliable your data is, how much of your ad spend is properly attributed, and how much manual work your team needs to maintain tracking accuracy.
Understanding Your Options
Each approach has advantages and trade-offs. Your decision should align with your store’s scale, ad spend, available technical resources, and how critical accurate tracking is to your marketing success.
![]()
Native Tracking Tools: What You Gain and What’s Missing
Native integrations are built directly into Shopify’s admin. You can connect platforms like Google, Facebook, or TikTok with just a few clicks — and for many small stores, this is enough.
![]()
When it makes sense:
You’re running basic campaigns (e.g., remarketing, branded search)
Your monthly ad spend is still on the lower end — typically under $3,000
You want a no-code, low-maintenance setup
Your team doesn’t have technical tracking experience
Where it falls short:
Native solutions are a good starting point — but they may not scale well with your marketing sophistication. Their key limitations — such as pixel-only tracking, limited event enrichment, and no server-side delivery — are explored in more detail in next sections.
Professional Tools: When Shopify Merchants Need More Than Native
Professional tools like Analyzify, Elevar, and Littledata are designed to address the gaps that native integrations leave behind. They often offer hybrid client + server tracking, custom parameter support, and integration across multiple ad platforms.
![]()
When it makes sense:
Your store relies on paid marketing to drive growth
Your team needs clearer attribution to scale campaigns
Your monthly ad spend is approaching or exceeding $5,000 across Meta, Google, or TikTok Ads
You’ve outgrown the limitations of free integrations
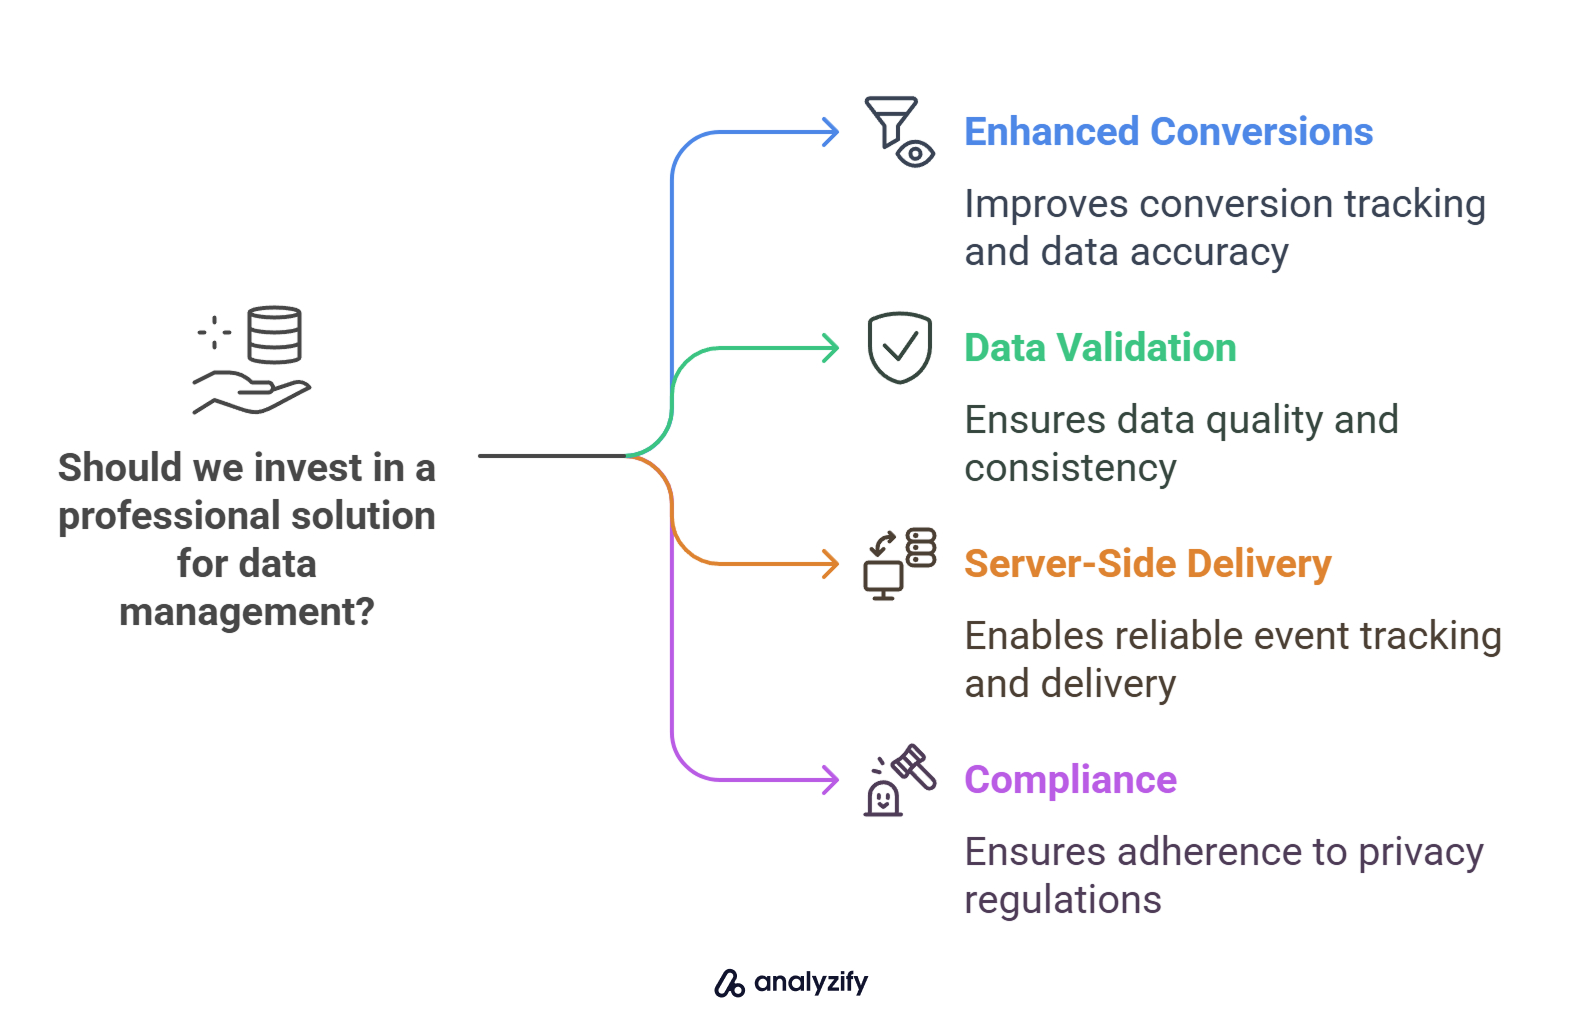
What you gain:
Support for Enhanced Conversions / CAPI / Events API setups
Data validation dashboards, deduplication handling, and identifier syncing
Server-side event delivery (e.g., via webhooks)
Compatibility with consent frameworks and GDPR tools
The investment in a professional solution often pays off through better ROAS visibility, reduced wasted spend, and cleaner data across platforms.
Custom Server-Side Setups: Full Control, Full Responsibility
Some merchants opt to build their own tracking stack using Google Tag Manager Server-Side and Google Cloud Platform. This approach offers complete flexibility — but also introduces long-term maintenance, technical debt, and privacy risks.
When it makes sense:
You have strong in-house developers or a dedicated analytics agency
You need a non-standard data model (e.g., for headless or multi-tenant setups)
You want to maintain full ownership of your infrastructure
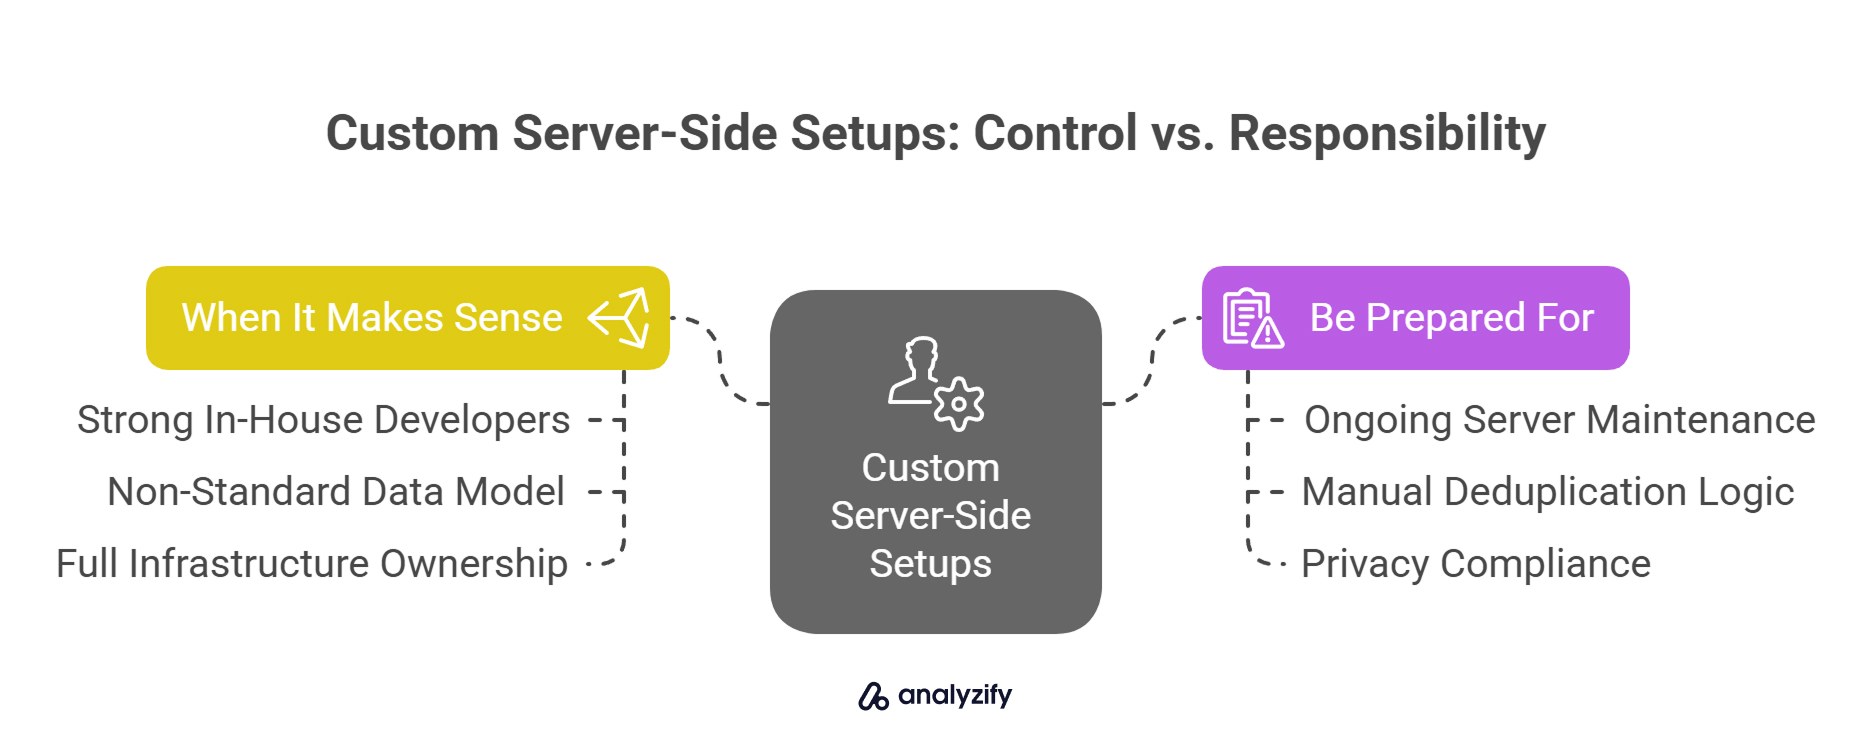
Be prepared for:
Ongoing server maintenance and API version updates
Manual deduplication logic and identifier syncing
Ensuring compliance with evolving privacy rules
This option is powerful but rarely recommended unless there’s a clear business case or engineering support in place.
Choosing Based on Your Store Size, Spend, and Resources
You don’t need the most advanced tool — you need the one that gives you clean, reliable tracking data with the least ongoing friction for your team.
Here’s a quick decision framework:
| Situation | Recommended Stack |
|---|---|
| Low ad spend, early-stage store | Native Shopify integrations |
| High ad spend, performance marketing focus | Analyzify, Elevar, Littledata |
| Need full control + dev resources available | GTM + GCP server-side setup |
Tracking quality affects everything from campaign performance to business forecasting. Choosing the right foundation now can save you thousands later — in misattributed conversions, lost signal, and hours of debugging.
Implementation Options — Native vs Professional Setup
Now that you’ve selected the right type of tracking solution — native, professional, or custom — this section focuses on how those options actually behave in a live Shopify store.
While the first section helped you decide what to choose, this section shows how they work behind the scenes — and why technical details like event capture methods, deduplication logic, and consent handling matter just as much as feature lists.
Native Shopify Integrations: Quick Setup, But Browser-Only Logic
Shopify’s native integrations — such as Google & YouTube Sales Channel, Facebook & Instagram App, and the TikTok App — are easy to install from the admin panel. Most merchants expect that once connected, these tools “just work.”
But in practice, they function almost entirely through client-side pixels. When you activate a native integration:
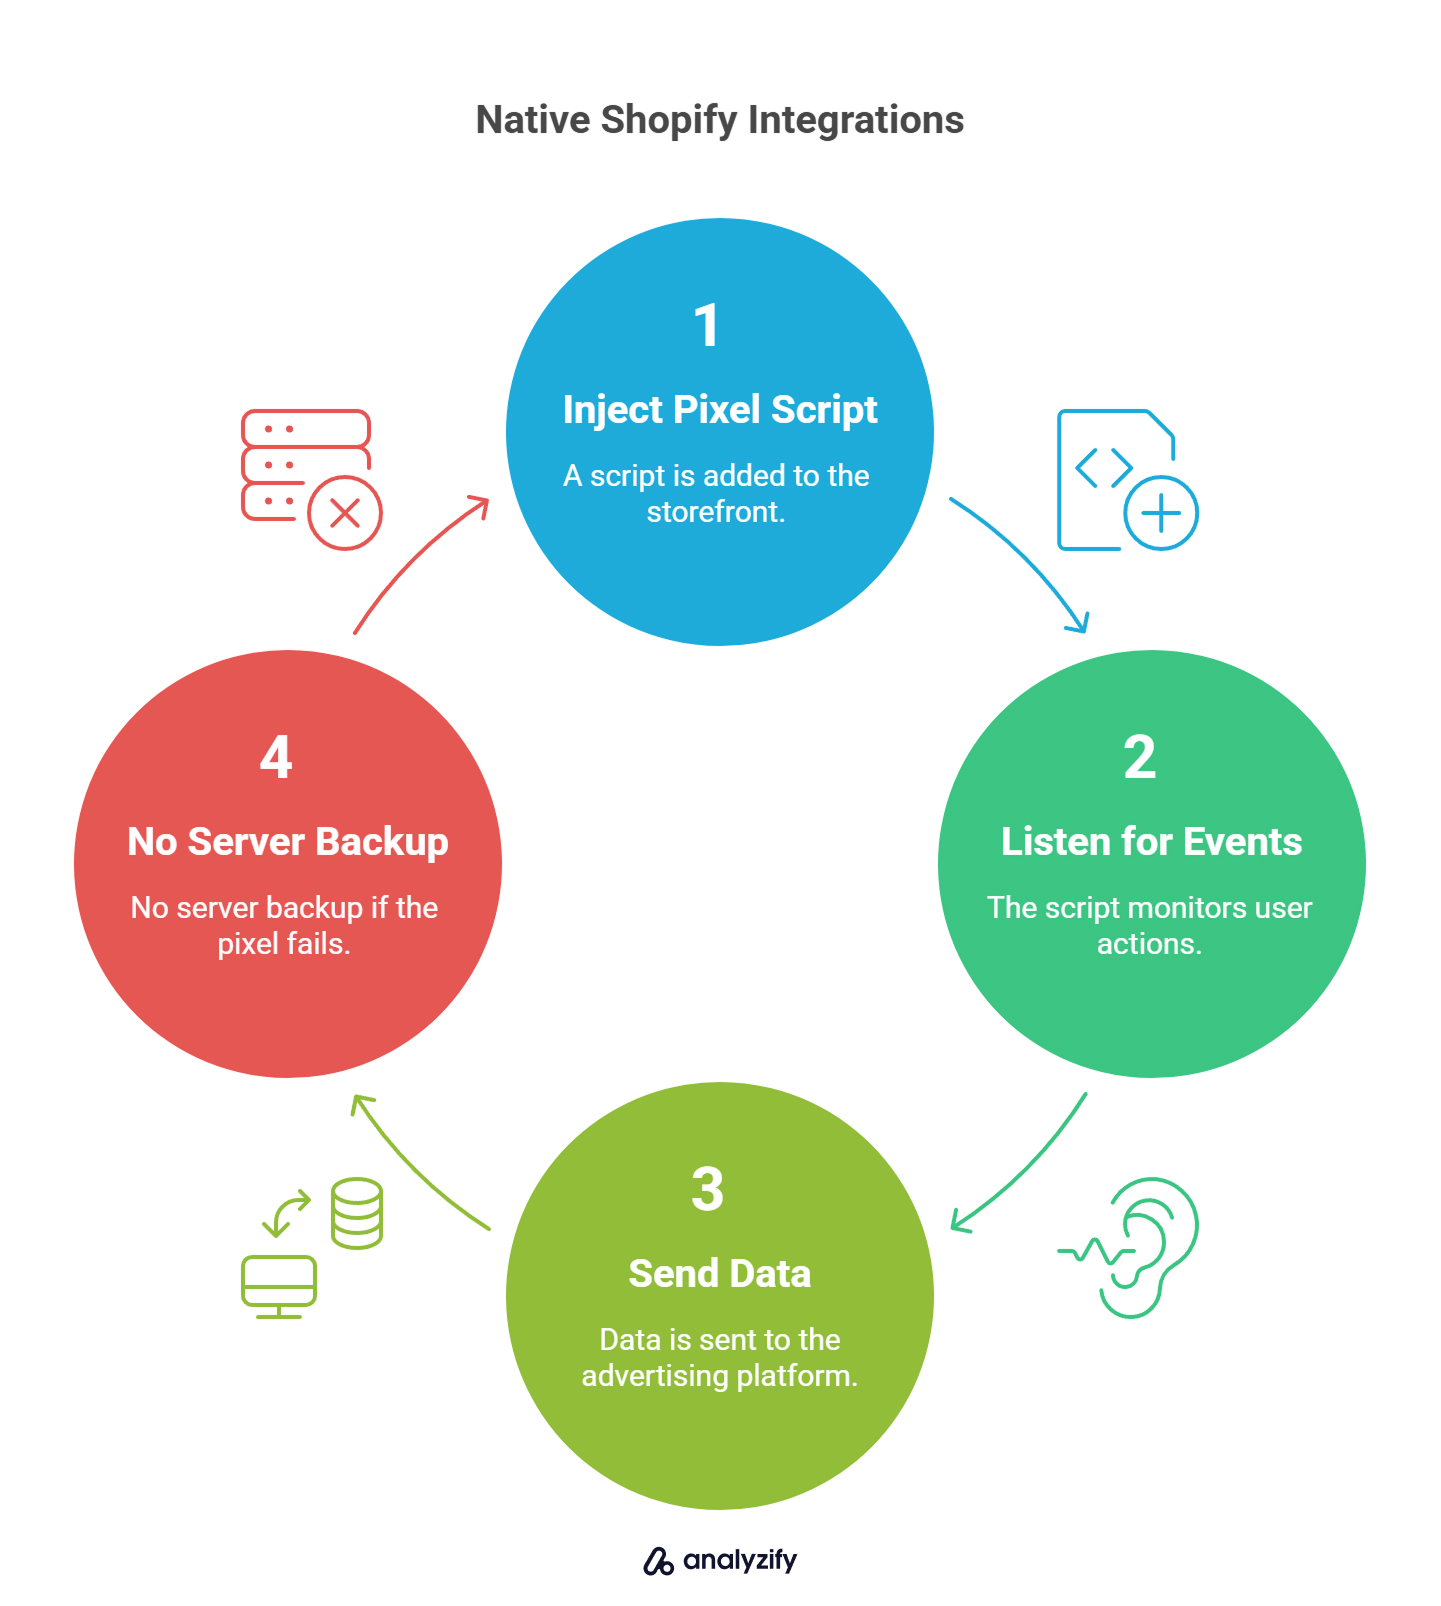
A pixel script (e.g., Facebook, TikTok, or Google Ads) is injected into your storefront
It listens for browser-side events like page_view, add_to_cart, or purchase
The data is sent directly from the user’s browser to the advertising platform
Customer identifiers (like email or phone) are often not included, unless an Enhanced Conversions setup is manually added
And importantly, no server-side backup is triggered if the pixel fails to load
This means tracking only works if the pixel fires — which isn’t guaranteed, especially on mobile, iOS, or privacy-focused browsers.
![]()
Here are some of the key limitations of this approach:
No webhook access: Native tools can’t capture order/paid events from Shopify
No hybrid support: There’s no fallback mechanism if the pixel is blocked
Weak consent integration: These tools don’t always align with your actual GDPR configuration
Limited visibility: There’s little control over what’s being tracked or why a conversion might be missed
In short, native integrations are fast and free — but they operate with minimal coverage, limited accuracy, and almost no debugging transparency.
How Professional Tools Capture More Reliable Shopify Data
Professional tools like Analyzify, Elevar, and Littledata are built to address the weaknesses of native setups. They use a multi-layered approach to capture events more reliably and enrich the data before sending it to ad platforms.
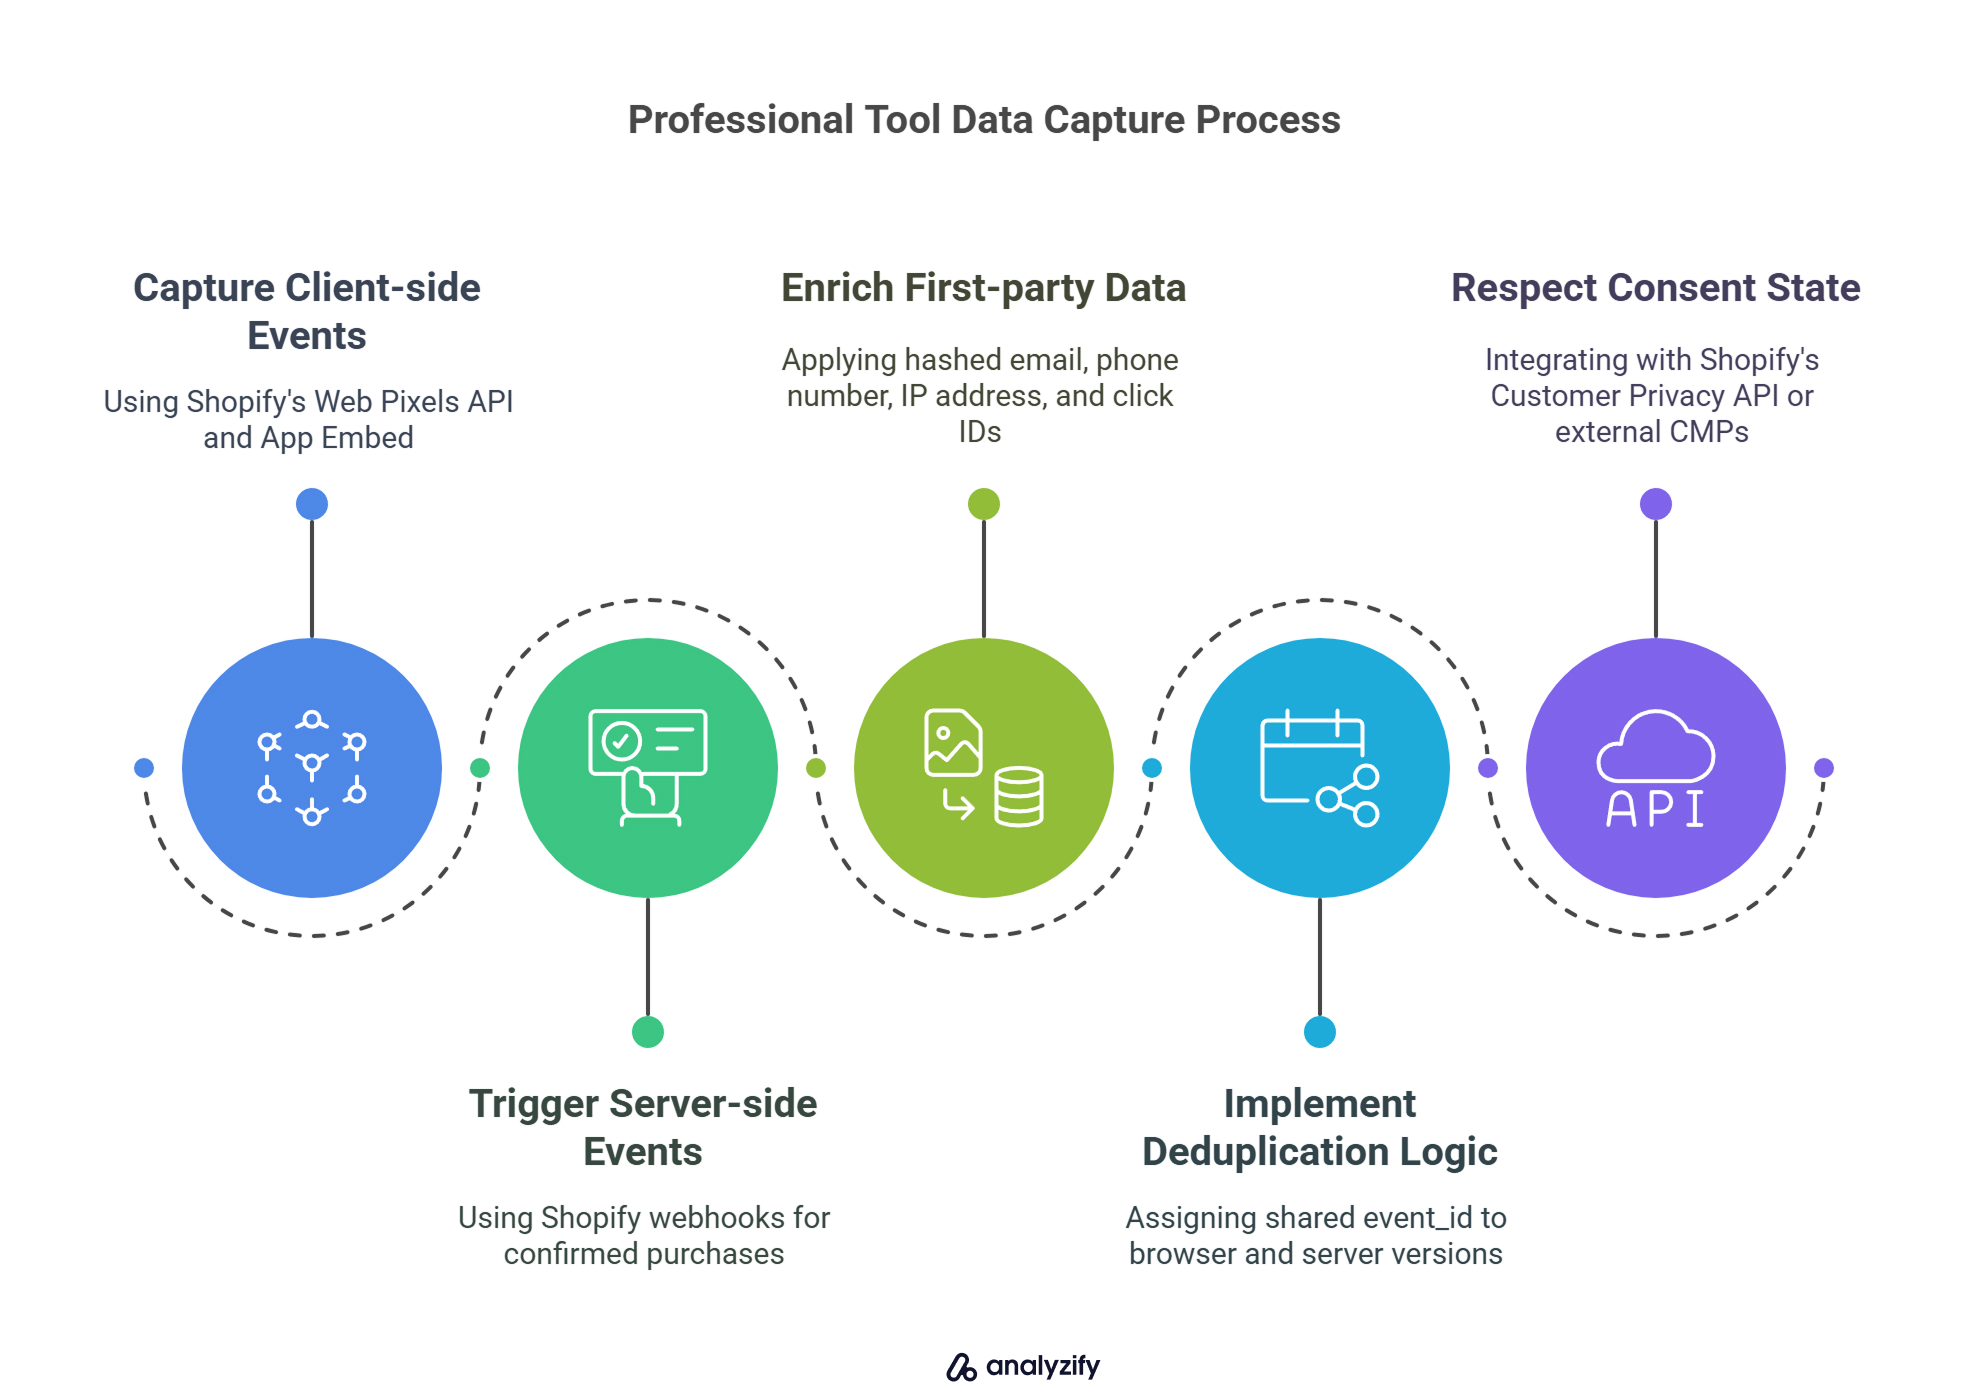
Here’s how a professional tool works in practice:
Client-side events are captured using Shopify’s Web Pixels API and App Embed — ensuring compatibility with Shopify’s latest checkout changes.
Server-side events are triggered using Shopify webhooks (e.g., order/paid) to track confirmed purchases — even when the pixel fails or the thank_you page is skipped.
First-party data enrichment is applied using hashed email, phone number, IP address, and click IDs like fbp or ttclid.
Deduplication logic is implemented by assigning a shared event_id to both the browser and server versions of the same event.
Consent state is respected by integrating with Shopify’s Customer Privacy API or external CMPs like Pandectes.
The final data is sent through the correct platform endpoints:
Meta’s Conversions API (scored by EMQ — see next sections for optimization tips)
GA4’s Measurement Protocol (as part of a hybrid implementation)
TikTok’s Events API (with preserved ttclid across checkout)
What Makes Analyzify Different
Analyzify helps Shopify merchants implement accurate, privacy-compliant tracking across GA4, Google Ads, Meta, TikTok, and other key platforms — with a setup designed for Shopify’s structure and marketing use cases.
It combines client-side, server-side, and Shopify-specific logic into one unified tracking framework.
![]()
Here’s how it stands out:
Delivers up to 98%+ purchase accuracy in GA4 by using hybrid tracking and confirmed order/paid webhooks instead of relying solely on browser events
Optimizes Meta and TikTok tracking with proper deduplication (event_id), enriched user data (email, phone, IP), accurate click ID handling (fbclid, ttclid), and higher Event Match Quality (EMQ) scores for better attribution and ad performance
Adapts to Shopify checkout flows, including draft orders, subscription apps, and third-party app checkouts
Ensures GDPR compliance by activating server-side tags only when valid marketing consent is granted, using Shopify’s Customer Privacy API or compatible CMPs
Backed by a hands-on setup and support team who audits each store, implements tracking with care, and provides post-launch guidance to ensure accuracy
Analyzify is built to give Shopify merchants a dependable tracking foundation — one that scales with their marketing needs and stays aligned with privacy regulations and platform changes.
Common Misunderstandings About Integration Methods
Even after setup, many merchants misinterpret how tracking tools behave — especially when native and professional options seem similar on the surface. Here are some of the most common assumptions and why they’re misleading:
| Assumption | Reality |
|---|---|
| “Native apps also support server-side.” | ❌ Most native tools rely entirely on browser-side pixels. There is no webhook-based tracking. |
| “Installing a pixel is enough for accurate attribution.” | ❌ Not if the pixel fails, the page is skipped, or consent isn’t granted — all common on Shopify checkouts. |
| “Server-side replaces the pixel.” | ❌ No — hybrid setups are required. The browser provides context, session ID, and consent. The server ensures reliability. |
| “All professional tools offer the same features.” | ❌ Not true. Some use full webhook-based logic and deduplication, while others rely more on enriched pixels. Implementation depth varies. |
Practical Implementation Checklist & Validation Flow
Even the best tracking tools can produce bad data if they’re implemented incorrectly.The quality of your tracking depends not just on the tool — but on how you launch and validate it.
Step 1: Audit Your Existing Setup
Before adding anything new, it’s critical to understand what’s already running in your store. Most Shopify stores have some level of tracking conflict or misconfiguration — often without realizing it.
![]()
What to check:
Are multiple versions of the same pixel installed?
Are browser-side and server-side versions both firing without deduplication?
Are you still using old Google Universal Analytics tags or inactive pixels?
Are UTM parameters preserved through checkout?
Is your consent logic working and respected by all tools?
Removing or disabling outdated tags will help you avoid double-counting, attribution mismatches, or privacy issues.
Step 2: Implement as a Secondary Conversion Source
Don’t rush into replacing your current tracking.
Instead, start by running your new setup as a secondary conversion source. This allows you to capture and validate data without affecting your live campaigns or ad optimization algorithms.
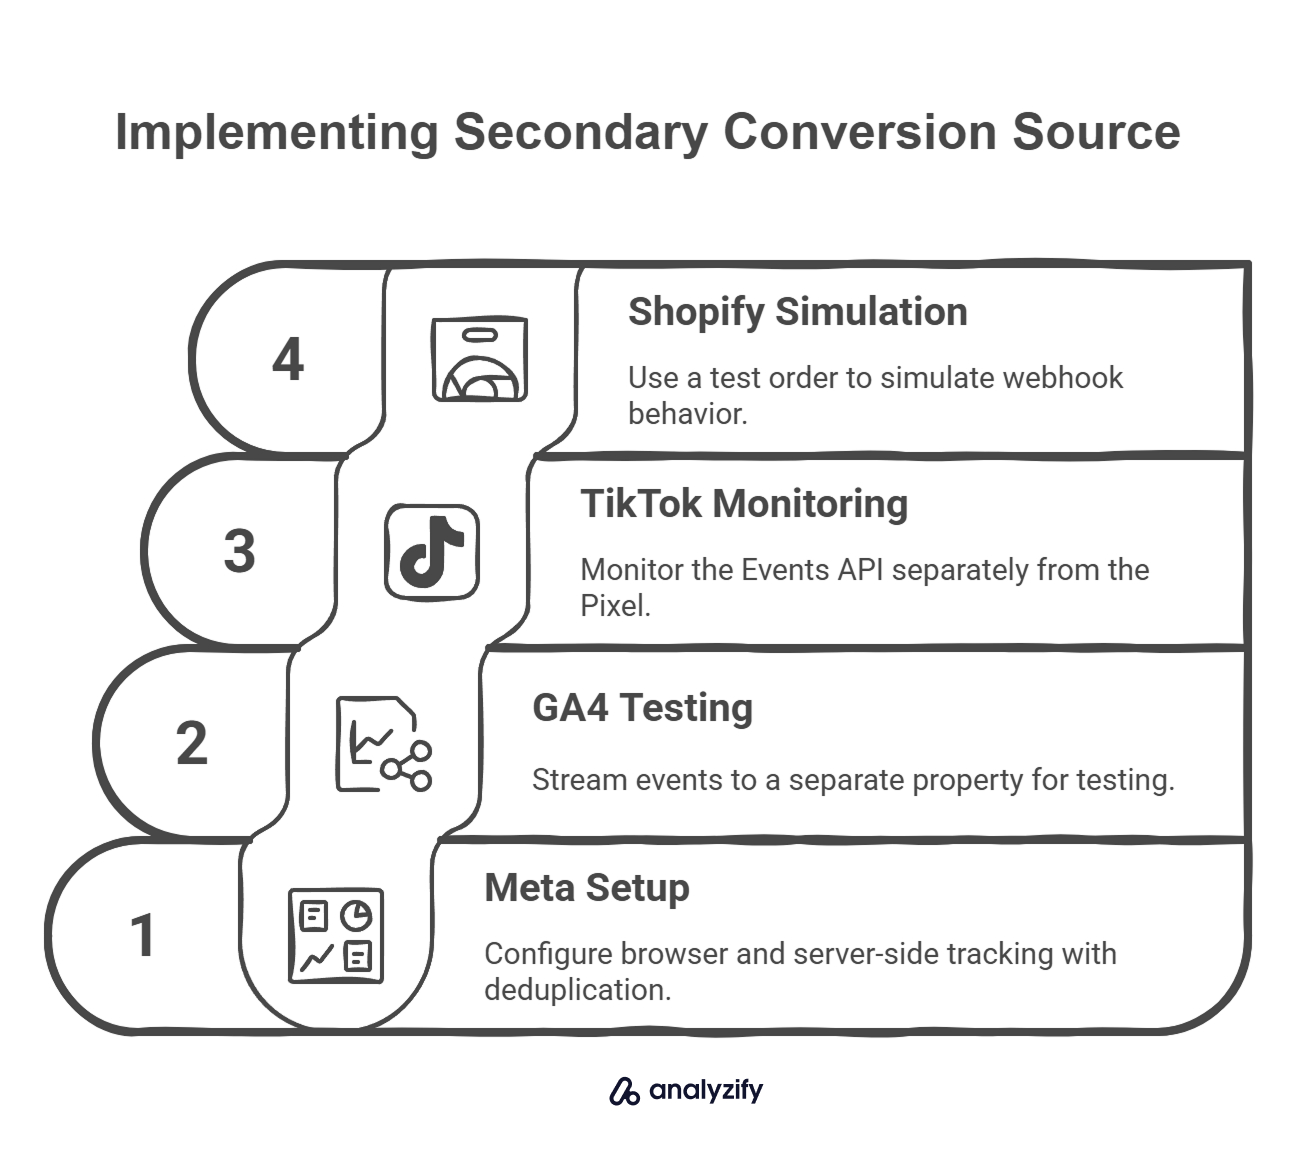
For example:
In Meta, you can run both browser and server-side (CAPI) together with deduplication
In GA4, you can stream events to a separate property for testing
In TikTok, you can monitor the Events API separately from the Pixel
In Shopify, use a test order to simulate order/paid webhook behavior
This phase is about proving accuracy — not switching attribution sources yet.
Step 3: Choose the Right Tool Stack (If You Haven’t Yet)
If you’re still comparing tools at this stage, don’t just ask what they support — ask how they implement it. For example:
Do they use Shopify webhooks or rely on frontend only?
Do they support proper consent-state mapping with CMPs or Customer Privacy API?
Do they offer a deduplication and validation process?
Can you test events before going live?
Tool selection should always align with your business complexity, internal skill level, and marketing priorities — not just feature checklists.
Step 4: Request or Run a Pre-Audit
Before finalizing implementation, a professional-grade setup should include a pre-audit — either performed by your tool provider or your internal team.
![]()
What a good audit covers:
Tag conflicts, outdated scripts, or legacy code
Missing data parameters in existing event payloads
Consent coverage (client + server alignment)
Compatibility with Checkout Extensibility (for Shopify Plus stores)
Event structure compatibility with Meta, TikTok, GA4
This step avoids a common mistake: layering a modern tracking solution on top of broken foundations.
Step 5: Validate Events in Real-Time
Once your new setup is active as a secondary stream, run full validation over a 2–4 week period:
![]()
Compare platform event logs (Meta Events Manager, TikTok Events, GA4 DebugView) with Shopify orders
Verify key parameters like client_id, fbp, ttclid, event_id, and transaction value
Confirm that deduplication works (Pixel + API events are counted once)
Run test purchases and simulate consent scenarios (with/without permission)
Confirm that events are firing under all key user flows — product page, cart, checkout, mobile
This validation phase should give you quantitative confidence that your new stack is reliable.
Step 6: Transition to Primary Conversion Source (When Ready)
After validating your setup you can begin shifting your tracking system from secondary to primary — meaning it becomes the version your ad platforms use for optimization and reporting.
This transition may include updating your Google Ads settings to import GA4 conversions, pointing Meta Ads to server-side CAPI events, or disabling old native pixel tags if a professional tool now handles tracking across all platforms.
![]()
Before switching, confirm the following:
Your event data closely matches Shopify orders, with acceptable variance
Deduplication is functioning — each conversion is counted only once
Consent signals are passed consistently across client and server
Old scripts or integrations are removed to prevent conflicts
Once these conditions are met, your new setup is ready to become the default — and a reliable foundation for ad performance and attribution moving forward.
Consent, GDPR, and Privacy-Compliant Tracking
Server-side tracking is often misunderstood when it comes to data privacy. Many merchants assume that moving tracking to the server eliminates the need for user consent — but in reality, privacy regulations like GDPR still apply, regardless of where the data is processed.
Why Consent Still Matters — Even Server-Side
Laws like the General Data Protection Regulation (GDPR) and ePrivacy Directive require explicit consent before collecting and using personal data for marketing purposes. This applies to:
Pixel-based tracking (e.g., Meta, TikTok, GA4)
Server-side event delivery (e.g., Conversions API, Events API)
Any data used for advertising, attribution, or remarketing
Just because server-side tracking avoids browser restrictions doesn’t mean it bypasses consent laws. In fact, collecting personal data like email, IP address, and phone number without proper consent can still lead to compliance violations — even if those values are hashed or processed server-to-server.
Consent Roles in a Hybrid Tracking Setup
A compliant Shopify tracking stack typically relies on both layers to handle consent properly:
![]()
Client-side: Responsible for presenting the consent banner, capturing opt-in status, and flagging whether marketing tags can be activated.
Server-side: Must receive and respect that consent signal — and not send marketing events if permission hasn’t been granted.
If these two layers are not properly connected, you may be sending events to platforms like Meta or TikTok without valid consent, even if your frontend looks compliant.
How Shopify Merchants Can Manage Consent
There are two main approaches to implementing consent controls in Shopify, and both can be adapted to work with hybrid (client + server) tracking setups. Your choice depends on how much control, customization, and compliance coverage your store needs.
1. Shopify’s Customer Privacy API
Shopify’s built-in consent mechanism is available on Online Store 2.0 themes and compatible with apps that rely on Shopify’s privacy signals. It’s a low-effort solution for stores focused on basic regional compliance.
Captures user consent based on location, browser settings, or explicit opt-in
Passes consent state (analytics, marketing, etc.) to Shopify-compatible tools
Works well for merchants who want a simple, built-in framework
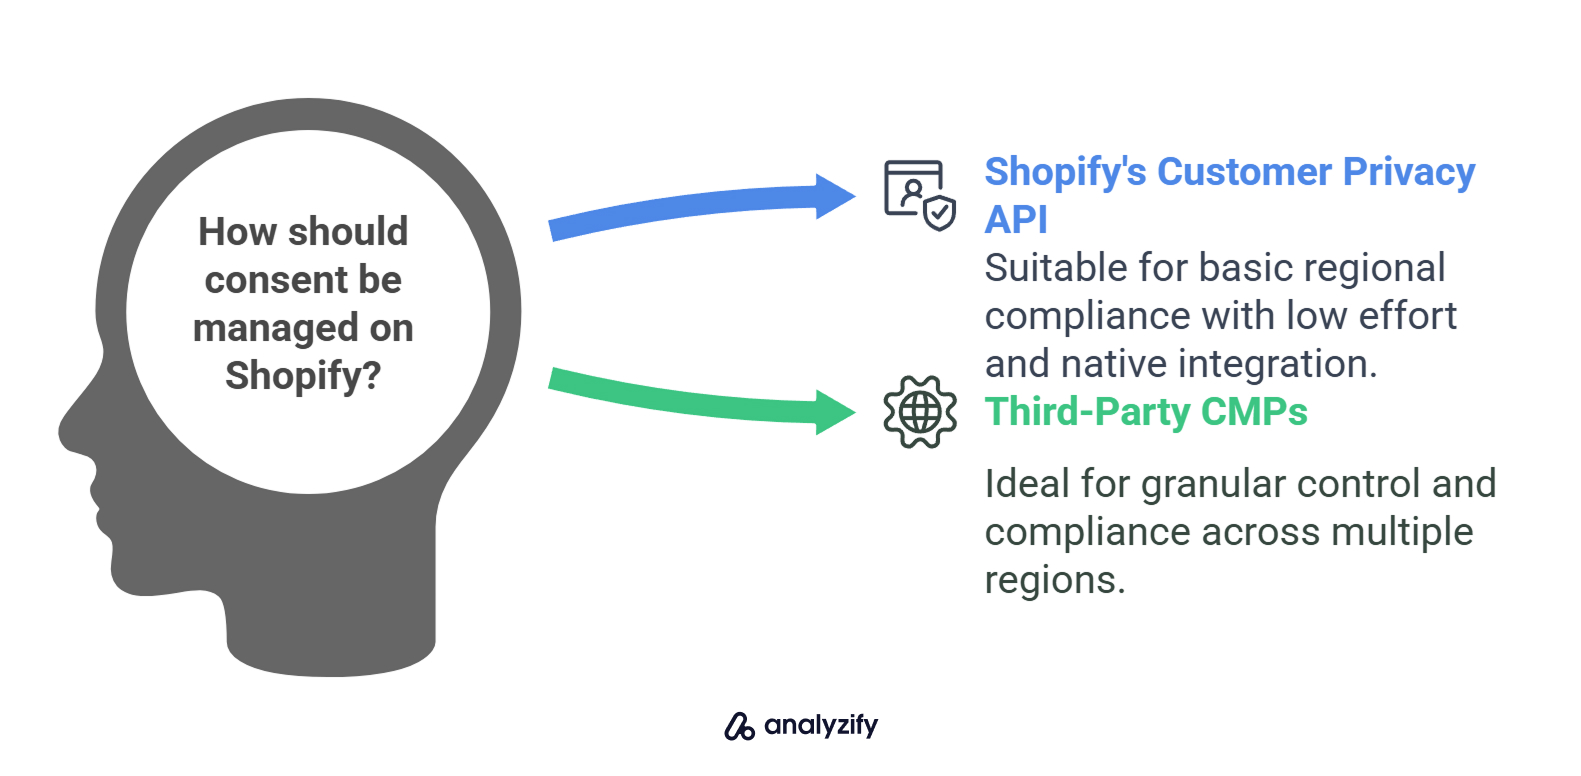
2. Third-Party Consent Management Platforms (CMPs)
CMPs like Pandectes, Cookiebot, or OneTrust offer more granular control over consent banners and logic. These tools are ideal for stores operating in multiple markets with different legal requirements.
Enable geo-based targeting, granular category-level control, and customizable UX
Can be integrated with Shopify via app embeds or theme scripts
Useful for larger stores needing fine-tuned consent logic or working across multiple regions
Regardless of which you choose, the most important thing is that your server-side tracking tools listen to and act on the user’s consent state — not just collect it.
What Makes a Server-Side Setup Privacy-Compliant?
To remain compliant, your implementation should meet these core requirements:
✅ Consent must be collected before firing any marketing events — whether from pixel or server
✅ Personal data (email, IP, phone) must only be sent when consent for marketing has been granted
✅ Consent state must be passed from the browser to the server, and honored there
✅ Opt-outs must be respected and auditable, including cases where the user revokes consent later
✅ Data must be secured in transit — especially when sent to third-party APIs like Meta or TikTok
Server-side tools like Analyzify are built to respect these rules automatically — but if you’re building a custom setup, each of these conditions must be handled manually.
Common Misunderstandings
| Myth | Reality |
|---|---|
| “Server-side means I don’t need a consent banner.” | ❌ Not true. Consent is still required before sending marketing data — regardless of how it’s sent. |
| “Hashed emails are safe to send without consent.” | ❌ Hashing does not remove legal obligations — consent is still needed before collecting personal data. |
| “GDPR only applies in the EU.” | ❌ Even if your business is outside the EU, GDPR applies to any users located in the EU or EEA. |
| “Server-side makes me exempt from privacy rules.” | ❌ Server-side improves data control, but it doesn’t remove your responsibility to collect and honor consent. |
Troubleshooting & Optimization
Even with the right tools and a clean setup, tracking issues are inevitable — especially in Shopify’s hybrid environment. Pixels can misfire, webhooks can fail, and identifiers can fall out of sync. When that happens, conversions are lost, reports become unreliable, and your marketing performance suffers.
Step 1: Use the Right Debugging Tools
A good tracking setup is only as reliable as your ability to test and troubleshoot it. These tools will help you verify what’s firing, what’s not, and why:
![]()
GTM Server-Side Preview Mode
Allows you to inspect incoming event payloads, cookies, and tag firing conditions inside your sGTM container.Webhook Log Viewers (Analyzify’s dashboard, Shopify’s admin logs, or your custom GCP functions)
Help confirm that order/paid or similar backend events are received by your server.Postman or API Clients
Useful for testing payloads manually against platforms like Meta’s CAPI, GA4’s Measurement Protocol, or TikTok’s Events API.Platform-Specific Debug Tools
Use Meta’s Event Manager diagnostics, TikTok’s Events panel, and GA4 DebugView to verify live event flow and parameter quality.
You should be able to verify that events fire correctly under different conditions: with and without consent, from mobile and desktop, and in normal and ad-blocked sessions.
Step 2: Validate Client-Server Sync
Many tracking issues don’t come from failed events — they come from disconnected client and server signals. To diagnose this, check whether:
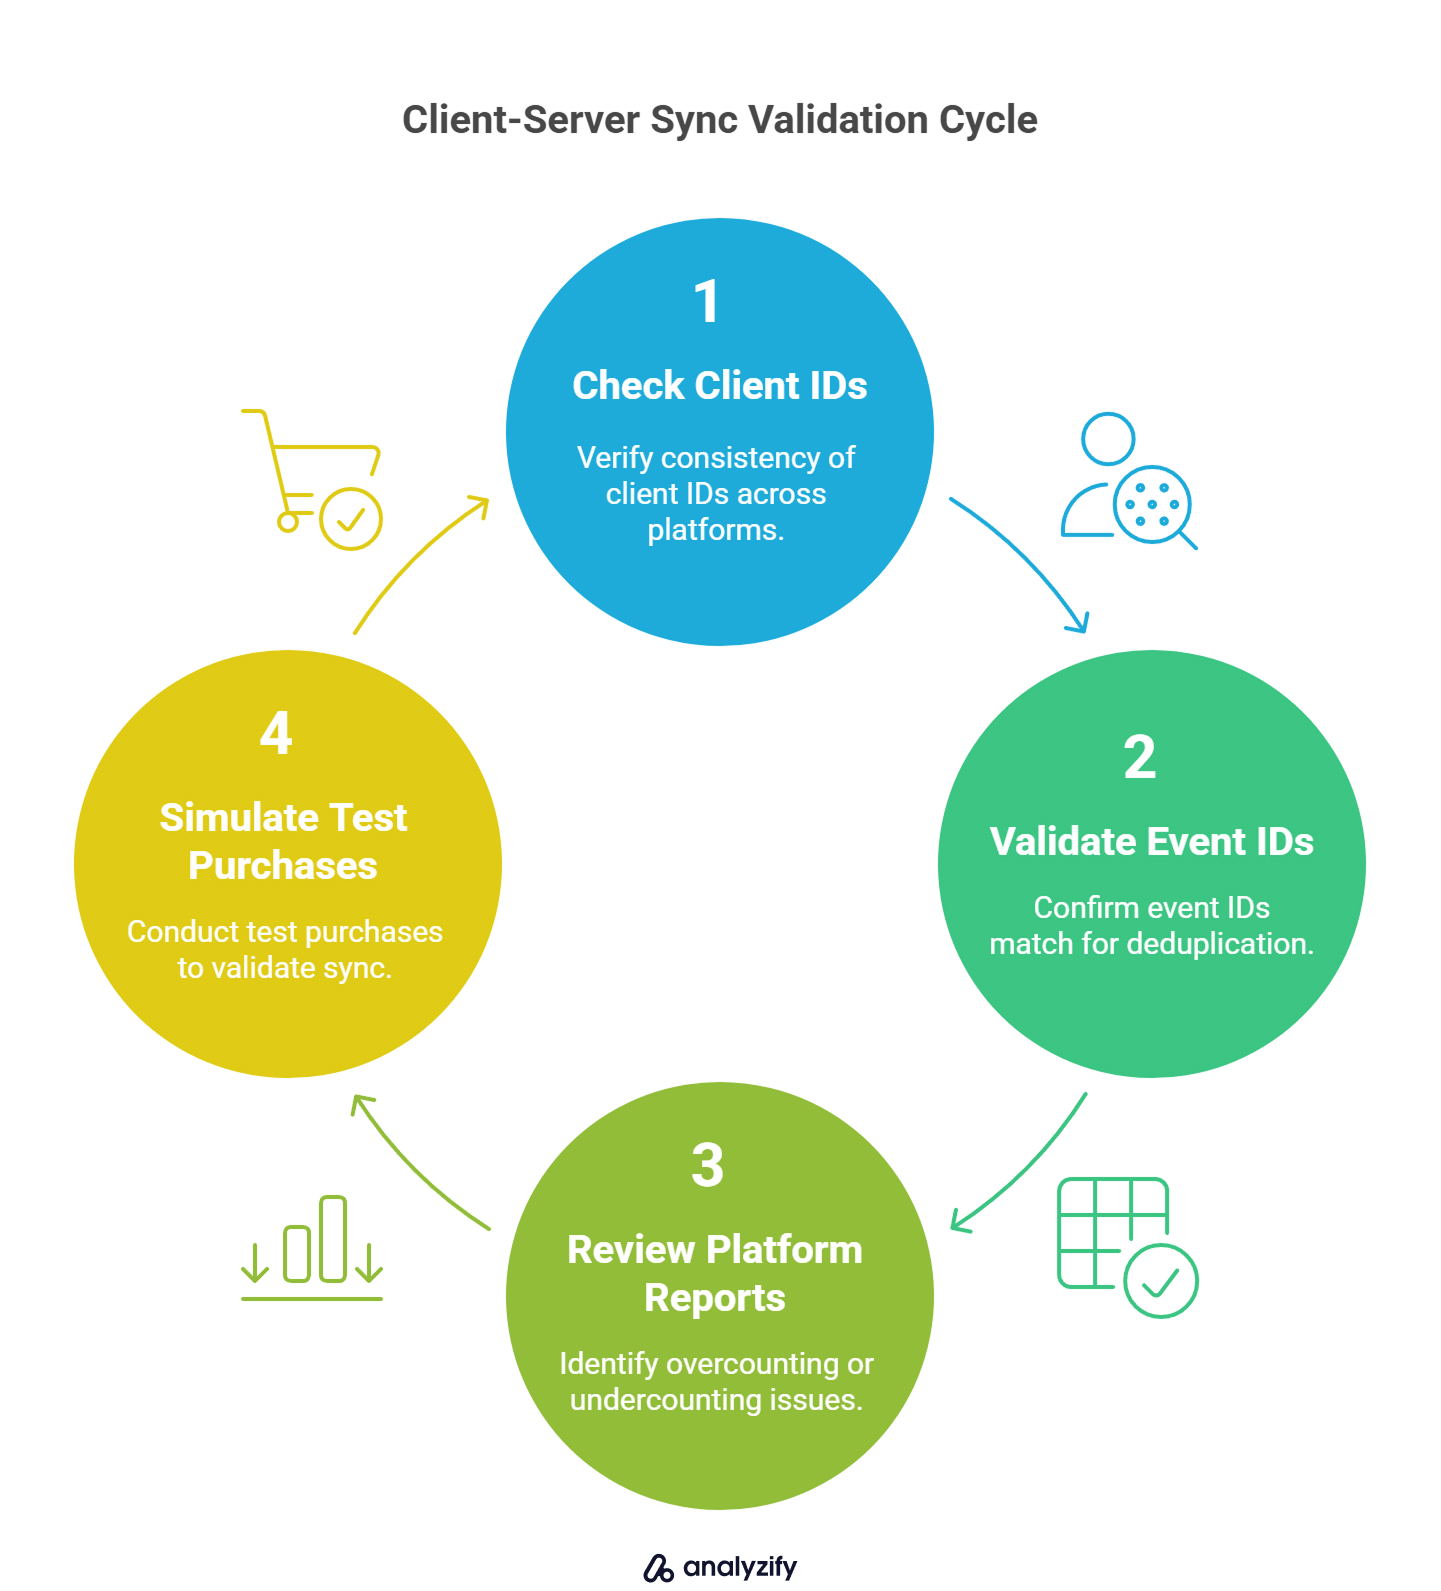
The client_id (GA4), fbp (Meta), or ttclid (TikTok) values are consistent across the browser and server
The same event_id is passed with both versions of a purchase event (for deduplication)
Platform reports are showing double conversions (overcounting) or missing conversions (undercounting)
You can usually validate this in event logs or through test purchases that simulate both layers. A mismatch here means platforms may either drop or double-count your conversions — both hurt your attribution clarity.
Step 3: Watch for Common Implementation Mistakes
Run a technical audit periodically — especially if you’ve recently updated your theme, changed apps, or added a new marketing platform.
Some tracking issues are caused by setup mistakes that are easy to miss:
![]()
Event duplication: Firing both pixel and API versions of the same event without event_id coordination
** Missing identifiers**: Sending purchase events without client_id, fbp, email, or ttclid
Consent mismatch: Sending server-side events even when browser consent was denied
Old or layered scripts: Mixing legacy tracking tools or plugins with new ones can create conflicts and make debugging harder
Step 4: Optimize Tracking for Reliability and Match Quality
Even small improvements here can lead to better ROAS, cleaner analytics, and fewer unexplained attribution gaps. Once your setup is stable, focus on improving signal quality and platform trust. Here’s what matters most:
![]()
Data completeness: Send as many matching signals as possible — email, phone, IP, click ID, user agent, timestamp
Identifier retention: Make sure click IDs (like ttclid, fbclid, gclid) persist through the full checkout flow
Attribution consistency: Monitor the delta between Shopify order data and ad platform-reported conversions
Event Match Quality (EMQ): Platforms like Meta score your events based on data richness — higher scores mean better attribution and optimization
Even small improvements here can lead to better ROAS, cleaner analytics, and fewer unexplained attribution gaps.
Final Thought: A Tracking Setup You Can Trust
The best setups don’t just rely on code — they’re maintained through process and visibility.
Keep your tracking reliable by:
Logging every implementation and change clearly.
Monitoring attribution shifts after any update.
Running tests regularly for both pixel and API-based events.
Having a fallback plan if events are dropped or duplicated.
When your tracking is built this way, your team isn’t guessing — they’re working with data they can trust.